My partner took a big crunch from the jar of these easy classic refrigerator dill pickles and immediately said, “Wait, did you buy these or make them?” I had to laugh because, honestly, I wasn’t sure how he’d react. But that moment — the snap of the pickle, the burst of tangy dill and garlic — told me this simple recipe hit the spot. I’d watched him skeptically eye those cucumbers soaking in brine for just a day, expecting a bland outcome. Instead, he was hooked, asking for more before the jar was even half empty.
It reminded me how sometimes the best flavors come from the simplest methods. No heat, no fuss, just cucumbers and a few pantry staples mingling overnight. I’ve always been wary of canning, you know? The whole boiling and jar-sealing drama felt like a lot, especially when you want quick results. That’s why this no-canning needed recipe stuck — it’s a refrigerator pickle that’s fast, fresh, and surprisingly crisp. The scent of fresh dill and garlic fills the kitchen while they sit, teasing your taste buds before that first satisfying bite.
And here’s the kicker — these pickles aren’t just a side snack; they’ve become a regular on our table alongside easy dinners like the Greek chicken bowls or those crispy smashed potatoes I can’t stop making. They bring that perfect punch of acidity and crunch that makes the whole meal pop. So, I can’t help but pass along this little shortcut for anyone who loves pickles but dreads the canning process. It’s honest, quick, and yes — addictive in the best way.
Why You’ll Love This Recipe
This easy classic refrigerator dill pickles recipe is one of those little kitchen wins that makes life simpler and meals tastier. I’ve tested it over several summers and shared it with friends — it never disappoints. Here’s why you might want to give it a go:
- Quick & Easy: Comes together in under 5 minutes, then you just wait for the magic overnight. Perfect for busy weeknights or last-minute pickle cravings.
- Simple Ingredients: No fancy or obscure items here. Just cucumbers, vinegar, dill, garlic, and a few spices you probably already have.
- Perfect for Snacking and Meals: Whether you’re adding crunch to sandwiches, serving alongside grilled favorites, or just grabbing a quick tangy bite, these pickles hold their own.
- Canning Not Required: Skip the hot water bath and jars. This recipe uses the fridge to do all the work — safer, easier, and no special equipment needed.
- Crispy & Flavorful: The brine strikes just the right balance — sharp, garlicky, and herbaceous without overpowering the fresh cucumber.
What really sets this recipe apart is the little trick of layering fresh dill and garlic cloves in the jar, which infuses the pickles with authentic, bold flavor. Plus, I’ve found that using pickling cucumbers makes a huge difference — they stay firm and crunchy, unlike regular slicing cucumbers that can get mushy. Honestly, it’s the kind of pickle that makes you close your eyes and savor the bite, no matter how many times you’ve had one before.
What Ingredients You Will Need
This recipe uses simple, wholesome ingredients to deliver bold flavor and satisfying texture without the fuss. You’ll find everything easy to source in grocery stores or your pantry.
- Pickling cucumbers: About 1 to 1.5 pounds (450–680 grams). These small, firm cucumbers hold up best and stay crisp.
- White vinegar: 1 cup (240 ml), the classic choice for bright acidity. You can swap with apple cider vinegar for a milder tang.
- Water: 1 cup (240 ml), to balance the vinegar’s strength.
- Fresh dill: 3 to 4 sprigs (about 10 grams). Dill is the star herb here, delivering that signature pickle flavor.
- Garlic cloves: 3 to 4, peeled and lightly crushed. These add savory depth and a little zing.
- Pickling salt or kosher salt: 1 tablespoon (18 grams). Avoid iodized salt as it can cloud the brine.
- Black peppercorns: 1 teaspoon (about 2 grams), whole for a subtle peppery kick.
- Optional spices: A pinch of red pepper flakes for heat, or a small bay leaf for complexity.
For best results, I recommend using a trusted brand of white vinegar like Heinz, which keeps the brine clear and clean-tasting. If you want to swap salt types, just remember the amounts might need slight adjustment. Also, if fresh dill isn’t in season, a teaspoon of dried dill seeds can work but won’t be quite the same. This recipe is forgiving, so feel free to tweak as you like — but the classic combination of fresh dill and garlic is what really makes these pickles shine.
Equipment Needed
This recipe calls for straightforward kitchen gear you probably already have. No fancy pickle presses or canning sets required.
- Glass jar or container: A quart-sized (1 liter) wide-mouth jar or any airtight container. Mason jars are perfect but any clean, sealable glass works well.
- Measuring cups and spoons: For accurate brine mixing.
- Knife and cutting board: To slice cucumbers or crush garlic.
- Small bowl or measuring cup: For mixing the brine ingredients.
If you don’t have a wide-mouth jar, a clean plastic container with a lid is fine for refrigeration. Just make sure everything is food-safe and airtight. I’ve tried both and prefer glass because it doesn’t absorb odors and cleans easily. Also, a simple jar brush helps keep everything spotless after pickling. You won’t need anything special since this is a fridge pickle recipe, which makes it all the more accessible for anyone hesitant about traditional canning gear.
Preparation Method
- Wash and slice the cucumbers: Rinse 1 to 1.5 pounds (450–680 grams) of pickling cucumbers thoroughly. Trim the ends and slice them into your preferred shape — spears, rounds, or halves. I usually go for spears about 3 to 4 inches (7.5–10 cm) long because they’re easy to grab and snack on.
- Prepare the brine: In a bowl, combine 1 cup (240 ml) white vinegar, 1 cup (240 ml) water, and 1 tablespoon (18 grams) pickling salt. Stir until the salt dissolves completely — this usually takes about a minute. Make sure to use pickling or kosher salt, not table salt, to keep the brine clear.
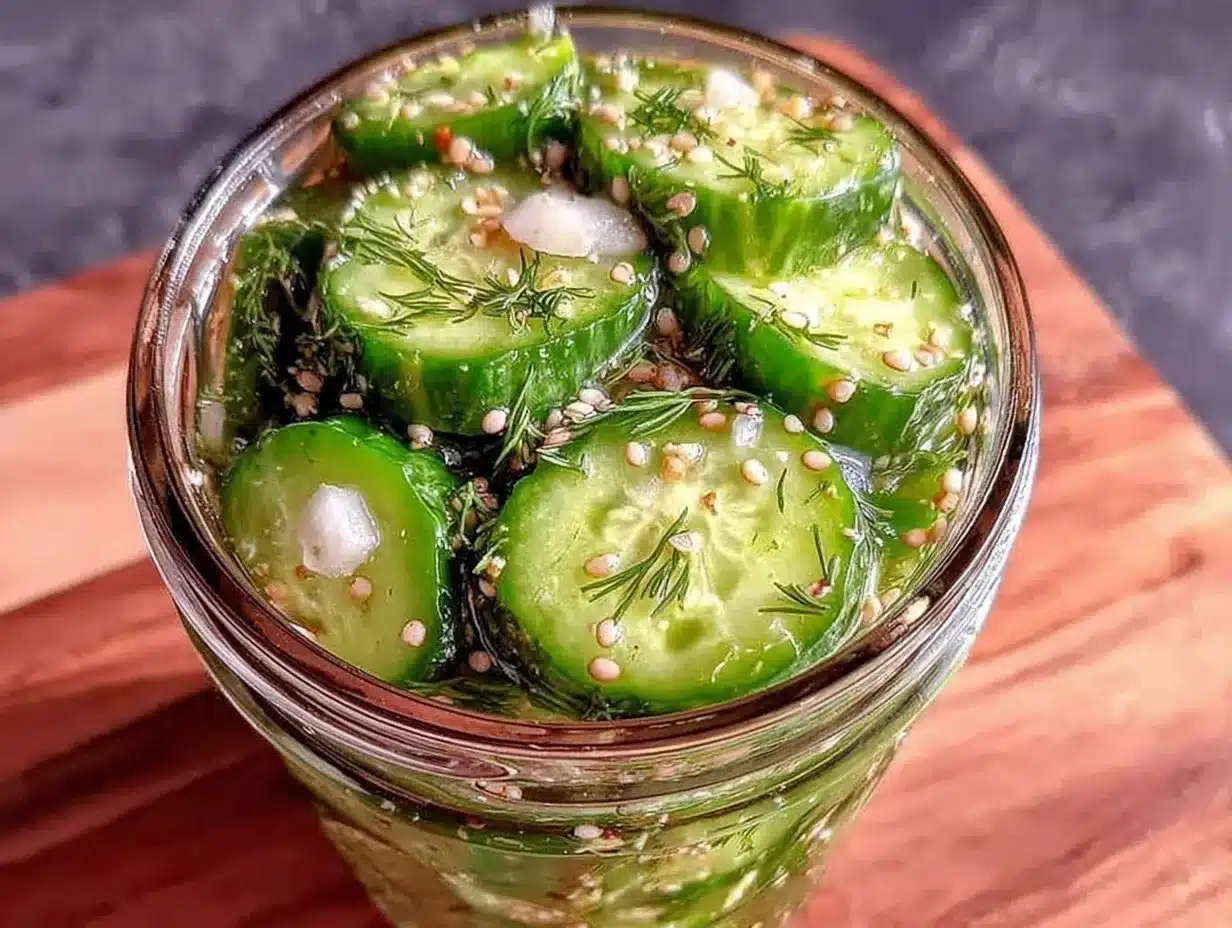
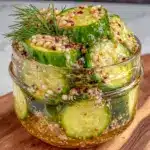
- Pack the jar: Place 3 to 4 sprigs of fresh dill and 3 to 4 lightly crushed garlic cloves at the bottom of your clean quart-sized jar. Add 1 teaspoon (about 2 grams) whole black peppercorns and any optional spices like red pepper flakes or a bay leaf. Pack the cucumber slices tightly but without smashing them.
- Pour the brine over cucumbers: Pour the prepared brine into the jar, covering the cucumbers completely. Leave about half an inch (1 cm) of headspace at the top to avoid overflow.
- Seal and refrigerate: Close the jar tightly with the lid and give it a gentle shake to distribute the spices. Place it in the refrigerator. The pickles will start tasting pickled in about 24 hours, but I recommend waiting at least 48 hours for that classic dill punch.
- Enjoy and store: These refrigerator dill pickles stay crisp and delicious for up to 3 to 4 weeks when kept cold. Always use a clean fork or tongs to avoid contamination.
A quick note: If your pickles turn out a bit soft, it’s usually because the cucumbers weren’t fresh or the brine was too weak. Next time, try fresh, firm cucumbers and double-check your salt measurements. Also, a splash of pickle crisp (calcium chloride) can help if you want to experiment. The smell of fresh dill and garlic during the first day is a pretty good sign you’re on the right track.
Cooking Tips & Techniques
Getting the perfect crunch and flavor in refrigerator dill pickles can feel like a small art, but here are some tips I’ve picked up over the years:
- Choose the right cucumber: Pickling cucumbers are usually smaller and less watery than slicing cucumbers, which means firmer pickles. If you’re stuck with regular cucumbers, peel them partially to reduce moisture.
- Salt matters: Using pickling salt or kosher salt avoids cloudiness and off-flavors. Table salt has additives that can make your brine murky.
- Don’t skip crushing garlic: Crushing just lightly releases more garlic flavor without turning bitter. Whole cloves are fine but less intense.
- Pack gently: Avoid squishing the cucumbers when packing them into the jar. Too much pressure can release water and make pickles soggy.
- Patience is key: The flavor develops best after a day or two in the fridge. I’ve learned not to rush opening the jar — the wait is worth it.
- Watch your fridge temperature: Pickles develop best between 35°F and 40°F (1.5°C to 4.5°C). Too warm, and they might soften faster.
One kitchen mishap I remember: I once used iodized salt by accident, and the brine turned cloudy with an odd taste. Lesson learned — salt type is surprisingly important. Also, multitasking by prepping these pickles while making a quick meal, like the shrimp scampi with zucchini noodles, saves time and keeps the kitchen humming. It’s all about those little efficiencies that add up.
Variations & Adaptations
While the classic dill pickle is a timeless favorite, I’ve played around with a few variations that you might enjoy:
- Spicy Refrigerator Pickles: Add 1 teaspoon of red pepper flakes or a sliced jalapeño to the jar for a fiery kick.
- Garlic-Dill with Mustard Seeds: Toss in a teaspoon of mustard seeds along with the peppercorns for a slightly different aromatic profile.
- Low-Sodium Version: Cut the salt in half and add a splash of lemon juice for brightness, perfect if you’re watching sodium intake.
- Vegan-Friendly Variation: This recipe is naturally vegan, but if you want to add a smoky depth, try a small piece of smoked paprika or chipotle powder in the brine.
- Quick Pickled Vegetables: Use this brine to pickle other veggies like carrots, radishes, or green beans. Just adjust soaking time to 12–24 hours.
Once, I swapped fresh dill for dill seeds when I was out, and while it still tasted good, it wasn’t quite the same fresh vibrancy. For those who love experimenting, combining this recipe with quick homemade dips, like tzatziki from the Greek chicken bowls post, can turn your pickles into a snack superstar.
Serving & Storage Suggestions
These easy classic refrigerator dill pickles are best served cold and crisp. They’re fantastic straight from the jar as a snack or alongside sandwiches, burgers, and grilled dishes. I find they pair especially well with rich or creamy foods, cutting the heaviness with their bright acid and crunch.
For storage, keep the pickles refrigerated in a sealed glass jar. They last best up to 3 or 4 weeks. Over time, the flavor deepens and the cucumbers soften slightly but still hold a nice bite. If you want your pickles extra crisp, eat them within the first week.
Reheating isn’t really necessary or recommended here — these are meant to be enjoyed chilled. But if you’re serving them as part of a warm dish, adding them fresh right before serving keeps their snap intact.
Whenever I’ve hosted summer BBQs with friends, these pickles have been a hit alongside smoky grilled corn or the crispy smashed potatoes from that recipe. They add a refreshing contrast that everyone seems to reach for.
Nutritional Information & Benefits
One serving (about 3 spears or 50 grams) of these refrigerator dill pickles contains roughly:
| Nutrient | Amount |
|---|---|
| Calories | 10-15 |
| Carbohydrates | 2-3 grams |
| Fiber | 0.5 grams |
| Sodium | 300-400 mg (varies by salt) |
| Vitamin K | 10% DV |
Pickles are low in calories and carbs but high in flavor, making them a great snack if you’re watching your intake. The vinegar provides a bit of digestive support, and dill adds antioxidants. Just watch the sodium if you’re salt-sensitive.
For those on gluten-free or low-carb diets, these pickles fit right in with no modifications needed. Plus, they’re naturally vegan and free from preservatives often found in store-bought varieties. I appreciate having a fresh, homemade option that’s both flavorful and simple.
Conclusion
Easy classic refrigerator dill pickles are proof that great flavor doesn’t need complicated steps. This recipe has become a staple in my kitchen because it’s quick, reliable, and produces consistently crisp, garlicky, dill-packed pickles without any scary canning process. I love how they add that perfect tang and crunch to meals, whether it’s a casual snack or part of a bigger dinner spread.
Feel free to tweak the spices or try different vegetables with this method to make it your own. It’s a recipe that invites experimentation but always delivers a satisfying punch. If you try it, I’d be thrilled to hear how your pickles turned out or what twists you added — sharing those stories is part of the fun.
Happy pickling, and may your fridge always have a jar of these ready to brighten your day!
FAQs
How long do refrigerator dill pickles last?
They keep well in the fridge for about 3 to 4 weeks. The flavor deepens over time, but eat them within the first week if you want maximum crunch.
Can I use regular cucumbers instead of pickling cucumbers?
You can, but regular slicing cucumbers tend to be more watery and may turn softer faster. Partially peeling them can help maintain firmness.
Do I need to boil the brine for refrigerator pickles?
Nope! This no-canning method skips boiling. Just mix the vinegar, water, and salt until dissolved, then pour over the cucumbers.
Can I make spicy refrigerator dill pickles?
Absolutely! Add red pepper flakes or a sliced jalapeño to the jar to give your pickles a spicy kick.
Are these pickles safe without canning?
Yes, since they’re stored in the refrigerator and consumed within a few weeks, this method is safe and easy without the need for hot water bath canning.
Pin This Recipe!

Easy Classic Refrigerator Dill Pickles Recipe 5-Minute No Canning Method
A quick and simple refrigerator dill pickle recipe that requires no canning, delivering crisp, tangy, and flavorful pickles with fresh dill and garlic.
- Prep Time: 5 minutes
- Cook Time: 0 minutes
- Total Time: 48 hours (including refrigeration time)
- Yield: About 4 servings 1x
- Category: Side Dish, Snack
- Cuisine: American
Ingredients
- 1 to 1.5 pounds (450–680 grams) pickling cucumbers
- 1 cup (240 ml) white vinegar
- 1 cup (240 ml) water
- 3 to 4 sprigs (about 10 grams) fresh dill
- 3 to 4 garlic cloves, peeled and lightly crushed
- 1 tablespoon (18 grams) pickling salt or kosher salt
- 1 teaspoon (about 2 grams) whole black peppercorns
- Optional: pinch of red pepper flakes
- Optional: small bay leaf
Instructions
- Wash and slice the cucumbers: Rinse 1 to 1.5 pounds (450–680 grams) of pickling cucumbers thoroughly. Trim the ends and slice into preferred shape (spears about 3 to 4 inches long recommended).
- Prepare the brine: In a bowl, combine 1 cup (240 ml) white vinegar, 1 cup (240 ml) water, and 1 tablespoon (18 grams) pickling salt. Stir until salt dissolves completely.
- Pack the jar: Place 3 to 4 sprigs of fresh dill and 3 to 4 lightly crushed garlic cloves at the bottom of a clean quart-sized jar. Add 1 teaspoon whole black peppercorns and any optional spices like red pepper flakes or a bay leaf. Pack cucumber slices tightly but without smashing.
- Pour the brine over cucumbers: Pour the prepared brine into the jar, covering cucumbers completely. Leave about half an inch of headspace at the top.
- Seal and refrigerate: Close the jar tightly and gently shake to distribute spices. Place in refrigerator. Pickles will start tasting pickled in about 24 hours; best after 48 hours.
- Enjoy and store: Keep refrigerated and consume within 3 to 4 weeks. Use clean utensils to avoid contamination.
Notes
Use pickling cucumbers for best crunch. Avoid iodized salt to keep brine clear. Crushing garlic lightly releases more flavor without bitterness. Patience is key; flavor improves after 48 hours. Keep fridge temperature between 35°F and 40°F for best results. If pickles turn soft, check cucumber freshness and salt concentration. Optional calcium chloride can help maintain crispness.
Nutrition
- Serving Size: About 3 spears or 50
- Calories: 1015
- Sodium: 300400
- Carbohydrates: 23
- Fiber: 0.5
Keywords: refrigerator dill pickles, no canning pickles, quick pickles, easy dill pickles, homemade pickles, crunchy pickles, garlic dill pickles