I want bread right now, and I have flour, water, salt, and a sourdough starter bubbling away on the counter. No yeast packet in sight, no fancy bread flour, and honestly, no desire to wrestle with a high-hydration loaf that demands precise shaping and a scoring pattern worthy of Instagram. What I do have is a deep craving for something oily, herb-flecked, and pillowy—something that feels rustic without trying so hard. That’s when my brain landed on focaccia. Specifically, a sourdough focaccia. It’s the kind of bread that forgives you for not having a perfect stretch and fold routine. It’s the kind of bread that lets the olive oil do the heavy lifting.
This isn’t a recipe I learned from my grandmother or discovered on a trip to Italy. It came from a Tuesday night when I had leftover sourdough discard and a single sprig of rosemary that was about to go sad in the fridge. I poured a generous amount of olive oil into a baking pan, dumped in the shaggy dough, and just let it sit. Hours later, I dimpled the dough with my fingertips, sprinkled it with flaky salt, and baked it until the kitchen smelled like a bakery in Tuscany. The result was exactly what I needed—crispy edges, a tender crumb, and that unmistakable tang that only sourdough can deliver.
So here we are. This Perfect Rustic Sourdough Focaccia with Rosemary and Sea Salt has become my go-to for lazy afternoons, last-minute dinner sides, and even sandwich bread for the week. It’s proof that you don’t need a complicated recipe to make something genuinely memorable. Just four ingredients, a little patience, and a willingness to get your hands messy. I promise, the payoff is worth every sticky finger.
Why You’ll Love This Recipe
Let me tell you why this sourdough focaccia has earned a permanent spot in my kitchen rotation. It’s not just another bread recipe—it’s the one I turn to when I want maximum flavor with minimum fuss.
- Incredibly Simple Ingredients : You only need flour, water, salt, olive oil, and an active sourdough starter. No commercial yeast, no specialty flours, no hard-to-find items. Chances are, you already have everything in your pantry.
- Perfect for Sourdough Lovers : If you maintain a sourdough starter, you know the struggle of finding ways to use discard. This recipe is a fantastic way to use up that unfed starter while creating something spectacular.
- Forgiving and Foolproof : Unlike artisan loaves that require precise shaping and scoring, focaccia is wonderfully forgiving. The dough is wet and sticky, and that’s exactly how it should be. No stress, no perfectionism required.
- Customizable and Versatile : Rosemary and sea salt are a classic combination, but feel free to experiment. Add olives, cherry tomatoes, caramelized onions, or garlic confit. This recipe is a blank canvas for your creativity.
- Unbelievably Delicious : The combination of crispy, golden edges, a soft and airy interior, and the fragrant aroma of rosemary and olive oil is absolutely irresistible. One bite, and you’ll understand why focaccia has been a staple for centuries.
What sets this recipe apart is the depth of flavor from the sourdough. The natural fermentation process adds a subtle tanginess that you just can’t get with commercial yeast. It’s the kind of bread that makes you close your eyes after the first bite. Honestly, it’s comfort food at its finest—simple, soulful, and deeply satisfying.
What Ingredients You Will Need
This recipe uses simple, wholesome ingredients that come together to create something truly special. Each component plays a crucial role in the texture and flavor of the final focaccia.
For the Dough
- Bread flour (500g / about 4 cups) : Bread flour has a higher protein content than all-purpose flour, which gives the focaccia its chewy, airy structure. I prefer King Arthur or Bob’s Red Mill for consistent results.
- Active sourdough starter (200g / about ¾ cup) : Use a bubbly, active starter that has been fed within the last 4-8 hours. The starter is what leavens the bread and gives it that signature tang.
- Warm water (350g / about 1½ cups) : The water should be lukewarm (around 80°F/27°C) to encourage fermentation without killing the natural yeast. Tap water is fine, but avoid chlorinated water if possible.
- Extra-virgin olive oil (60g / about ¼ cup, plus more for the pan and topping) : Use a good-quality olive oil here. It’s a key flavor component, so don’t skimp. I love California Olive Ranch for its fruity, peppery notes.
- Fine sea salt (10g / about 1½ teaspoons) : Salt not only seasons the dough but also strengthens the gluten structure. Fine sea salt dissolves more evenly than coarse salt.
For the Topping
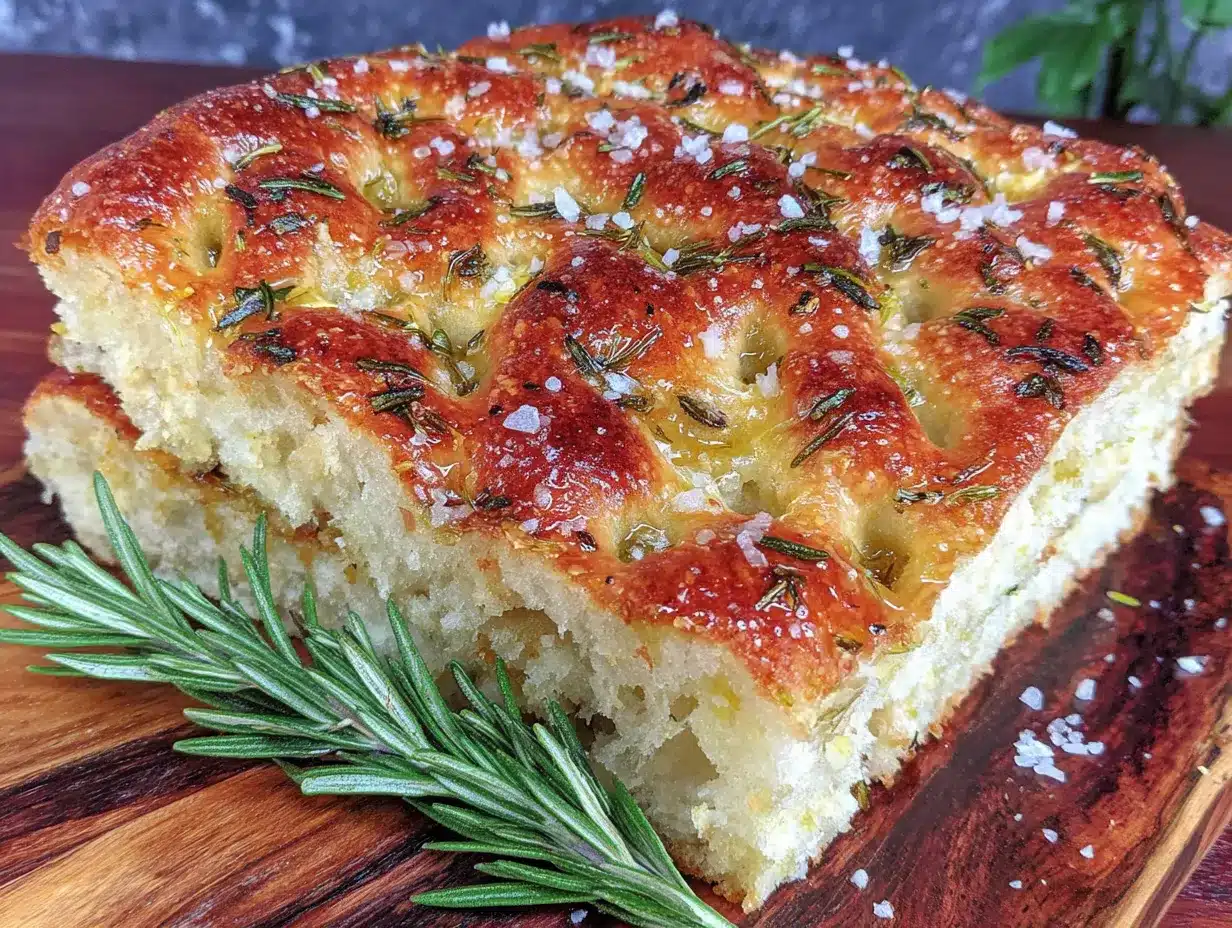
- Fresh rosemary (2-3 sprigs, leaves stripped and roughly chopped) : Fresh rosemary is non-negotiable here. Dried rosemary just doesn’t have the same aromatic punch. Look for bright green, fragrant sprigs.
- Flaky sea salt (such as Maldon or Fleur de Sel, for sprinkling) : The flaky salt adds a delightful crunch and burst of salinity that contrasts beautifully with the rich olive oil.
- Extra-virgin olive oil (for drizzling before baking) : A generous drizzle before baking ensures the top stays golden and crispy.
Ingredient Tips: If you don’t have bread flour, all-purpose flour works in a pinch, but the texture will be slightly less chewy. For a gluten-free version, you can try a 1:1 gluten-free flour blend, but the results will vary. If you’re new to sourdough, make sure your starter is reliably doubling in size within 4-6 hours of feeding before attempting this recipe.
Equipment Needed
You don’t need a lot of fancy equipment to make this focaccia, but a few key tools will make the process smoother and more enjoyable.
- Large mixing bowl : A glass or stainless steel bowl works well. You need enough room to mix the dough and let it rise.
- Digital kitchen scale : I cannot stress this enough—weighing your ingredients is far more accurate than using measuring cups. It ensures consistent results every time.
- Bench scraper or dough scraper : This tool is invaluable for handling the sticky dough and transferring it to the pan.
- 9×13-inch baking pan (or similar size) : A metal or ceramic baking pan works great. Avoid glass, as it doesn’t conduct heat as well and can result in a soggy bottom.
- Plastic wrap or a damp kitchen towel : To cover the dough during the bulk fermentation and final proof.
- Parchment paper (optional) : Lining the pan makes cleanup a breeze, but it’s not strictly necessary if you grease the pan well.
If you don’t have a bench scraper, a metal spatula works as a substitute. For the baking pan, any oven-safe dish of similar size will do—just adjust the baking time slightly if the pan is deeper or shallower. I’ve made this in a cast-iron skillet before, and the results were fantastic, with extra-crispy edges.
Preparation Method
Making sourdough focaccia is a labor of love, but the process is surprisingly hands-off. Most of the time is spent waiting for the dough to rise, not actively working. Here’s how to do it.
Step 1: Mix the Dough (10 minutes)
In a large mixing bowl, combine the bread flour and warm water. Use your hands or a wooden spoon to mix until a shaggy dough forms. Let this mixture rest for 20-30 minutes. This autolyse step allows the flour to fully hydrate and starts developing gluten naturally.
After the rest, add the active sourdough starter and fine sea salt. Mix thoroughly until the starter is fully incorporated and the dough feels smooth and elastic. It will be very sticky—that’s normal. Cover the bowl with plastic wrap or a damp towel and let it rest for 30 minutes.
Step 2: Stretch and Fold (2-3 hours)
Over the next 2-3 hours, perform 4 sets of stretch and folds, spaced 30 minutes apart. To do this, wet your hands slightly to prevent sticking. Grab one side of the dough, stretch it upward, and fold it over itself. Rotate the bowl 90 degrees and repeat. Do this 4 times, then cover the bowl again.
This technique strengthens the gluten without the need for kneading, creating a light, airy crumb. After the final set, the dough should feel noticeably smoother and more elastic. Cover the bowl and let it continue bulk fermentation at room temperature (around 70-75°F/21-24°C) for another 4-6 hours, or until the dough has doubled in size and is bubbly on top.
Step 3: Prepare the Pan and Shape (15 minutes)
Generously coat your 9×13-inch baking pan with olive oil. Use at least 2-3 tablespoons—don’t be shy. The oil is what gives focaccia its signature crispy bottom and golden crust.
Gently scrape the risen dough out of the bowl and into the oiled pan. It will look deflated and messy—that’s okay. Let it rest for 20-30 minutes to relax the gluten. Then, using oiled fingertips, gently stretch the dough to fill the pan. If it resists, let it rest for another 10 minutes and try again. The dough should be about 1-inch thick.
Step 4: Final Proof (2-4 hours)
Cover the pan with plastic wrap or a damp towel and let the dough rise again. This second proof is crucial for developing those beautiful air pockets. It should take 2-4 hours, depending on the temperature of your kitchen. The dough is ready when it’s puffy, jiggly, and has nearly doubled in height.
Step 5: Dimple and Top (5 minutes)
Preheat your oven to 425°F (220°C) with a rack in the middle. Just before baking, drizzle another 1-2 tablespoons of olive oil over the dough. Then, using your fingertips, press deep dimples all over the surface—right down to the bottom of the pan. This is my favorite part. Don’t be timid; the dimples are what hold the oil and create those signature focaccia pockets.
Sprinkle the chopped fresh rosemary and a generous amount of flaky sea salt over the top.
Step 6: Bake (25-30 minutes)
Place the pan in the preheated oven and bake for 25-30 minutes, rotating the pan halfway through. The focaccia is done when the top is deep golden brown and the bottom sounds hollow when tapped. If the top is browning too quickly but the bottom isn’t done, tent with foil for the last 5-10 minutes.
Let the focaccia cool in the pan for 5 minutes, then transfer to a wire rack. Resist the urge to cut into it immediately. Let it cool for at least 20 minutes so the crumb sets properly. I know it’s hard, but trust me—it’s worth the wait.
Cooking Tips & Techniques
Over the years, I’ve learned a few tricks that make this focaccia consistently excellent. Here are my top tips.
- Use a wet hand for sticky dough : When handling the dough during stretch and folds, keep a bowl of water nearby and wet your hands frequently. It prevents sticking without adding extra flour, which can make the bread dense.
- Don’t rush the fermentation : Sourdough works on its own timeline. If your kitchen is cool, the bulk fermentation might take 8-10 hours. That’s fine. The longer, slower fermentation develops more flavor. I’ve even let it go overnight in a cool room with great results.
- Be generous with olive oil : This isn’t the time to be frugal. The olive oil in the pan and on top is what creates that crispy, almost fried texture on the bottom and edges. It also prevents the dough from sticking.
- Dimple with confidence : The dimples aren’t just decorative. They create pockets that trap the olive oil and salt, ensuring every bite is flavorful. Use your fingertips and press firmly, almost to the bottom of the pan.
- Check for doneness properly : Ovens vary, so use a thermometer if you’re unsure. The internal temperature of the focaccia should be around 200°F (93°C). If you don’t have a thermometer, tap the bottom—it should sound hollow.
I once rushed the bulk fermentation because I was impatient, and the focaccia came out flat and dense. It was still edible (I mean, it’s bread with olive oil and salt), but it wasn’t the light, airy focaccia I was after. Patience really is the secret ingredient here.
Variations & Adaptations
One of the best things about focaccia is how adaptable it is. Here are some of my favorite variations.
- Herb and Garlic Focaccia : Add 3-4 minced garlic cloves to the olive oil before pouring it into the pan. You can also sprinkle dried oregano or thyme along with the rosemary for an herby twist.
- Tomato and Olive Focaccia : Press halved cherry tomatoes and pitted olives into the dimples before baking. The tomatoes roast and become sweet and jammy, while the olives add a briny punch.
- Caramelized Onion and Gruyère Focaccia : Top the dough with slowly caramelized onions and a generous sprinkle of grated Gruyère cheese before baking. It’s rich, savory, and perfect for a hearty appetizer.
- Everything Bagel Focaccia : Skip the rosemary and sprinkle everything bagel seasoning (sesame seeds, poppy seeds, dried garlic, dried onion, and salt) over the dimpled dough. It’s a fun, savory twist.
- Sweet Focaccia : For a dessert version, reduce the salt slightly and top the dough with a mixture of brown sugar, cinnamon, and sliced apples or pears. Drizzle with honey after baking.
I’ve personally tried the caramelized onion version for a dinner party, and it was gone within minutes. The combination of sweet, savory, and cheesy is irresistible. Feel free to experiment and create your own signature version.
Serving & Storage Suggestions
Focaccia is incredibly versatile when it comes to serving. Here’s how I like to enjoy it.
Serving: Serve the focaccia warm or at room temperature. It’s perfect on its own as a snack, alongside a bowl of creamy roasted butternut squash soup for dipping, or as the bread for a hearty sandwich. I love slicing it in half horizontally and using it for a turkey and pesto sandwich. It also pairs beautifully with a simple salad or a plate of cured meats and cheeses.
Storage: Store leftover focaccia in an airtight container at room temperature for up to 2 days. Do not refrigerate—it will dry out the bread. To reheat, place slices in a 350°F (175°C) oven for 5-7 minutes, or until warmed through and crispy. You can also toast it in a skillet with a little olive oil for a quick, crispy treat.
Freezing: Focaccia freezes beautifully. Wrap the cooled loaf tightly in plastic wrap, then in aluminum foil, and freeze for up to 3 months. To thaw, let it come to room temperature on the counter, then reheat in the oven. I often make a double batch and freeze one for later—it’s a lifesaver on busy days.
The flavors actually develop and deepen overnight, so day-old focaccia is still delicious. It’s also fantastic for making croutons or breadcrumbs if you have leftovers that are a bit stale.
Nutritional Information & Benefits
While focaccia is certainly a treat, it does offer some nutritional benefits, especially when made with sourdough.
Estimated Nutritional Values (per serving, based on 12 servings):
- Calories: 220
- Fat: 8g
- Carbohydrates: 32g
- Protein: 5g
- Fiber: 1g
- Sodium: 380mg
Health Benefits: Sourdough fermentation breaks down phytic acid, which can make the minerals in the flour more bioavailable. This means your body can absorb more of the nutrients from the bread. The fermentation process also produces beneficial bacteria that can support gut health. Olive oil is rich in heart-healthy monounsaturated fats and antioxidants, while rosemary contains anti-inflammatory compounds.
Dietary Considerations: This recipe is vegetarian and vegan (if you use a vegan-friendly starter). It is not gluten-free, but you can experiment with a gluten-free flour blend. For a lower-sodium version, reduce the amount of flaky salt on top.
I personally love that this focaccia feels indulgent but is made from simple, wholesome ingredients. It’s a reminder that you don’t need processed foods to create something truly satisfying.
Conclusion
This Perfect Rustic Sourdough Focaccia with Rosemary and Sea Salt is more than just a bread recipe—it’s an experience. It’s the smell of olive oil and rosemary filling your kitchen, the satisfying feeling of dimpling the soft dough, and the joy of tearing into a warm, crispy slice. It’s proof that four simple ingredients can create something extraordinary.
I encourage you to make this recipe your own. Play with the toppings, adjust the proofing times to fit your schedule, and don’t be afraid to get your hands messy. Whether you serve it alongside a bowl of creamy slow cooker Tuscan white bean soup or enjoy it as a snack with a cup of tea, I know you’ll love it as much as I do.
If you try this recipe, I’d love to hear about it. Leave a comment below and let me know how it turned out. Did you add any fun toppings? Share your creations on social media and tag me—I can’t wait to see your beautiful focaccia. Happy baking, my friend!
Frequently Asked Questions
Can I use all-purpose flour instead of bread flour?
Yes, you can. The focaccia will still be delicious, but the texture will be slightly less chewy and airy. Bread flour has a higher protein content, which creates more gluten and a better structure. If you only have all-purpose flour, it’s still worth making—just expect a slightly softer crumb.
My starter isn’t very active. Can I still make this recipe?
It’s best to use an active, bubbly starter for this recipe. If your starter is sluggish, the focaccia may not rise as well and could be dense. Try feeding your starter a few times before using it to strengthen it. Alternatively, you can add a tiny pinch of commercial yeast (about ⅛ teaspoon) to help the fermentation along.
Why is my focaccia dense and heavy?
Dense focaccia is usually a sign of under-fermentation. The dough needs enough time to develop air pockets. Make sure your kitchen is warm enough (70-75°F/21-24°C) and give the dough enough time to double during bulk fermentation. Also, be gentle when transferring the dough to the pan—you don’t want to deflate it too much.
Can I make this recipe without a stand mixer?
Absolutely. This recipe is designed to be made by hand. The stretch and fold technique builds gluten without any kneading. You just need a bowl, your hands, and a little patience. It’s actually quite therapeutic.
How do I know when the focaccia is fully baked?
The focaccia should be deep golden brown on top and sound hollow when you tap the bottom. If you have an instant-read thermometer, the internal temperature should be around 200°F (93°C). If the top is browning too quickly, tent it with foil for the last few minutes of baking.
Pin This Recipe!

Perfect Rustic Sourdough Focaccia: Easy 4-Ingredient Recipe
This Perfect Rustic Sourdough Focaccia with Rosemary and Sea Salt is a simple, forgiving bread made with just four ingredients. It features crispy edges, a tender crumb, and the unmistakable tang of sourdough, perfect for lazy afternoons or as a versatile side.
- Prep Time: 20 minutes
- Cook Time: 30 minutes
- Total Time: 14 hours (includes fermentation and proofing)
- Yield: 12 servings 1x
- Category: Bread
- Cuisine: Italian
Ingredients
- 500g bread flour (about 4 cups)
- 200g active sourdough starter (about ¾ cup)
- 350g warm water (about 1½ cups)
- 60g extra-virgin olive oil (about ¼ cup, plus more for pan and topping)
- 10g fine sea salt (about 1½ teaspoons)
- 2–3 sprigs fresh rosemary, leaves stripped and roughly chopped
- Flaky sea salt (such as Maldon or Fleur de Sel, for sprinkling)
Instructions
- In a large mixing bowl, combine the bread flour and warm water. Mix until a shaggy dough forms. Let rest for 20-30 minutes (autolyse).
- Add the active sourdough starter and fine sea salt. Mix thoroughly until the starter is fully incorporated and the dough feels smooth and elastic. Cover and let rest for 30 minutes.
- Over the next 2-3 hours, perform 4 sets of stretch and folds, spaced 30 minutes apart. Wet your hands slightly, grab one side of the dough, stretch it upward, and fold it over itself. Rotate the bowl 90 degrees and repeat 4 times. Cover after each set.
- After the final set, let the dough continue bulk fermentation at room temperature (70-75°F/21-24°C) for 4-6 hours, or until doubled in size and bubbly on top.
- Generously coat a 9×13-inch baking pan with olive oil (at least 2-3 tablespoons). Gently scrape the risen dough into the pan. Let rest for 20-30 minutes.
- Using oiled fingertips, gently stretch the dough to fill the pan. If it resists, let rest for another 10 minutes and try again. The dough should be about 1-inch thick.
- Cover the pan and let the dough rise for 2-4 hours, until puffy, jiggly, and nearly doubled in height.
- Preheat oven to 425°F (220°C) with a rack in the middle.
- Drizzle 1-2 tablespoons of olive oil over the dough. Using your fingertips, press deep dimples all over the surface, right down to the bottom of the pan.
- Sprinkle chopped fresh rosemary and a generous amount of flaky sea salt over the top.
- Bake for 25-30 minutes, rotating the pan halfway through, until deep golden brown on top and the bottom sounds hollow when tapped. If browning too quickly, tent with foil for the last 5-10 minutes.
- Let cool in the pan for 5 minutes, then transfer to a wire rack. Cool for at least 20 minutes before cutting.
Notes
Use an active, bubbly starter for best results. If your kitchen is cool, bulk fermentation may take 8-10 hours. Be generous with olive oil for crispy edges. Dimple the dough firmly to create pockets for oil and salt. For a gluten-free version, try a 1:1 gluten-free flour blend, but results may vary.
Nutrition
- Serving Size: 1 slice (1/12 of rec
- Calories: 220
- Sodium: 380
- Fat: 8
- Saturated Fat: 1
- Carbohydrates: 32
- Fiber: 1
- Protein: 5
Keywords: sourdough focaccia, rustic focaccia, easy focaccia recipe, 4-ingredient focaccia, rosemary focaccia, sourdough bread, homemade focaccia


