“You sure that chicken’s going to come out good with a beer can in it?” my neighbor asked, eyebrows raised as I fiddled with the makeshift stand on the grill. Honestly, I wasn’t totally sold myself at first. I mean, roasting a whole bird upright, perched on a cold can of beer? It sounded like a backyard experiment that might end with a soggy mess or worse—an undercooked disaster.
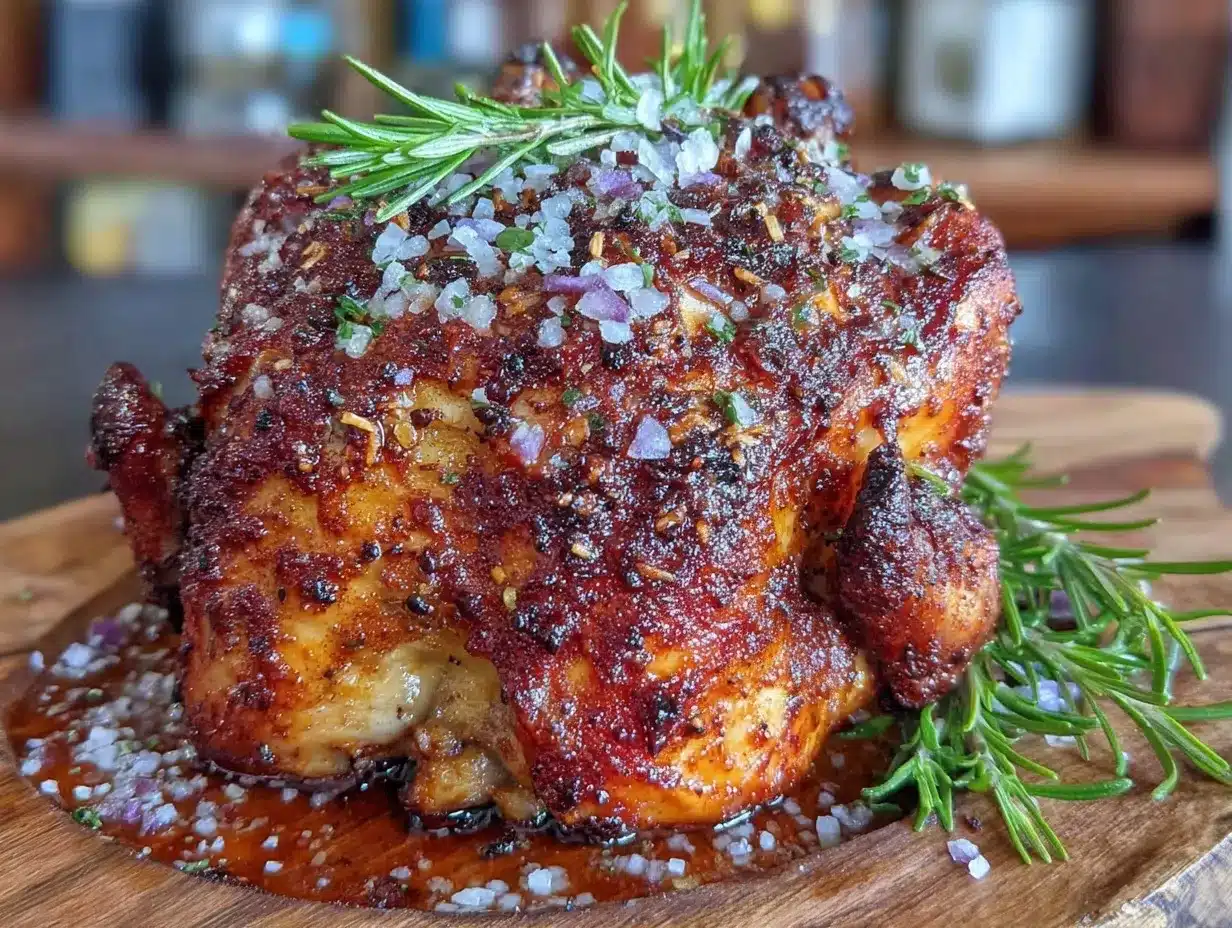
But here’s the thing: what started as a slightly skeptical weekend trial quickly turned into an obsession. Multiple chickens later, I found myself tweaking the smoky paprika garlic rub until it felt just right—robust, a little bit spicy, and downright addictive. The skin? Gloriously crispy, snapping with every bite. The inside? Juicy, tender, and infused with subtle hints of beer steam mingling with bold spices.
That evening, the aroma of garlic and paprika curling through the air drew a small crowd of curious friends, all eager to try this oddly charming “beer can chicken” that had quietly become the star of my grill. The surprise wasn’t just how delicious it was, but how simple it felt to make—a recipe born from a hunch and a half-hearted dare that ended up as a go-to for weekend cookouts. There’s something about the ritual of prepping the rub, balancing the bird on the can, and waiting patiently for that perfect crispness that made it more than just a meal. It became a kind of slow, smoky celebration.
That’s why this Crispy Beer Can Chicken with Smoky Paprika Garlic Rub stuck around in my recipe box—it’s honest, it’s flavorful, and it’s a reminder that sometimes the best dishes come from a bit of curiosity and a dash of boldness. If you’re wondering whether to give beer can chicken a shot, let me just say this: it’s worth every minute of the wait, and every bit of the crispy, garlicky reward.
Why You’ll Love This Crispy Beer Can Chicken Recipe
This Crispy Beer Can Chicken with Smoky Paprika Garlic Rub is not your average roasted chicken. After countless attempts and adjustments, I landed on a recipe that’s become a personal favorite for good reason. Here’s why you’ll want this one in your rotation:
- Quick & Easy: The prep takes about 15 minutes, and then it grills itself for under 90 minutes—perfect for weekend gatherings or when you want something impressive without crazy effort.
- Simple Ingredients: No need for fancy or hard-to-find spices. The smoky paprika and garlic blend uses pantry staples you probably already have, making this recipe very approachable.
- Perfect for Outdoor Cooking: Whether you’re firing up the grill for a casual BBQ or enjoying a sunny afternoon in the backyard, this beer can chicken method adds a fun twist to your cookout.
- Crowd-Pleaser: Kids and adults alike love the crispy skin and juicy meat combo. It’s always the dish people ask about when I bring it to a potluck or family dinner.
- Unbelievably Delicious: The interplay between the smoky paprika, garlicky punch, and the subtle beer steam makes the flavors sing—comfort food with a bit of a kick.
What sets this recipe apart is the way the beer can roasting method keeps the chicken moist while crisping the skin to that perfect golden-brown. The smoky paprika garlic rub isn’t just a seasoning—it’s a flavor lock that penetrates the skin and meat, giving the chicken a character that’s hard to forget. I’ve tried other methods, but this one always brings me back, especially when I want to impress friends without fuss.
And, honestly, there’s a little nostalgia in it too. It’s the kind of recipe that turns a simple backyard meal into a relaxed event, where people linger over plates, stories, and maybe a cold beer (or two). If you appreciate recipes that feel like a celebration and a comfort all in one, this crispy beer can chicken is definitely for you.
What Ingredients You Will Need
This recipe uses straightforward, wholesome ingredients that build big flavor without complicated steps. Most are pantry staples, with a few fresh touches, making it easy to gather everything in one trip.
- Whole Chicken: About 4 to 5 pounds (1.8 to 2.3 kg), preferably fresh or fully thawed. I find that organic or free-range chickens give the best flavor and texture.
- Beer: One standard 12 oz (355 ml) can of your favorite lager or ale. The beer choice subtly influences the aroma; a light lager works well for a clean finish.
- Smoky Paprika: 2 tablespoons (30 ml). Use Spanish smoked paprika if you can find it for that authentic smoky depth.
- Garlic Powder: 1 tablespoon (15 ml), for that punchy garlic flavor without the hassle of fresh chopping.
- Onion Powder: 1 teaspoon (5 ml) to round out the seasoning.
- Brown Sugar: 1 tablespoon (15 ml), adds a subtle caramelized sweetness and helps the skin crisp up nicely.
- Salt: 2 teaspoons (10 ml), preferably kosher salt for better seasoning control.
- Black Pepper: 1 teaspoon (5 ml), freshly ground for optimal flavor.
- Olive Oil: 2 tablespoons (30 ml), to help the rub stick and promote crispiness.
- Lemon: Half a lemon, juiced, to brighten the flavors and add a slight tang.
- Fresh Herbs (Optional): A few sprigs of thyme or rosemary tucked inside the cavity for extra aroma.
If you want to swap things up, almond flour makes a nice gluten-free coating alternative if you decide to dust the skin lightly before applying the rub. For dairy-free versions, olive oil works perfectly, but you can also try avocado oil for a higher smoke point. And if you don’t have beer on hand, sparkling water with a squeeze of lemon can be a stand-in, though it won’t have quite the same steamy effect.
Equipment Needed
- Grill: Gas or charcoal grill works, though charcoal adds an extra smoky note. A sturdy grill grate is important for even cooking.
- Beer Can Chicken Roaster or Stand: Optional but helpful. You can use a metal stand designed for beer can chicken or improvise with a clean, empty can and a roasting pan to catch drippings.
- Meat Thermometer: Essential for checking the internal temperature to avoid overcooking or undercooking. I swear by instant-read digital thermometers for speed and accuracy.
- Mixing Bowl: For combining the rub ingredients.
- Basting Brush: To apply olive oil and rub evenly.
- Disposable Gloves: Optional, but handy for rubbing the chicken without getting your hands all messy.
- Aluminum Foil: For tenting the chicken after cooking to rest the meat and keep it moist.
If you don’t have a specialty beer can chicken stand, no worries—just make sure your grill is stable and the chicken sits upright without tipping. For cleanup, I recommend using a drip pan under the grill grate; it catches all those delicious drippings and keeps flare-ups at bay.
Preparation Method
- Prep the Chicken: Remove any giblets from the cavity and pat the chicken dry with paper towels. This step is crucial for crisp skin—moisture is the enemy here. Let it sit uncovered in the fridge for 30 minutes if you have time; it helps dry out the skin further.
- Make the Rub: In a bowl, combine the smoky paprika, garlic powder, onion powder, brown sugar, salt, and black pepper. Mix well to distribute all those flavors evenly.
- Apply Olive Oil: Rub the entire chicken with olive oil, making sure to coat every nook and cranny. This helps the spice blend stick and promotes that coveted crispy texture.
- Rub the Chicken: Generously massage the spice mixture all over the chicken, including under the skin where you can reach, and inside the cavity. Don’t be shy; this flavor boost is what makes the difference.
- Prepare the Beer Can: Open the beer and pour out (or drink) about half the can—no need to waste it! You want enough liquid left to steam the chicken from the inside. Optionally, add a few garlic cloves or herbs into the beer can for extra aroma.
- Mount the Chicken: Carefully place the chicken upright on the beer can, inserting the can into the cavity so the bird stands steady. Use a roaster stand if you have one to prevent tipping.
- Preheat the Grill: Heat your grill to medium heat, around 350°F (175°C). If using charcoal, set it up for indirect cooking, with coals on one side and the chicken on the other.
- Grill the Chicken: Place the chicken on the grill grate over indirect heat. Close the lid and cook for about 1 hour and 15 minutes to 1 hour and 30 minutes, or until the internal temperature reaches 165°F (74°C) in the thickest part of the thigh. Resist the urge to open the lid too often; every peek lets out heat and adds to cooking time.
- Rest the Chicken: Using tongs and oven mitts, carefully remove the chicken and beer can from the grill. Tent it loosely with foil and let rest for 10-15 minutes. This step helps the juices redistribute and keeps the meat juicy.
- Carve and Serve: Remove the beer can carefully (it will be hot!) and carve the chicken. You’ll notice the skin is crispy and the meat juicy, with subtle hints of smoky paprika and garlic.
If the skin isn’t as crispy as you’d like, a quick broil for 2-3 minutes in the oven works wonders—just watch it carefully. Also, keep a spray bottle of water nearby in case of flare-ups on the grill. Trust me, they happen, and it’s better to douse flames than lose your crispy finish.
Cooking Tips & Techniques
Getting the perfect crispy skin and juicy meat on beer can chicken isn’t magic—it’s about a few simple but important tricks I’ve learned the hard way.
- Dry the Skin Thoroughly: Patting the chicken dry and letting it air out in the fridge before cooking makes a huge difference. Moisture leads to soggy skin, so don’t skip this.
- Use Indirect Heat: Direct flames will char the skin before the inside cooks. Setting your grill for indirect heat allows slow, even cooking, letting the beer steam do its magic inside.
- Don’t Rush the Rest: Resting the bird after cooking keeps juices locked in. I’ve tried carving immediately and ended up with dry meat—lesson learned.
- Check Temperature Properly: Use a reliable meat thermometer. Insert it into the thickest part of the thigh without touching bone for an accurate read.
- Balance the Rub: The smoky paprika and garlic are the stars, but the brown sugar adds caramelization—don’t skimp or your skin won’t crisp right.
Once, I forgot the beer can entirely (don’t ask), and the chicken was dry and lacked depth. The beer-steaming technique isn’t just a gimmick; it really infuses moisture and subtle flavor. Also, multitasking helps—while the chicken grills, I like to prep a quick side like this easy sheet pan loaded fajita bowl to keep things simple but tasty.
Variations & Adaptations
If you want to mix things up, this crispy beer can chicken recipe is surprisingly flexible.
- Spice Variations: Swap smoky paprika with chipotle powder for a spicier kick, or add cumin and coriander for a more earthy, southwestern vibe.
- Herb Infusion: Stuff the cavity with fresh lemon slices, rosemary, or sage instead of thyme. Each lends a unique aromatic note.
- Cooking Methods: If you don’t have a grill, you can roast the chicken upright in a conventional oven at 375°F (190°C) for about 1 hour and 20 minutes. The beer can still work in the oven, just place a drip tray underneath.
- Dietary Adjustments: For a low-sodium version, reduce the salt and add more garlic and smoked paprika for flavor. For gluten-free, ensure your paprika and other spices are certified gluten-free.
- Personal Twist: I once added a splash of maple syrup to the rub for a sweet-smoky combo that surprised everyone. It’s worth trying if you like a touch of sweetness balancing the savory garlic.
Serving & Storage Suggestions
This crispy beer can chicken is best served warm, straight off the grill or rested to room temperature. The skin stays crisp longest if you carve it just before serving.
Pair it with fresh, vibrant sides like a crisp green salad or roasted vegetables. For a heartier meal, a creamy side like BBQ chicken pasta complements the smoky flavors beautifully. And, of course, a cold beer or sparkling lemonade rounds out the experience.
To store leftovers, wrap the chicken tightly in foil or airtight containers and refrigerate for up to 3 days. Reheat gently in the oven at 325°F (160°C) covered with foil to avoid drying out. Avoid microwaving if you want to keep the skin crispy—microwaves tend to make it rubbery.
Flavors actually deepen overnight, so the next day’s chicken tastes even better cold or warmed up, making it a great candidate for sandwiches or salads. Just remember to keep the skin separate if you want it crispy; it tends to soften in storage.
Nutritional Information & Benefits
A typical serving of this crispy beer can chicken (about 6 ounces or 170 grams of cooked meat) provides approximately 350 calories, 28 grams of protein, 25 grams of fat, and minimal carbohydrates. The rub adds negligible calories but delivers a good dose of antioxidants from paprika and garlic.
Chicken is an excellent source of lean protein, essential for muscle repair and overall health. Paprika contributes vitamins A and E, supporting eye and skin health, while garlic is well-known for its immune-boosting properties.
This recipe is naturally gluten-free and can easily fit into low-carb or keto diets by pairing with suitable sides. Just watch the brown sugar if you’re limiting sugars; you can reduce or substitute with a pinch of a sweetener alternative if preferred.
Conclusion
This Crispy Beer Can Chicken with Smoky Paprika Garlic Rub has earned a special place in my cooking repertoire—not just for its delicious taste, but because it turns a simple meal into a memorable event. The crispy skin and juicy interior, kissed by smoky, garlicky flavors, make it a winner every time.
Feel free to tweak the rub or cooking method to suit your taste or equipment. Whether you’re grilling for friends or treating yourself on a quiet night, this recipe adapts beautifully.
Give it a try, and let me know how it goes—there’s something about sharing stories and tips around a great meal that makes cooking even better. And if you like dishes that balance comfort and flavor without fuss, you might also enjoy the rich and creamy instant pot loaded chicken and rice that I often pair for weeknight dinners.
Here’s to crispy skin, juicy bites, and the smoky, garlicky goodness that keeps us coming back to the grill.
FAQs About Crispy Beer Can Chicken with Smoky Paprika Garlic Rub
What type of beer is best for beer can chicken?
A light lager or pale ale works best for a clean, subtle flavor. Avoid heavy stouts or flavored beers that might overpower the chicken’s natural taste.
Can I use a different liquid instead of beer?
Yes, sparkling water with lemon or chicken broth can substitute if you prefer no alcohol. The steaming effect remains, but flavor will be milder.
How do I know when the chicken is fully cooked?
Use a meat thermometer to check the internal temperature in the thickest part of the thigh. It should read 165°F (74°C) for safe consumption.
Is beer can chicken safe to cook on a gas grill?
Absolutely. Just set up indirect heat by turning on burners on one side of the grill and placing the chicken on the other side to avoid flare-ups.
Can I prepare the rub in advance?
Yes, the rub can be mixed and stored in an airtight container for up to 2 weeks. This makes prep even quicker when you’re ready to grill.
Pin This Recipe!
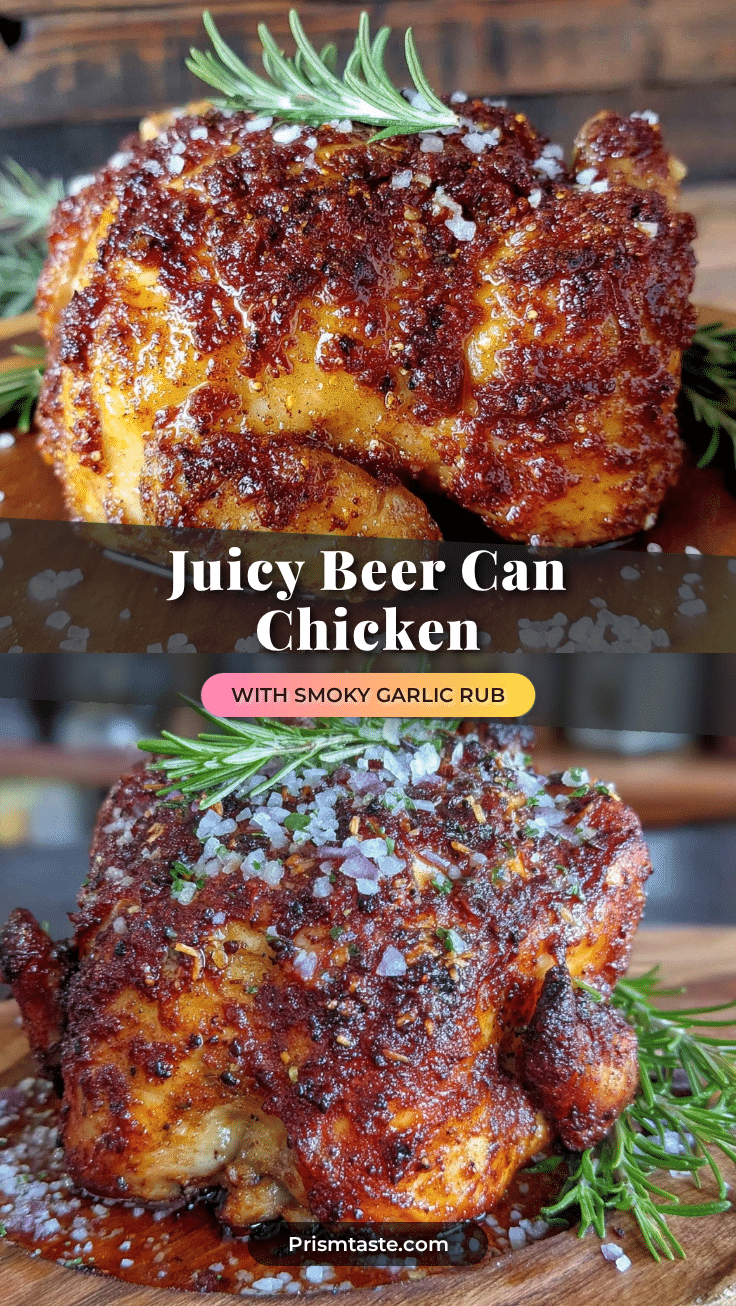
Crispy Beer Can Chicken Recipe with Smoky Paprika Garlic Rub

A flavorful and crispy beer can chicken recipe featuring a smoky paprika garlic rub that delivers juicy, tender meat with a perfectly crisp skin. Ideal for grilling and outdoor cookouts.
- Prep Time: 15 minutes
- Cook Time: 1 hour 30 minutes
- Total Time: 1 hour 45 minutes
- Yield: 4 to 6 servings 1x
- Category: Main Course
- Cuisine: American
Ingredients
- 1 whole chicken (4 to 5 pounds)
- 1 standard 12 oz can of beer (lager or ale)
- 2 tablespoons smoky paprika
- 1 tablespoon garlic powder
- 1 teaspoon onion powder
- 1 tablespoon brown sugar
- 2 teaspoons kosher salt
- 1 teaspoon freshly ground black pepper
- 2 tablespoons olive oil
- Juice of half a lemon
- Optional: fresh herbs (thyme or rosemary) for cavity
- Optional: almond flour for gluten-free coating
- Optional: avocado oil as alternative to olive oil
Instructions
- Remove giblets from the chicken cavity and pat the chicken dry with paper towels. Optionally, let it sit uncovered in the fridge for 30 minutes to dry the skin further.
- In a mixing bowl, combine smoky paprika, garlic powder, onion powder, brown sugar, salt, and black pepper. Mix well.
- Rub the entire chicken with olive oil to help the spice blend stick and promote crispiness.
- Generously apply the spice rub all over the chicken, including under the skin and inside the cavity.
- Open the beer can and pour out or drink about half the beer, leaving enough liquid to steam the chicken. Optionally add garlic cloves or herbs into the can.
- Place the chicken upright on the beer can, inserting the can into the cavity so the bird stands steady. Use a roaster stand if available.
- Preheat the grill to medium heat (around 350°F). For charcoal grills, set up for indirect cooking with coals on one side.
- Place the chicken on the grill grate over indirect heat. Close the lid and cook for 1 hour 15 minutes to 1 hour 30 minutes, or until the internal temperature reaches 165°F in the thickest part of the thigh.
- Remove the chicken and beer can carefully from the grill. Tent loosely with aluminum foil and let rest for 10-15 minutes.
- Remove the beer can carefully and carve the chicken. Serve warm.
Notes
Pat chicken dry and let air out in fridge for crispier skin. Use indirect heat on grill to avoid charring. Rest chicken after cooking to keep juices locked in. Use a meat thermometer to ensure internal temperature reaches 165°F. For extra crispiness, broil skin for 2-3 minutes after grilling if needed. Keep a spray bottle of water handy for flare-ups.
Nutrition
- Serving Size: 6 ounces (170 grams)
- Calories: 350
- Fat: 25
- Protein: 28
Keywords: beer can chicken, crispy chicken, smoky paprika, garlic rub, grilled chicken, outdoor cooking, BBQ chicken, easy chicken recipe