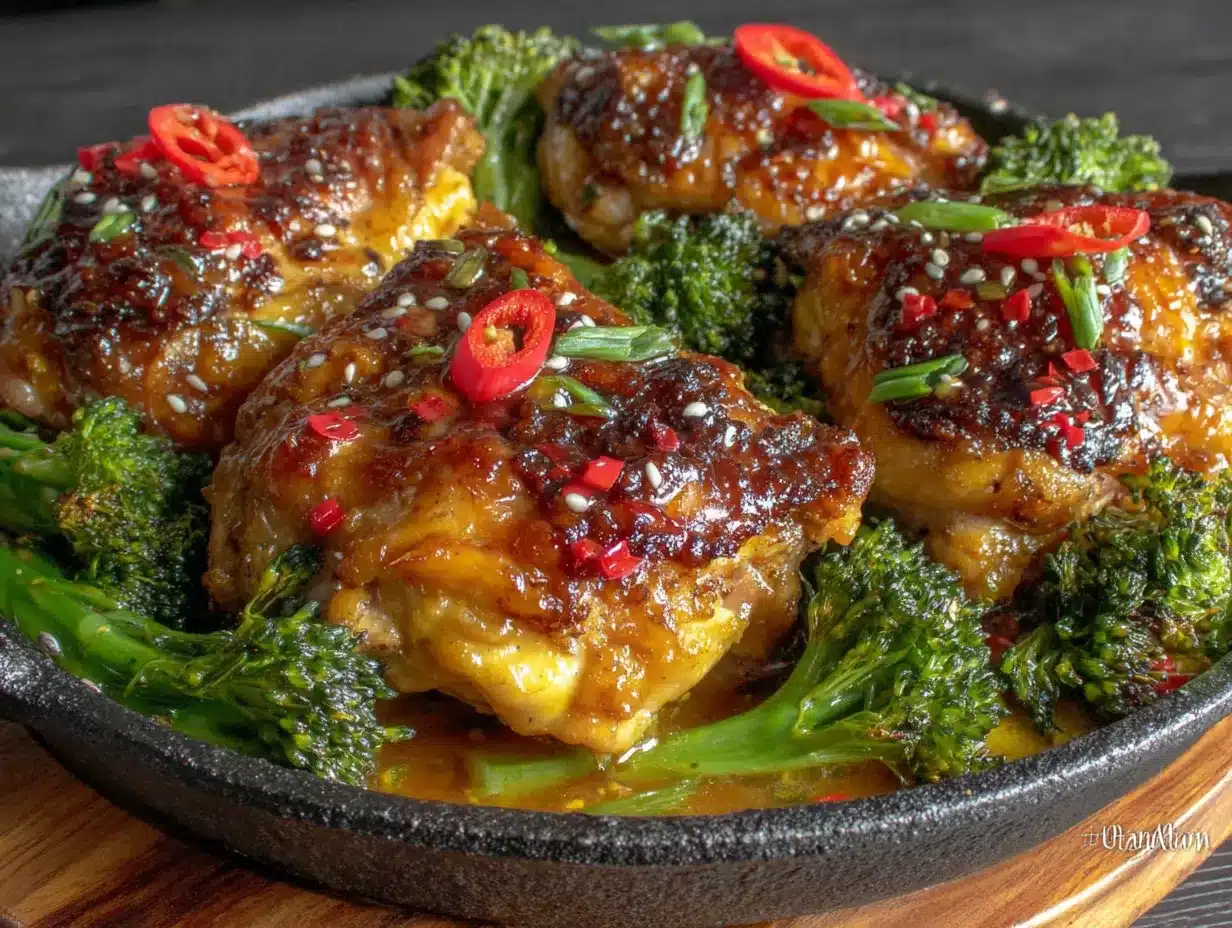
The pan was still warm when my husband scraped the last bit of sauce over his rice. He didn’t say anything at first — just looked at the empty skillet like he was trying to figure out how it happened so fast. I’d made it on a Tuesday night after a long day, throwing things together out of sheer desperation. The chicken was juicy, the broccoli was tender-crisp, and that sticky honey garlic sauce had caramelized into something dangerously good. He finally asked if I could make it again the next night. Honestly, I was already planning to.
I didn’t grow up making anything like this. My mom was a from-scratch cook who never measured anything and never used a recipe twice. But this one-pan honey garlic chicken and broccoli? It stuck. Not because it’s fancy or complicated, but because it solved the problem we all face at 5:30 PM: what do I make that’s fast, satisfying, and doesn’t leave a mountain of dishes?
The answer turned out to be simpler than I expected. A few pantry staples, one skillet, and about twenty minutes later, dinner was done. And the best part? Everyone at the table actually ate it without complaint. That alone felt like a win.
This recipe has become my go-to for those nights when I need dinner to just work. No fussing, no fancy ingredients, just honest food that tastes like you put in way more effort than you actually did. And honestly, that’s the kind of recipe worth keeping around.
Why You’ll Love This Recipe
Let me tell you why this one-pan honey garlic chicken and broccoli has earned a permanent spot in my weekly rotation. I’ve tested this recipe more times than I care to admit — tweaking the sauce ratios, adjusting the cooking times, and even burning a batch or two before I got it right. What I landed on is something I’m genuinely proud of.
- Ready in 20 minutes: From start to finish, this meal comes together faster than takeout delivery. Perfect for those evenings when you’re staring at the fridge wondering what to cook.
- Simple pantry ingredients: You probably have everything you need already. Chicken, broccoli, honey, soy sauce, garlic — that’s the backbone of this dish. No specialty grocery store trips required.
- One pan, minimal cleanup: The skillet does all the work. Less time washing dishes means more time actually enjoying your meal.
- Crowd-pleasing flavors: The sweet and savory combo works for kids and adults alike. My picky eater niece even asked for seconds last time she visited.
- Healthy-ish without trying too hard: You get lean protein and green vegetables in one dish. It feels good without feeling like a chore.
What makes this version different from the dozens of honey garlic chicken recipes out there? It’s the balance. The sauce isn’t too sweet or too salty. The chicken stays tender because you don’t overcook it. And the broccoli gets that perfect char without turning into mush. I’ve made this for friends who claimed they didn’t like broccoli, and they went back for more. That’s the kind of recipe magic you can’t fake.
This isn’t just another weeknight dinner. It’s the kind of meal that makes you close your eyes after the first bite and think, “Yeah, I could eat this every week.” And honestly? You probably will.
What Ingredients You Will Need
This recipe uses simple, wholesome ingredients that work together to create something greater than the sum of their parts. Most of these are pantry staples, which makes this dish perfect for those nights when you need dinner to happen without a trip to the store.
For the Chicken
- 1.5 pounds boneless, skinless chicken breasts (or thighs if you prefer dark meat) — cut into bite-sized pieces. I like using chicken breasts for a leaner option, but thighs stay juicier if you’re prone to overcooking.
- 2 tablespoons cornstarch — this helps create that light coating that grabs onto the sauce beautifully. You can substitute arrowroot powder if needed.
- 1/2 teaspoon salt — I use fine sea salt for even seasoning.
- 1/4 teaspoon black pepper — freshly ground if you have it.
- 2 tablespoons avocado oil (or any neutral oil with a high smoke point) — for searing the chicken without burning.
For the Sauce
- 1/3 cup honey — use a runny, good-quality honey. Local honey adds a nice floral note if you can find it.
- 1/4 cup low-sodium soy sauce — I recommend Kikkoman or San-J for consistent flavor. Tamari works great for a gluten-free option.
- 4 cloves garlic, minced — fresh garlic is non-negotiable here. The pre-minced stuff in a jar just doesn’t hit the same.
- 1 tablespoon rice vinegar — adds a touch of acidity to balance the sweetness. Apple cider vinegar works in a pinch.
- 1 teaspoon sesame oil — optional but highly recommended for that subtle nutty depth.
- 1/2 teaspoon red pepper flakes — skip this if you’re sensitive to heat, but I love the tiny kick it adds.
- 1 tablespoon water — helps thin the sauce slightly for even coating.
For the Broccoli
- 3 cups broccoli florets — about one large head of broccoli. Cut them into similar-sized pieces so they cook evenly.
- 1 tablespoon avocado oil — for roasting the broccoli right in the same pan.
- Pinch of salt — just a little to bring out the flavor.
For Garnish (Optional)
- Sesame seeds — for that restaurant-style finishing touch.
- Sliced green onions — adds freshness and color.
One thing I’ve learned through trial and error: don’t skip the cornstarch. It might seem like an extra step, but it makes a real difference in how the sauce clings to the chicken. Without it, you end up with a watery sauce that runs off instead of coating each piece.
Equipment Needed
You don’t need much for this one-pan wonder. Here’s what I use every time:
- A large skillet or frying pan — 12-inch is ideal. Cast iron works beautifully for that nice sear, but a good non-stick pan will also do the job. I’ve used my trusty Lodge cast iron for years, and it just gets better with age.
- A sharp chef’s knife — for cutting the chicken and broccoli into uniform pieces. A dull knife makes everything harder and less safe.
- Cutting board — preferably one you can dedicate to raw meat prep.
- Measuring spoons — for the sauce ingredients. I keep a set specifically for liquids to avoid cross-contamination.
- A small bowl — for whisking the sauce together before adding it to the pan.
- Tongs — for flipping the chicken and tossing everything together. Silicone-tipped tongs won’t scratch your non-stick pans.
- A wooden spoon or spatula — for stirring the sauce as it thickens.
If you don’t have a cast iron skillet, don’t worry. A regular stainless steel or non-stick pan works perfectly. The key is making sure it’s large enough to hold everything in a single layer — overcrowding leads to steaming instead of searing, and you lose that golden brown crust.
I’ve made this recipe in a cheap non-stick pan from the grocery store and it turned out just fine. You don’t need fancy equipment, just a pan that heats evenly and some patience.
Preparation Method
Let me walk you through this step by step. I’ve included all the little details I wish someone had told me the first time I made this.
- Prep your ingredients first. This dish comes together fast, so you want everything ready to go. Cut the chicken into 1-inch pieces — try to keep them uniform so they cook at the same rate. Pat the chicken dry with paper towels (this is crucial for a good sear). In a small bowl, whisk together the honey, soy sauce, minced garlic, rice vinegar, sesame oil, red pepper flakes, and water. Set the sauce aside.
- Toss the chicken with cornstarch. Place the chicken pieces in a bowl, add the cornstarch, salt, and pepper. Toss until each piece is lightly coated. This thin layer helps create that beautiful golden crust and gives the sauce something to cling to. Don’t skip this step — I learned the hard way that bare chicken just doesn’t hold onto the sauce the same way.
- Heat your pan over medium-high heat. Add 2 tablespoons of avocado oil and let it get hot — you should see it shimmer slightly. Drop a piece of chicken in; if it sizzles immediately, you’re ready. Working in batches if needed (don’t overcrowd the pan), add the chicken in a single layer. Let it cook undisturbed for 3-4 minutes until the bottom is golden brown and crispy. Flip each piece and cook another 3-4 minutes until cooked through. Transfer the chicken to a plate and set aside.
- Cook the broccoli in the same pan. Add 1 tablespoon of avocado oil to the pan (still over medium-high heat). Add the broccoli florets and a pinch of salt. Cook for 3-4 minutes, stirring occasionally, until the broccoli is bright green and has some charred spots. I like mine with a little crunch — if you prefer softer broccoli, add a tablespoon of water and cover the pan for 2 minutes.
- Bring it all together. Return the cooked chicken to the pan with the broccoli. Pour the sauce over everything. Stir well to coat all the pieces. Let it cook for 1-2 minutes until the sauce thickens and becomes glossy. You’ll see it transform from a thin liquid into a sticky, caramelized coating that clings to every piece of chicken and broccoli.
- Finish and serve. Remove from heat. Sprinkle with sesame seeds and sliced green onions if you’re using them. Serve immediately over steamed rice, quinoa, or noodles.
A few things I’ve noticed after making this dozens of times: the sauce will thicken more as it cools, so don’t overcook it in the pan. And if you’re serving this with rice, start the rice before you begin cooking the chicken — it takes about the same amount of time and everything will be ready together.
Cooking Tips & Techniques
After making this recipe more times than I can count, I’ve picked up a few tricks that make a real difference. Let me share what I’ve learned the hard way so you don’t have to.
Don’t skip drying the chicken. This is the number one mistake I see. Wet chicken won’t sear properly — it’ll steam instead, and you’ll lose that golden crust. Pat those pieces dry with paper towels before you add the cornstarch. It takes ten seconds and changes everything.
Get your pan hot enough. I used to be too impatient to wait for the oil to heat up properly. The result? Pale, sad chicken that stuck to the pan. Give it a full 2-3 minutes over medium-high heat before adding the chicken. You want that immediate sizzle when the meat hits the pan.
Watch the garlic. Fresh garlic burns fast. I add it to the sauce rather than sautéing it directly in the pan. This way it cooks gently in the liquid without turning bitter. Trust me on this — burnt garlic ruins an entire dish.
Use low-sodium soy sauce. Regular soy sauce plus honey creates a sauce that’s way too salty. Low-sodium gives you control over the seasoning. You can always add more salt at the end if needed.
Let the sauce bubble. When you add the sauce to the pan, let it come to a full boil before reducing the heat. That bubbling action helps it thicken and caramelize properly. You’ll see it go from watery to glossy in about a minute.
Multitask strategically. While the chicken cooks, you can prep any sides or garnishes. I like to steam some rice or cook noodles while the chicken is searing. Everything comes together at the same time, and dinner is on the table in twenty minutes flat.
One failure I’ll never forget: I once made this with frozen broccoli because I thought it would save time. It turned into mushy, watery chaos. Fresh broccoli is worth the extra minute of chopping. The texture difference is night and day.
Variations & Adaptations
This recipe is incredibly flexible. Here are some ways I’ve adapted it depending on what I have in the kitchen or who I’m cooking for:
Make it spicy: Double the red pepper flakes or add a teaspoon of sriracha to the sauce. I’ve also thrown in some sliced fresh chili peppers for extra heat. My husband loves this version — I call it “honey garlic with a kick.”
Swap the protein: Chicken thighs work beautifully here (they stay juicier). You can also use shrimp — just reduce the cooking time to 2-3 minutes per side. I’ve even made this with cubed firm tofu for a vegetarian option. Press the tofu first to remove excess moisture, then follow the same cornstarch coating method.
Change the vegetables: Broccoli is classic, but this sauce works with so many veggies. Try snap peas, bell peppers, snow peas, or asparagus. Adjust the cooking time based on what you’re using — harder vegetables like carrots need a few extra minutes.
Gluten-free option: Use tamari or coconut aminos instead of soy sauce, and make sure your cornstarch is certified gluten-free. Everything else in the recipe is naturally gluten-free.
Low-carb version: Skip the cornstarch coating (or use almond flour) and serve over cauliflower rice or zucchini noodles. The sauce itself is relatively low in carbs if you use a sugar-free honey substitute.
Add more flavor: A teaspoon of grated fresh ginger in the sauce adds a wonderful warmth. I also love adding a splash of orange juice for a citrusy twist — it brightens up the whole dish.
My personal favorite variation? I add a handful of cashews at the end for crunch. The combination of tender chicken, crisp broccoli, sticky sauce, and crunchy nuts is absolutely addictive.
Serving & Storage Suggestions
This dish is best served hot, straight from the pan. The sauce is at its glossiest and most flavorful right after cooking. Here’s how I like to serve it:
Serving temperature: Serve immediately while the chicken is hot and the broccoli is still bright green. The sauce will start to thicken as it cools, so don’t let it sit too long.
What to serve with it: Steamed jasmine rice is my go-to — it soaks up all that extra sauce beautifully. Brown rice, quinoa, or noodles also work well. For a lighter option, try serving it over a bed of fresh spinach or mixed greens. I’ve also stuffed it into lettuce wraps for a low-carb lunch.
Complementary dishes: This pairs nicely with a simple cucumber salad or some steamed edamame. If you’re feeling fancy, a side of honey garlic glazed salmon would make an impressive surf-and-turf combo. For a complete meal, I sometimes add a bowl of one-pot ramen with a soft egg on the side.
Storage: Leftovers keep well in an airtight container in the refrigerator for up to 3 days. The flavors actually meld together overnight, making it even better the next day for lunch.
Reheating: The best way to reheat is in a skillet over medium heat with a splash of water or chicken broth. This helps revive the sauce and prevents the chicken from drying out. Microwave works in a pinch, but the texture won’t be as good — the chicken can get rubbery and the broccoli might turn mushy.
Freezer instructions: You can freeze this dish for up to 2 months. Let it cool completely, then transfer to a freezer-safe container. Thaw overnight in the refrigerator before reheating. The broccoli will be softer after freezing, so if that bothers you, consider adding fresh broccoli when reheating.
One thing I’ve noticed: the sauce continues to develop flavor as it sits. Day-old leftovers often taste even better than the fresh version. The honey and garlic meld together into something deeper and more complex.
Nutritional Information & Benefits
Here’s a rough estimate of the nutritional breakdown per serving (based on 4 servings, served without rice):
| Nutrient | Amount Per Serving |
|---|---|
| Calories | 385 |
| Protein | 38g |
| Carbohydrates | 28g |
| Fat | 14g |
| Saturated Fat | 2g |
| Fiber | 4g |
| Sugar | 20g |
| Sodium | 680mg |
Health benefits: Chicken breast is a fantastic source of lean protein, which helps keep you full and supports muscle maintenance. Broccoli is packed with vitamin C, fiber, and antioxidants — it’s one of those vegetables that genuinely earns its superfood reputation. Garlic has anti-inflammatory properties and may support immune health. Honey provides natural energy, though it’s still sugar, so moderation is key.
Dietary considerations: This recipe is dairy-free and nut-free (unless you add cashews). For a gluten-free version, use tamari instead of soy sauce. It’s also relatively low in saturated fat compared to many weeknight dinner options.
Potential allergens: Soy (from soy sauce). If you have a soy allergy, coconut aminos are a great substitute.
Personally, I love that this meal feels indulgent while still being reasonably healthy. It’s the kind of dinner that satisfies a takeout craving without the guilt or the delivery fee.
Conclusion
This one-pan honey garlic chicken and broccoli has become my emergency dinner, my go-to for busy weeknights, and the meal I make when I need to feel like I’ve got my life together. It’s proof that you don’t need complicated techniques or exotic ingredients to make something genuinely delicious.
What I love most about this recipe is how forgiving it is. You can tweak the sauce to your taste, swap in whatever vegetables you have on hand, and it still turns out great. It’s the kind of recipe that builds confidence in the kitchen — after you make it once, you’ll start experimenting and making it your own.
I’d love to hear how this turns out for you. Did you add extra spice? Serve it over noodles? Make it for a crowd? Drop a comment below and let me know your favorite variation. And if you’re looking for more quick and easy dinner ideas, check out this slow cooker garlic parmesan chicken thighs recipe or this creamy crockpot marry me chicken for those nights when you want dinner to cook itself.
Happy cooking, friends. Go make something delicious tonight.
Frequently Asked Questions
Can I use frozen chicken for this recipe?
I don’t recommend it. Frozen chicken releases too much water as it cooks, which prevents that golden sear you’re looking for. Thaw your chicken completely in the refrigerator overnight, then pat it dry before cooking. The texture and flavor are significantly better.
What if I don’t have cornstarch?
You can use arrowroot powder or potato starch as a direct substitute in the same amount. All-purpose flour also works in a pinch, though the coating won’t be as light and crispy. Just toss the chicken with flour instead of cornstarch before cooking.
How do I keep the broccoli from getting soggy?
The key is not overcooking it. Cook the broccoli just until it turns bright green and gets some char marks — about 3-4 minutes. If you like it softer, add a splash of water and cover the pan for 1-2 minutes, but watch it closely. Overcooked broccoli turns mushy and loses its vibrant color.
Can I double this recipe?
Absolutely, but you’ll need to cook in batches. Don’t overcrowd the pan — the chicken needs space to sear properly. Cook the chicken in two batches, then add all of it back to the pan with the sauce at the end. The broccoli can be cooked in one batch if your pan is large enough.
What can I use instead of honey?
Maple syrup or brown sugar work well as substitutes. Maple syrup will give a slightly different flavor profile — more woodsy and complex. Brown sugar will make the sauce thicker and more caramel-like. For a sugar-free option, try monk fruit sweetener or a sugar-free honey substitute.
Pin This Recipe!
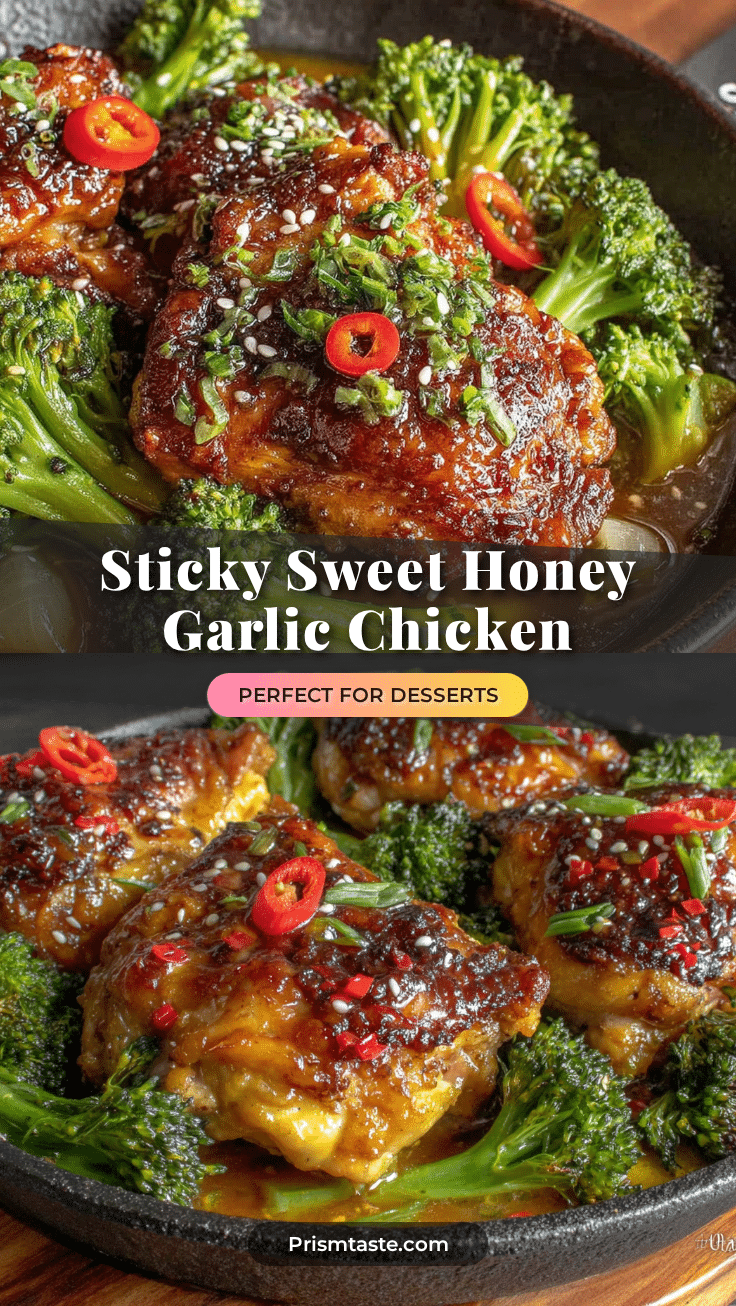
Easy One-Pan Honey Garlic Chicken and Broccoli: 20-Minute Weeknight Dinner
A quick and satisfying one-pan meal featuring juicy chicken and tender-crisp broccoli in a sticky honey garlic sauce. Ready in just 20 minutes with minimal cleanup, this crowd-pleasing recipe uses simple pantry ingredients for a healthy-ish weeknight dinner.
- Prep Time: 10 minutes
- Cook Time: 10 minutes
- Total Time: 20 minutes
- Yield: 4 servings 1x
- Category: Main Course
- Cuisine: Asian-inspired
Ingredients
- 1.5 pounds boneless, skinless chicken breasts (or thighs), cut into bite-sized pieces
- 2 tablespoons cornstarch
- 1/2 teaspoon fine sea salt
- 1/4 teaspoon freshly ground black pepper
- 2 tablespoons avocado oil (or neutral oil with high smoke point)
- 1/3 cup honey
- 1/4 cup low-sodium soy sauce
- 4 cloves garlic, minced
- 1 tablespoon rice vinegar
- 1 teaspoon sesame oil (optional)
- 1/2 teaspoon red pepper flakes
- 1 tablespoon water
- 3 cups broccoli florets (about 1 large head)
- 1 tablespoon avocado oil
- Pinch of salt
- Sesame seeds for garnish (optional)
- Sliced green onions for garnish (optional)
Instructions
- Prep your ingredients first. Cut chicken into 1-inch pieces and pat dry with paper towels. In a small bowl, whisk together honey, soy sauce, minced garlic, rice vinegar, sesame oil, red pepper flakes, and water. Set aside.
- Place chicken pieces in a bowl, add cornstarch, salt, and pepper. Toss until each piece is lightly coated.
- Heat a large skillet (12-inch) over medium-high heat. Add 2 tablespoons avocado oil and let it get hot until shimmering. Add chicken in a single layer (work in batches if needed). Cook undisturbed for 3-4 minutes until golden brown, then flip and cook another 3-4 minutes until cooked through. Transfer to a plate.
- In the same pan, add 1 tablespoon avocado oil over medium-high heat. Add broccoli florets and a pinch of salt. Cook for 3-4 minutes, stirring occasionally, until bright green with charred spots.
- Return cooked chicken to the pan with broccoli. Pour sauce over everything and stir well. Cook for 1-2 minutes until sauce thickens and becomes glossy.
- Remove from heat. Sprinkle with sesame seeds and sliced green onions if desired. Serve immediately over steamed rice, quinoa, or noodles.
Notes
Don’t skip drying the chicken for a good sear. Add garlic to the sauce rather than sautéing to prevent burning. Use low-sodium soy sauce to control saltiness. Let sauce bubble to thicken properly. Fresh broccoli is recommended over frozen for best texture. Sauce thickens more as it cools.
Nutrition
- Serving Size: 1 serving (without r
- Calories: 385
- Sugar: 20
- Sodium: 680
- Fat: 14
- Saturated Fat: 2
- Carbohydrates: 28
- Fiber: 4
- Protein: 38
Keywords: honey garlic chicken, one-pan dinner, weeknight dinner, quick chicken recipe, broccoli recipe, 20-minute meal, easy dinner


