That first sharp crack of a candy cane breaking — the kind that sends tiny shards of peppermint skittering across the counter — still takes me straight to my aunt’s tiny kitchen the Christmas I turned twelve. She had this way of making everything feel like a celebration, even the hot chocolate she’d pour into mismatched mugs, each one chipped in a different spot. I remember watching her stir in a splash of vanilla, then drop a homemade marshmallow on top that bobbed like a little cloud. I didn’t know it then, but that night was the start of my obsession with building the ultimate hot cocoa bar.
Years later, I still chase that feeling. Not the exact recipe, but the way the whole room smelled like chocolate and mint, and how everyone got to pick their own toppings from a little tray she’d set out. It wasn’t fancy — just crushed candy canes, some whipped cream, and those marshmallows she’d made the night before. But it felt special. And honestly, that’s what this Ultimate Hot Cocoa Bar with Peppermint Marshmallows is all about. It’s not just a drink. It’s a whole experience you can set up in under an hour.
This isn’t one of those fussy recipes that requires a dozen specialty ingredients. The hot cocoa base is rich and creamy, made with real milk and dark cocoa powder, while the peppermint marshmallows are surprisingly simple to pull off — no candy thermometer needed, I promise. You get that satisfying homemade touch without the stress. I’ve tweaked this setup over countless holiday parties, and it never fails to get people hovering around the table, layering their mugs with all the fixings. It’s the kind of thing that makes a cold night feel warm, and a gathering feel like a real memory in the making.
Why You’ll Love This Recipe
Look, I’ve tested a lot of hot cocoa setups over the years. Some were too complicated, others just fell flat in flavor. This one? It’s the Goldilocks of hot cocoa bars — just right in every way. Here is why this one works so well:
- Comes together in under an hour — The marshmallows need about 20 minutes of hands-on time, and the cocoa base takes maybe 10. Perfect for last-minute holiday entertaining or a cozy weekend project with the kids.
- Simple, real ingredients — No powdered mixes or artificial flavorings here. You likely have most of the cocoa bar items in your pantry already. The marshmallows use gelatin, sugar, corn syrup, and peppermint extract — all easy to find.
- Perfect for holiday gatherings — Whether it’s a Christmas party, a New Year’s Eve cozy night in, or just a snowy Sunday, this setup makes any occasion feel festive. It is also a fantastic activity for DIY snack boxes — just portion out the toppings into little containers for a make-your-own treat.
- Always a crowd-pleaser — I’ve served this to kids, adults, and even picky in-laws. Everyone loves building their own mug. The peppermint marshmallows get the most compliments — people can’t believe they’re homemade.
- Unbelievably delicious — The combination of rich, dark hot cocoa with the cool, crisp hit of peppermint and the pillowy softness of a fresh marshmallow is next-level comfort. It’s the kind of drink that makes you close your eyes after the first sip.
What makes this recipe different from the rest is the marshmallow technique. Most homemade marshmallow recipes require a candy thermometer and precise timing. My version uses a simple stand mixer method that works every time, even if you’ve never made candy before. The peppermint flavor is subtle enough to not overpower the chocolate, but present enough to feel like a special holiday treat. It’s comfort food reimagined — homemade, but totally doable on a busy weeknight.
What Ingredients You Will Need
This recipe uses simple, wholesome ingredients to deliver bold flavor and satisfying texture without the fuss. Most of these are pantry staples, but I’ve included a few notes to help you pick the best versions. Let’s break it down by component.
For the Peppermint Marshmallows
- Unflavored gelatin (3 packets, about 3 tablespoons) — This is what gives marshmallows their signature bounce. I use Knox brand, but any unflavored gelatin works. Do not substitute with flavored gelatin or agar agar — the texture will be different.
- Cold water (1/2 cup, divided) — You’ll use half to bloom the gelatin and half to dissolve the sugar. Make sure it’s cold, not room temperature, for best results.
- Granulated sugar (2 cups) — Regular white sugar is best. Do not use brown sugar or coconut sugar — they change the texture and color.
- Light corn syrup (1/2 cup) — This prevents crystallization and keeps the marshmallows soft. I know some people avoid corn syrup, but it really is essential here. You can try honey or agave in a pinch, but the texture won’t be as fluffy.
- Salt (1/4 teaspoon) — Just a pinch to balance the sweetness.
- Peppermint extract (1 teaspoon) — Use pure peppermint extract, not mint extract or peppermint oil. The flavor is cleaner and more authentic. I prefer the brand Simply Organic.
- Powdered sugar (1/2 cup, for dusting) — This keeps the marshmallows from sticking together. You can also use a mix of powdered sugar and cornstarch if you like.
- Crushed candy canes (1/4 cup, optional but recommended) — For that festive look and extra crunch on the outside. You can buy pre-crushed candy canes or crush your own in a zip-top bag with a rolling pin.
For the Hot Cocoa Base
- Whole milk (4 cups) — Whole milk gives the richest, creamiest texture. You can use 2% or oat milk in a pinch, but avoid skim milk — it turns watery. For a dairy-free version, use full-fat oat milk or canned coconut milk (the kind in a can, not the carton).
- Heavy cream (1 cup) — This adds luxurious richness. You can substitute with half-and-half, but the cocoa won’t be as thick.
- Unsweetened cocoa powder (1/2 cup) — I use Dutch-processed cocoa for a smoother, less acidic flavor. Ghirardelli or Valrhona are my go-to brands. Natural cocoa powder works too, but the flavor will be slightly more bitter.
- Dark chocolate (4 ounces, chopped) — This is the secret to a truly decadent hot cocoa. Use a bar with 60-70% cocoa content. I love Lindt or Guittard. Do not use chocolate chips — they contain stabilizers that prevent smooth melting.
- Granulated sugar (1/4 cup, or to taste) — Adjust based on the sweetness of your chocolate. Start with 1/4 cup and add more if needed.
- Vanilla extract (1 teaspoon) — Pure vanilla extract, not imitation. It rounds out the chocolate flavor beautifully.
- Pinch of salt — Just a tiny bit to enhance all the flavors.
For the Toppings Bar
- Whipped cream — Homemade is best, but store-bought works in a pinch. If making your own, whip 1 cup of heavy cream with 2 tablespoons of powdered sugar and 1/2 teaspoon of vanilla until soft peaks form.
- Crushed candy canes (1/2 cup) — For sprinkling on top.
- Chocolate shavings or curls — Use a vegetable peeler on a chocolate bar for pretty curls.
- Mini chocolate chips — They melt slightly into the hot cocoa for extra chocolatey goodness.
- Caramel sauce or chocolate syrup — For drizzling.
- Mini marshmallows (store-bought, optional) — Some people like the contrast of tiny marshmallows with the big homemade ones.
- Sea salt flakes — For a salted caramel vibe.
- Cinnamon sticks or peppermint stirrers — For stirring and flavoring.
Equipment Needed
You don’t need a fancy kitchen to pull this off. Here is what you will need:
- Stand mixer with whisk attachment — This is non-negotiable for the marshmallows. You need the power to whip the gelatin mixture for 10-12 minutes. A hand mixer can work, but it will take longer and your arm might get tired.
- Medium saucepan — For heating the milk and cream for the cocoa base.
- Small saucepan — For cooking the sugar syrup for the marshmallows.
- Candy thermometer (optional but helpful) — My recipe doesn’t require one, but if you have it, you can use it to ensure the sugar syrup reaches 240°F (soft ball stage).
- 8×8-inch baking pan — For setting the marshmallows. Line it with parchment paper for easy removal.
- Pizza cutter or sharp knife — For cutting the marshmallows. A pizza cutter works best — it doesn’t stick as much.
- Large mugs or heatproof glasses — For serving. Clear glasses show off the layers of cocoa and toppings.
- Small bowls and spoons — For setting up the toppings bar.
- Whisk or immersion blender — For combining the cocoa base smoothly.
I’ve made these marshmallows with a cheap hand mixer before, and honestly, it was a workout. If you’re planning to make them regularly, a stand mixer is worth the investment. You can find decent ones for under $100 these days.
Preparation Method
Step 1: Make the Peppermint Marshmallows (20 minutes active, 4 hours setting)
First, line your 8×8-inch pan with parchment paper, leaving some overhang on two sides. This makes lifting the marshmallows out later super easy. Lightly spray the parchment with non-stick cooking spray, then dust it with powdered sugar. Set aside.
In the bowl of your stand mixer, sprinkle the 3 packets of gelatin over 1/4 cup of the cold water. Let it sit for about 5 minutes — it will look like a thick, rubbery mass. That is normal. Do not skip this blooming step.
While the gelatin blooms, combine the remaining 1/4 cup cold water, the 2 cups of granulated sugar, and the 1/2 cup of corn syrup in a small saucepan. Stir gently to combine, then place over medium heat. Bring the mixture to a boil without stirring. Once it reaches a rolling boil, let it cook for about 4 minutes. If you are using a candy thermometer, you are aiming for 240°F (soft ball stage). If you don’t have one, watch for the bubbles to become thick and syrupy — they should look like slow, lazy bubbles.
Carefully pour the hot sugar syrup into the bowl with the bloomed gelatin. Start the mixer on low speed, then gradually increase to high. Whip for 10-12 minutes, until the mixture is thick, glossy, and white. It should hold stiff peaks — when you lift the whisk, the marshmallow should stand up without drooping.
Add the peppermint extract and salt, and mix for another 30 seconds to combine. The mixture will be very sticky and marshmallowy.
Pour the marshmallow mixture into the prepared pan. Use an offset spatula lightly sprayed with cooking spray to spread it evenly. It doesn’t need to be perfect — just try to get it into the corners. Let it sit at room temperature, uncovered, for at least 4 hours, or overnight. Do not refrigerate — it needs to set at room temperature.
Step 2: Cut and Coat the Marshmallows (10 minutes)
Once the marshmallows are set, dust a cutting board with powdered sugar. Lift the marshmallow block out of the pan using the parchment paper overhang. Peel off the paper and place the block on the cutting board. Dust the top with more powdered sugar.
Using a pizza cutter or sharp knife, cut the marshmallows into 1-inch squares. Dip the cutter in powdered sugar between cuts to prevent sticking. If you want them to look rustic, you can just tear them — they don’t need to be perfect.
In a small bowl, mix the remaining powdered sugar with the crushed candy canes. Toss each marshmallow in the mixture to coat all sides. This prevents them from sticking together and adds that festive peppermint crunch. Store in an airtight container at room temperature for up to 2 weeks.
Step 3: Prepare the Hot Cocoa Base (10 minutes)
In a medium saucepan, combine the whole milk and heavy cream. Heat over medium heat until it is steaming but not boiling — you should see small bubbles around the edges, but no rolling boil. Whisk occasionally to prevent a skin from forming.
Whisk in the cocoa powder and sugar until completely smooth. There should be no lumps. Add the chopped dark chocolate and continue whisking until it is fully melted and the mixture is silky. This takes about 2-3 minutes.
Remove from heat and stir in the vanilla extract and a pinch of salt. Taste and adjust sweetness if needed. Keep warm over low heat until ready to serve. If it thickens too much, add a splash of milk to thin it out.
Step 4: Set Up the Hot Cocoa Bar (5 minutes)
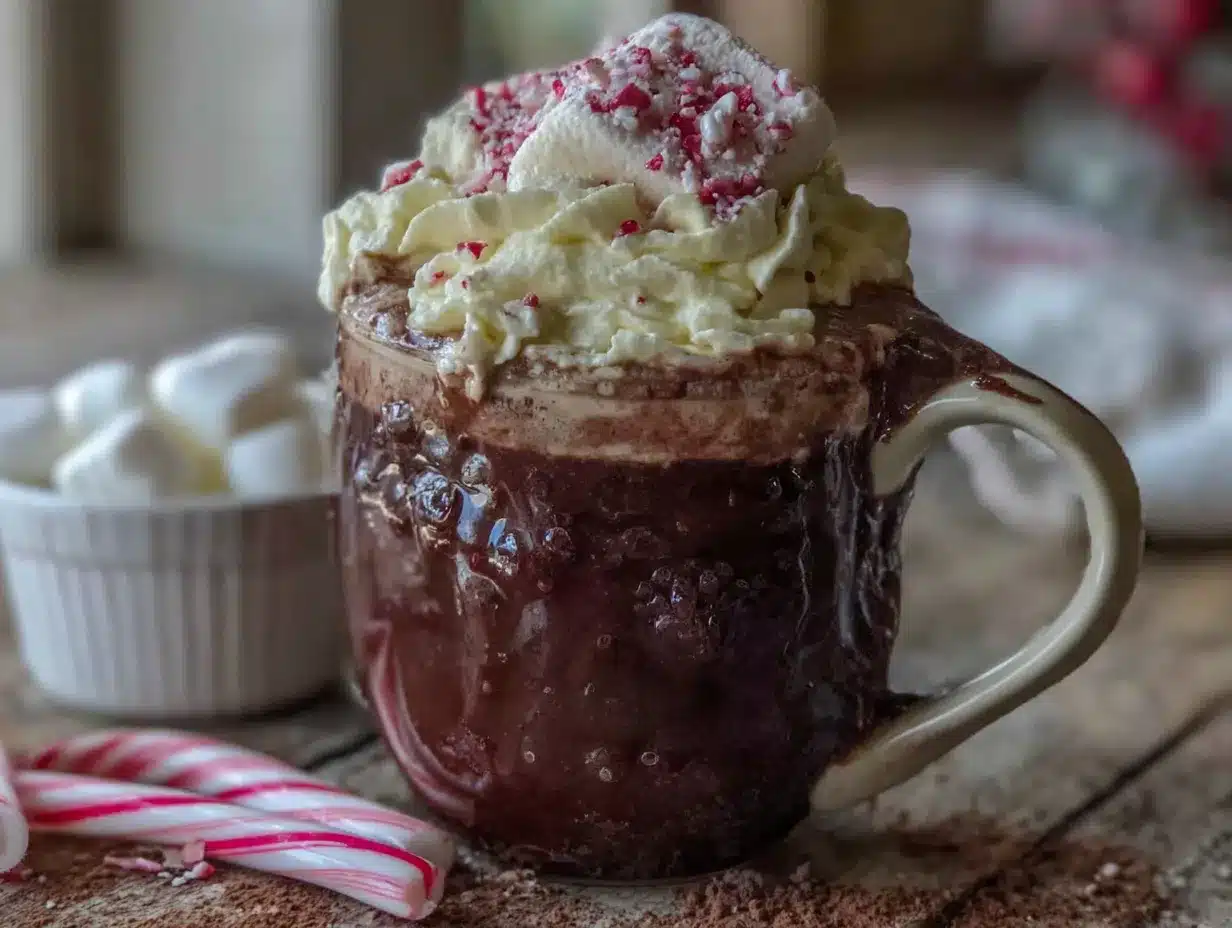
Pour the hot cocoa into a large thermos or a slow cooker set to warm. Arrange the toppings in small bowls: the peppermint marshmallows, whipped cream, crushed candy canes, chocolate shavings, mini chocolate chips, caramel sauce, and any other toppings you like. Provide spoons and tongs for serving.
Set out the mugs and let everyone build their own creation. I like to suggest a layering order: a spoonful of whipped cream, a sprinkle of crushed candy cane, a big peppermint marshmallow, and a drizzle of caramel. But honestly, half the fun is letting people experiment.
Cooking Tips & Techniques
I have made these marshmallows at least a dozen times, and I have definitely had my share of failures. Here are the lessons I learned the hard way:
Don’t rush the whipping time. The first time I made marshmallows, I stopped whipping after 7 minutes because I thought it looked done. It was still runny and never set properly. You need the full 10-12 minutes. The mixture should look like marshmallow fluff — thick, glossy, and holding its shape. When you lift the whisk, it should form a ribbon that sits on top of the mixture for a few seconds before sinking back in.
Humidity is your enemy. Marshmallows are basically sugar candy, and sugar hates humidity. If you are making these on a rainy or humid day, they might not set as firmly. Try to pick a dry day, or run a dehumidifier in your kitchen for a few hours before starting.
Oil your tools. The marshmallow mixture is incredibly sticky. Lightly spray your spatula, pizza cutter, and even your hands with non-stick cooking spray before handling it. It makes a world of difference.
For the cocoa base, low and slow wins. Do not boil the milk mixture. High heat can scorch the milk and give the cocoa a burnt, unpleasant flavor. Keep it at a gentle simmer. If you see steam rising and small bubbles around the edges, you are at the right temperature.
Make the marshmallows a day ahead. They actually get better after a day or two — the texture firms up and the peppermint flavor mellows and blends. Plus, it is one less thing to do on party day. I often make them two days before and store them in an airtight container.
Double the marshmallow recipe if you are serving a crowd. One batch makes about 36 1-inch marshmallows, which is plenty for 6-8 servings. But if you have a big party, people will eat these like candy. I usually make a double batch and freeze half.
Variations & Adaptations
One of the best things about this hot cocoa bar is how customizable it is. Here are some variations I have tried and loved:
Dairy-Free Version: Swap the whole milk and heavy cream for full-fat oat milk and canned coconut cream. The coconut cream adds a subtle tropical note that actually pairs beautifully with chocolate. Use dairy-free dark chocolate. The marshmallows are naturally dairy-free, so no changes needed there.
Spiked Hot Cocoa: For an adult version, add a shot of peppermint schnapps, crème de menthe, or bourbon to each mug. I like a combination of peppermint schnapps and a splash of Kahlua for a boozy twist. Just make sure to label the pitcher clearly if kids are around.
White Chocolate Peppermint Cocoa: Replace the dark chocolate with white chocolate and use white cocoa powder (or just skip the cocoa powder altogether). The result is a creamy, sweet, peppermint-forward drink that tastes like a melted candy cane. Top with crushed candy canes and a dollop of whipped cream.
Mexican Hot Chocolate Bar: Add a cinnamon stick, a pinch of cayenne pepper, and a dash of nutmeg to the cocoa base. Offer toppings like cinnamon-sugar, chili powder, and a drizzle of honey. It is a completely different flavor profile but just as cozy.
Marshmallow Flavor Swaps: Skip the peppermint extract and try vanilla bean paste, almond extract, or even a splash of orange extract for a chocolate-orange combo. You can also fold in mini chocolate chips or crushed freeze-dried raspberries before pouring the marshmallow mixture into the pan.
Low-Sugar Option: Use a sugar substitute like monk fruit sweetener in the cocoa base. For the marshmallows, you can try a sugar-free marshmallow recipe, but honestly, the texture is never quite the same. I would recommend just making the cocoa lower in sugar and enjoying the marshmallows as a treat.
Serving & Storage Suggestions
This hot cocoa bar is best served warm, right after you set it up. The cocoa should be steaming hot, and the marshmallows should be at room temperature — they will start to soften and melt as soon as they hit the hot liquid, which is exactly what you want.
For presentation, I like to use clear glass mugs so you can see the layers of cocoa, whipped cream, and marshmallow. It looks especially pretty when you drizzle caramel sauce down the inside of the glass before pouring the cocoa. If you are serving a crowd, set up the toppings bar on a large tray or cutting board with small bowls and labels. It makes the whole thing feel like a professional hot chocolate station.
Storage: The marshmallows will keep in an airtight container at room temperature for up to 2 weeks. Do not refrigerate them — they will get sticky and lose their texture. If you live in a humid climate, toss them in a bit more powdered sugar every few days to keep them from sticking together. You can also freeze them for up to 3 months. Just layer them between sheets of parchment paper in a freezer-safe container.
Reheating: The hot cocoa base can be made ahead and stored in the refrigerator for up to 3 days. Reheat it gently on the stovetop over low heat, whisking occasionally. You can also reheat individual servings in the microwave — about 1 minute for a standard mug. If it has thickened, add a splash of milk to thin it out.
Flavor Development: The marshmallows actually taste better after a day or two. The peppermint flavor mellows and blends with the sweetness, and the texture becomes perfectly chewy. I always try to make them at least 24 hours before I plan to serve them.
If you are looking for other cozy drink ideas, you might enjoy this spicy miso ramen for a savory, warming option, or these quick microwave mug mac and cheese for a cheesy comfort food fix.
Nutritional Information & Benefits
Here is the estimated nutritional breakdown for one serving of hot cocoa with one peppermint marshmallow (no additional toppings):
- Calories: 320
- Fat: 18g
- Saturated Fat: 11g
- Carbohydrates: 38g
- Sugar: 32g
- Protein: 7g
- Calcium: 15% of daily value
- Iron: 10% of daily value
While this is definitely a treat, it does offer some nutritional benefits. The dark chocolate is rich in antioxidants called flavonoids, which can support heart health. The milk provides calcium and vitamin D for bone health. And the gelatin in the marshmallows is a good source of collagen, which supports skin and joint health.
If you are watching your sugar intake, you can use a sugar substitute in the cocoa base or reduce the amount of chocolate. The marshmallows are harder to lighten up, but you can always skip them and just use a dollop of whipped cream instead. This recipe is naturally gluten-free and nut-free, but always check your labels if you have allergies.
I personally love that this treat feels indulgent but uses real, whole ingredients. It is a far cry from those powdered packets with artificial flavors and preservatives. When I serve this to my family, I feel good knowing exactly what went into it.
Conclusion
This Ultimate Hot Cocoa Bar with Peppermint Marshmallows is more than just a recipe — it is a whole experience. It is the kind of thing that turns an ordinary winter evening into a cozy memory. The rich, dark cocoa, the pillowy homemade marshmallows with that cool peppermint kick, and the fun of building your own mug — it is comfort in a cup.
I love this recipe because it is forgiving. You can tweak the toppings, swap the flavors, and make it your own. Maybe you add a pinch of cinnamon or a drizzle of salted caramel. Maybe you skip the marshmallows and load up on whipped cream and chocolate shavings. There is no wrong way to do it. That is the beauty of a hot cocoa bar — it adapts to whoever is drinking it.
I would love to hear how your hot cocoa bar turns out. Did you try any fun toppings? Did the marshmallows come out perfectly? Drop a comment below and let me know. And if you share a photo on social media, tag me — I always love seeing your creations. Until next time, stay warm and keep sipping something delicious.
Frequently Asked Questions
Can I make the marshmallows without a stand mixer?
Yes, you can use a hand mixer, but it will take longer — about 15-18 minutes of whipping. Your arm might get tired, and the texture might not be quite as fluffy. A stand mixer really is the best tool for the job.
Why did my marshmallows turn out too sticky?
Sticky marshmallows usually mean they were not dusted with enough powdered sugar, or the humidity was too high when they were setting. Make sure to coat them generously with the powdered sugar and candy cane mixture, and try to make them on a dry day.
Can I use a different extract instead of peppermint?
Absolutely! Vanilla bean paste, almond extract, or even orange extract work beautifully. If you use almond extract, start with 1/2 teaspoon — it is stronger than peppermint.
How do I crush candy canes without making a mess?
Place the candy canes in a sturdy zip-top bag and seal it. Wrap the bag in a kitchen towel, then use a rolling pin or the bottom of a heavy pan to crush them. The towel prevents the bag from breaking and keeps the mess contained.
Can I use store-bought marshmallows instead of homemade?
You can, but honestly, the homemade ones are a game-changer. They are softer, fluffier, and have a much better peppermint flavor. If you are short on time, buy large marshmallows and toss them in crushed candy canes for a quick alternative.
Pin This Recipe!

Ultimate Hot Cocoa Bar with Peppermint Marshmallows – Easy Holiday Treat

A rich and creamy hot cocoa bar with homemade peppermint marshmallows, perfect for holiday gatherings. This easy recipe comes together in under an hour and lets everyone build their own mug with a variety of toppings.
- Prep Time: 20 minutes
- Cook Time: 15 minutes
- Total Time: 4 hours 35 minutes (includes setting time)
- Yield: 6-8 servings 1x
- Category: Beverage
- Cuisine: American
Ingredients
- 3 packets unflavored gelatin (about 3 tablespoons)
- 1/2 cup cold water, divided
- 2 cups granulated sugar
- 1/2 cup light corn syrup
- 1/4 teaspoon salt
- 1 teaspoon peppermint extract
- 1/2 cup powdered sugar, for dusting
- 1/4 cup crushed candy canes (optional)
- 4 cups whole milk
- 1 cup heavy cream
- 1/2 cup unsweetened cocoa powder (Dutch-processed preferred)
- 4 ounces dark chocolate (60-70% cocoa), chopped
- 1/4 cup granulated sugar (or to taste)
- 1 teaspoon vanilla extract
- Pinch of salt
- Whipped cream (for serving)
- 1/2 cup crushed candy canes (for topping)
- Chocolate shavings or curls (for topping)
- Mini chocolate chips (for topping)
- Caramel sauce or chocolate syrup (for topping)
- Mini marshmallows (optional, for topping)
- Sea salt flakes (for topping)
- Cinnamon sticks or peppermint stirrers (for serving)
Instructions
- Line an 8×8-inch pan with parchment paper, leaving overhang. Lightly spray with non-stick spray and dust with powdered sugar. Set aside.
- In the bowl of a stand mixer, sprinkle gelatin over 1/4 cup cold water. Let bloom for 5 minutes.
- In a small saucepan, combine remaining 1/4 cup cold water, 2 cups sugar, and corn syrup. Bring to a boil over medium heat without stirring. Boil for 4 minutes (or until 240°F on a candy thermometer).
- Carefully pour hot sugar syrup into bloomed gelatin. Start mixer on low, then increase to high. Whip for 10-12 minutes until thick, glossy, and white. Add peppermint extract and salt; mix 30 seconds.
- Pour marshmallow mixture into prepared pan. Spread evenly with an oiled spatula. Let set at room temperature for at least 4 hours or overnight.
- Dust a cutting board with powdered sugar. Lift marshmallow block from pan, peel off paper, and place on board. Dust top with powdered sugar. Cut into 1-inch squares using a pizza cutter or sharp knife, dipping in powdered sugar between cuts.
- In a small bowl, mix remaining powdered sugar with crushed candy canes. Toss each marshmallow in the mixture to coat. Store in an airtight container at room temperature.
- In a medium saucepan, combine whole milk and heavy cream. Heat over medium heat until steaming but not boiling. Whisk in cocoa powder and sugar until smooth. Add chopped dark chocolate and whisk until melted and silky, about 2-3 minutes.
- Remove from heat. Stir in vanilla extract and a pinch of salt. Adjust sweetness if needed. Keep warm over low heat.
- Pour hot cocoa into a thermos or slow cooker set to warm. Arrange toppings in small bowls. Set out mugs and let everyone build their own creation.
Notes
Marshmallows can be made a day ahead for better texture. For dairy-free, use full-fat oat milk and canned coconut cream. For an adult version, add peppermint schnapps or bourbon. Store marshmallows in an airtight container at room temperature for up to 2 weeks.
Nutrition
- Serving Size: 1 mug with 1 marshma
- Calories: 320
- Sugar: 32
- Sodium: 150
- Fat: 18
- Saturated Fat: 11
- Carbohydrates: 38
- Fiber: 2
- Protein: 7
Keywords: hot cocoa, peppermint marshmallows, holiday, Christmas, hot chocolate bar, easy, homemade