The October sky had already gone dark by the time I pulled the first tray out of the oven. The kitchen light hummed low, casting long shadows across the counter, and the only sound was the faint crackle of chocolate setting on the counter. I had spent the whole afternoon working on these spooky spider cookies with crunchy chocolate legs, and honestly, I wasn’t sure they’d actually look like spiders. But there they were, eight legs each, slightly crooked, staring back at me from the cooling rack. They looked ridiculous. And perfect.
That night, I ate one standing over the sink, and something clicked. These weren’t just Halloween cookies. They were the kind of treat that makes you laugh out loud when you pull them out of the tin. The kind your niece will text you about the next day, asking if you can make them for the school party. I’ve made a lot of cookies over the years, but these spooky spider cookies with crunchy chocolate legs have a personality all their own. They’re not trying to be fancy. They’re just trying to be fun.
And honestly, that’s exactly what Halloween baking should be.
Why You’ll Love This Recipe
I’ve tested this recipe four times to get the chocolate legs just right. The first batch had legs that snapped off too easily. The second batch had legs that were too thick. The third batch? That one had legs that looked more like melted puddles. But the fourth batch was the one. I finally figured out the right chocolate-to-timing ratio, and now these spooky spider cookies with crunchy chocolate legs are officially foolproof.
- No Special Molds Needed : You don’t need a spider-shaped cookie cutter or any fancy equipment. Just your hands, some chocolate, and a little patience.
- Kid-Friendly Fun : My nephew helped me pipe the legs on the last batch, and let’s just say his spiders had a very unique look. That’s the beauty of this recipe, imperfections make them better.
- Perfect for Halloween Parties : These are the cookies that disappear first from the dessert table. People can’t resist picking one up and counting the legs.
- Crunchy and Satisfying : The chocolate legs snap when you bite into them, and the soft cookie base gives you that perfect contrast. It’s texture heaven.
- Make-Ahead Friendly : You can prep the cookie dough a day early and bake them fresh the day of your party. The legs hold up beautifully in an airtight container.
What makes these spooky spider cookies with crunchy chocolate legs different from other Halloween cookies I’ve tried is the leg technique. Most recipes use pretzel sticks, which get soggy after a day. But using chocolate that sets firm gives you that satisfying snap every single time. It’s a small detail, but it makes a big difference when you’re biting into one at midnight.
This is the kind of cookie that makes you feel like a kitchen wizard, even if you’re just a regular person who wants to make something fun for the kids. Or for yourself. No judgment here.
What Ingredients You Will Need
This recipe uses simple, everyday ingredients that you probably already have in your pantry. The magic happens in how you put them together. Each ingredient plays a specific role in making these spooky spider cookies with crunchy chocolate legs taste as good as they look.
- All-Purpose Flour (2 cups / 240g) – This gives the cookies their structure. I use Gold Medal or King Arthur for consistent results. Spoon and level your flour, don’t scoop directly from the bag, or you’ll end up with dense cookies.
- Unsalted Butter (1 cup / 226g, softened) – Butter adds richness and helps the cookies spread just enough. Make sure it’s truly softened, not melted. If you forget to take it out early, cut it into small cubes and let it sit for 15 minutes.
- Granulated Sugar (3/4 cup / 150g) – For sweetness and that slight crisp edge on the cookies.
- Brown Sugar (1/2 cup / 100g, packed) – This adds moisture and a hint of molasses flavor. Dark brown sugar gives a deeper flavor, but light brown works great too.
- Large Egg (1, room temperature) – Binds everything together. If your egg is cold, place it in a bowl of warm water for 5 minutes.
- Vanilla Extract (1 teaspoon) – Pure vanilla makes a difference here. Imitation works in a pinch, but pure adds a warmth that complements the chocolate.
- Baking Soda (1/2 teaspoon) – Helps the cookies spread and rise slightly.
- Salt (1/2 teaspoon) – Balances the sweetness. I use fine sea salt.
- Unsweetened Cocoa Powder (1/4 cup / 20g) – This gives the cookies a dark, spooky color. Use Dutch-process for a richer flavor, or natural cocoa for a more classic taste.
- Semi-Sweet Chocolate Chips (1 cup / 175g) – For the cookie dough itself. These melt into little pockets of chocolate throughout.
- Dark Chocolate Melting Wafers (1 cup / 175g) – These are for the legs. I prefer Ghirardelli melting wafers because they set firm and shiny. Chocolate chips work too, but they don’t set as hard and may need a teaspoon of coconut oil to thin them out.
- Candy Eyes (about 24 pairs) – You can find these at craft stores or online. If you can’t find them, use white chocolate chips with a tiny dot of dark chocolate in the center.
Equipment Needed
You don’t need a professional bakery setup to make these spooky spider cookies with crunchy chocolate legs. Here’s what you’ll actually use:
- Mixing Bowls – One large bowl for the wet ingredients, one medium for the dry. I prefer glass or stainless steel.
- Hand Mixer or Stand Mixer – A hand mixer works perfectly. I’ve made these with a whisk and a sore arm before, and it’s doable, but a mixer makes life easier.
- Baking Sheets – Two standard half-sheet pans. Line them with parchment paper, not wax paper. Parchment prevents sticking and makes cleanup a breeze.
- Piping Bag or Small Ziploc Bag – For piping the chocolate legs. A disposable piping bag with a small round tip works best, but a Ziploc bag with the corner snipped off is my go-to hack.
- Cooling Rack – Essential for letting the cookies cool completely before you add the legs. If you rush this step, the chocolate will melt right off.
- Small Microwave-Safe Bowl – For melting the chocolate wafers. Glass works better than plastic because it heats more evenly.
If you’re on a budget, skip the fancy piping tips. Seriously, the Ziploc method works just as well. I’ve been doing it for years and nobody has ever complained about crooked spider legs.
Preparation Method
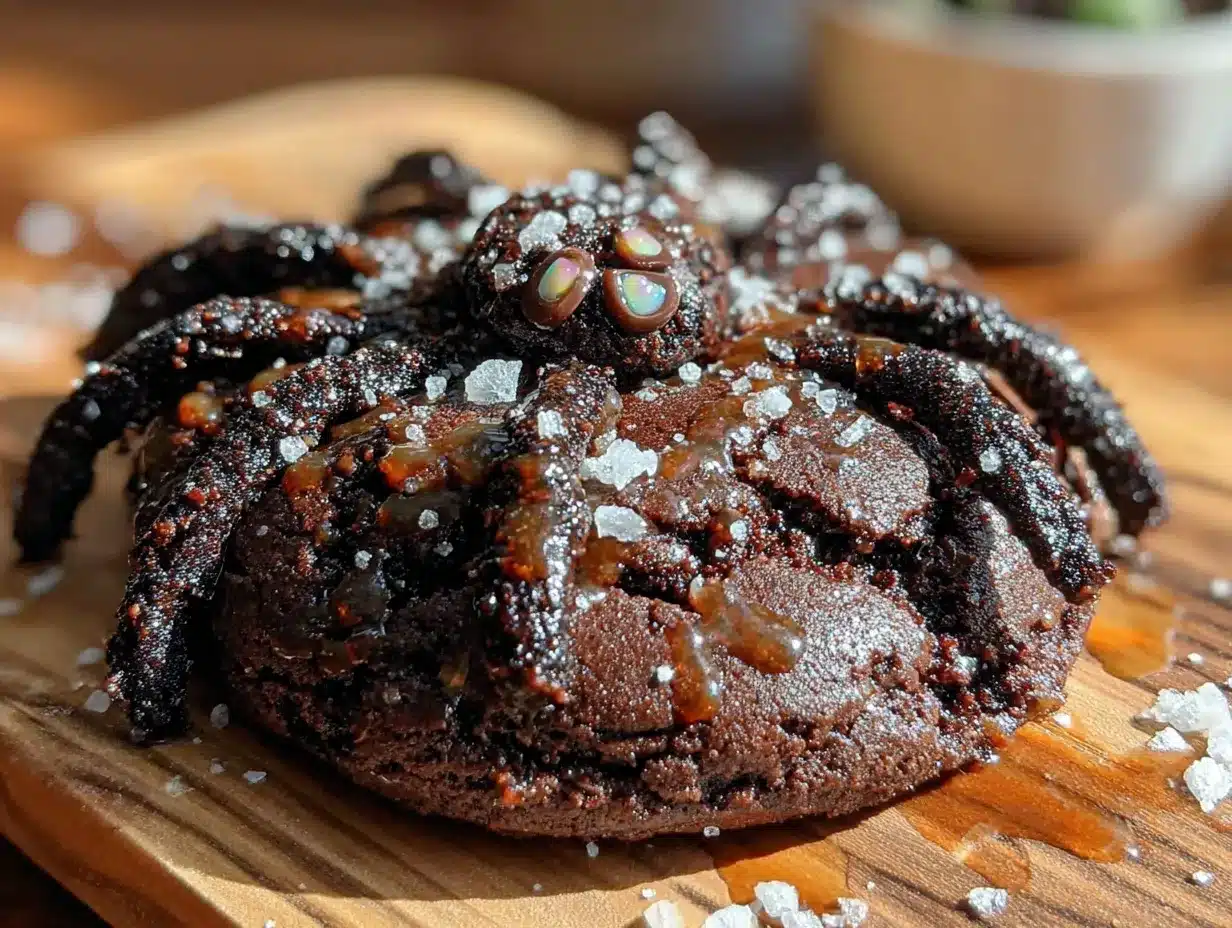
Let’s make these spooky spider cookies with crunchy chocolate legs. I’ll walk you through every step, including the little things I learned the hard way.
Step 1: Cream the Butter and Sugars
In a large mixing bowl, beat 1 cup of softened unsalted butter with 3/4 cup granulated sugar and 1/2 cup packed brown sugar. Beat on medium speed for about 3 minutes until the mixture looks light and fluffy. Scrape down the sides of the bowl halfway through. If it looks grainy, keep beating. You want it smooth and airy.
Step 2: Add the Egg and Vanilla
Crack in 1 large room-temperature egg and add 1 teaspoon vanilla extract. Beat on low until just combined. Don’t overmix here, or the cookies will be tough. The mixture might look slightly curdled at this point, and that’s totally fine.
Step 3: Mix the Dry Ingredients
In a separate bowl, whisk together 2 cups all-purpose flour, 1/2 teaspoon baking soda, 1/2 teaspoon salt, and 1/4 cup unsweetened cocoa powder. Whisking aerates the flour and ensures the cocoa powder is evenly distributed. Nobody wants a bite of straight cocoa powder.
Step 4: Combine Wet and Dry
Gradually add the dry ingredients to the wet mixture, mixing on low speed. Stop when you see the last streaks of flour disappear. Fold in 1 cup semi-sweet chocolate chips with a spatula. The dough will be thick and slightly sticky, which is exactly what you want.
Step 5: Chill the Dough
Cover the bowl with plastic wrap and refrigerate for at least 30 minutes. This step is non-negotiable. Chilled dough spreads less and gives you thicker, softer cookies. I once skipped this step and ended up with flat, sad spiders. Learn from my mistakes.
Step 6: Preheat and Prep
Preheat your oven to 350°F (175°C). Line two baking sheets with parchment paper.
Step 7: Scoop and Bake
Scoop rounded tablespoons of dough (about 1.5 inches in diameter) and place them 2 inches apart on the prepared baking sheets. Bake for 10-12 minutes. The edges should look set, but the centers will still appear slightly soft. That’s fine. They’ll continue baking on the hot pan. Let them cool on the baking sheet for 5 minutes, then transfer to a cooling rack. Cool completely before adding legs.
Step 8: Make the Chocolate Legs
Place 1 cup dark chocolate melting wafers in a small microwave-safe bowl. Microwave in 20-second intervals, stirring after each, until completely smooth. This usually takes about 60-80 seconds total. Don’t rush this, burnt chocolate is bitter and unusable.
Step 9: Pipe the Legs
Transfer the melted chocolate to a piping bag or a Ziploc bag with a tiny corner snipped off. Working with one cooled cookie at a time, pipe four thin lines of chocolate on each side of the cookie to form the legs. The legs should curve slightly outward, like a real spider. Work quickly because the chocolate sets fast. If it hardens in the bag, microwave it for 10 seconds to soften it again.
Step 10: Add the Eyes
While the chocolate legs are still wet, press two candy eyes onto the top of the cookie, near the front. If the chocolate has already set, dab a tiny dot of melted chocolate on the back of each eye to glue them on. Let the cookies sit at room temperature for about 15 minutes until the legs are fully set.
Cooking Tips & Techniques
After four batches of trial and error, here are the things I wish I’d known before I started making these spooky spider cookies with crunchy chocolate legs.
Don’t Overbake the Cookies
I know it’s tempting to leave them in the oven for that extra minute, but pull them out when the edges are set and the centers look slightly underdone. They’ll firm up as they cool. Overbaked cookies are dry, and dry cookies don’t hold chocolate legs well.
Chocolate Temperature Matters
If your chocolate is too hot when you pipe the legs, it will run off the cookie and make a mess. Let it cool for about 2 minutes after melting before you start piping. You want it fluid but not watery. The perfect consistency is when it drizzles off your spoon in a smooth ribbon.
Work in Batches
Don’t try to pipe legs on all 24 cookies at once. The chocolate will set before you finish, and you’ll end up with uneven legs. Pipe legs on 4-6 cookies at a time, add the eyes, then move on to the next batch. This keeps your workflow steady and your spiders looking consistent.
Practice on Parchment First
Before you pipe directly onto the cookies, practice making a few spider legs on a piece of parchment paper. This helps you get a feel for the pressure and speed you need. Plus, you get to eat the practice legs. Win-win.
Keep the Cookies Cool
If your kitchen is warm, the chocolate legs might not set properly. I learned this the hard way when I made these on a humid August afternoon. Pop the finished cookies in the fridge for 10 minutes if the chocolate isn’t hardening. Just make sure you bring them back to room temperature before serving, because cold chocolate doesn’t have the same snap.
Variations & Adaptations
One of the best things about these spooky spider cookies with crunchy chocolate legs is how easy they are to customize. Here are some variations I’ve tried and loved.
Peanut Butter Spider Cookies
Replace 1/4 cup of the butter with 1/4 cup creamy peanut butter. The peanut butter adds a savory note that pairs beautifully with the chocolate. My friend Sarah made these for her son’s Halloween party, and they were gone in 10 minutes. Just make sure the peanut butter is well incorporated so the dough stays consistent.
White Chocolate Spiders
Use white chocolate melting wafers instead of dark chocolate for the legs. The contrast against the dark cookie is striking, and white chocolate has a sweeter, creamier flavor. If you go this route, add a drop of orange food coloring to the white chocolate for a Halloween twist. It gives the legs a subtle orange tint that looks really cool.
Gluten-Free Version
Substitute the all-purpose flour with a 1:1 gluten-free baking flour blend. I’ve tested this with Bob’s Red Mill 1:1 Baking Flour, and the cookies came out slightly more crumbly but still delicious. Add an extra tablespoon of butter to help with moisture. The chocolate legs stay the same, so this is an easy adaptation for gluten-sensitive guests.
Extra Crunchy Legs
For legs that have even more crunch, dip the piped chocolate lines in crushed pretzel pieces or chopped nuts before they set. The salt from the pretzels is a fantastic contrast to the sweet cookie. Just be gentle when handling them, because the added weight makes the legs more fragile.
Spicy Spider Cookies
Add 1/2 teaspoon of cayenne pepper and 1/4 teaspoon of cinnamon to the dry ingredients. The heat sneaks up on you after the first bite, and the chocolate legs help cool things down. This is my personal favorite variation for adult Halloween parties. It’s unexpected and memorable.
Serving & Storage Suggestions
These spooky spider cookies with crunchy chocolate legs are best served at room temperature. The cookie should be soft and chewy, and the legs should snap cleanly when you bite into them. I like to arrange them on a black platter or a wooden board with some fake spider webs draped around for effect. It makes the whole presentation feel like a Halloween scene.
For parties, place them on a cake stand at eye level so kids can see the legs. I’ve noticed that adults are just as excited about them as children, so don’t be surprised if you need to make a double batch.
Storage Instructions
Store the cookies in an airtight container at room temperature for up to 5 days. Place a sheet of parchment paper between layers to prevent the legs from sticking to each other. Do not refrigerate them, because the moisture in the fridge can make the chocolate legs lose their snap.
Freezer Instructions
You can freeze the baked cookies without the legs for up to 3 months. Wrap each cookie individually in plastic wrap and place them in a freezer-safe bag. When you’re ready to serve, thaw them at room temperature for about 30 minutes, then pipe on the legs fresh. The legs really don’t freeze well, so always add them after thawing.
Reheating
These cookies don’t need reheating, but if you want a warm cookie experience, pop one in the microwave for 8 seconds. The cookie will soften, but the legs will stay crunchy. It’s a lovely contrast.
Nutritional Information & Benefits
Let’s be honest, these spooky spider cookies with crunchy chocolate legs are a treat, not a health food. But here’s the estimated breakdown per cookie (based on 24 cookies):
- Calories: 185
- Total Fat: 10g
- Saturated Fat: 6g
- Carbohydrates: 24g
- Sugar: 14g
- Protein: 3g
- Fiber: 1g
Dark chocolate contains antioxidants called flavonoids, which can support heart health in small amounts. The cocoa powder also provides a small dose of iron and magnesium. So while these cookies aren’t exactly a superfood, the chocolate does bring some minor benefits to the table.
If you’re watching your sugar intake, you can reduce the granulated sugar to 1/2 cup and use sugar-free chocolate chips. The cookies will be slightly less sweet, but the chocolate legs will still give you that satisfying crunch.
Allergen note: This recipe contains dairy, eggs, and gluten. For a dairy-free version, use vegan butter and dairy-free chocolate wafers. The texture will be slightly different, but the spiders will still look great.
Frequently Asked Questions
Can I use store-bought cookie dough for this recipe?
Yes, you can use pre-made chocolate cookie dough to save time. Just make sure it’s a sturdy dough that holds its shape during baking. Sugar cookie dough won’t give you the dark color you want for spiders. If you go the store-bought route, skip the chilling step and bake according to the package instructions.
Why did my chocolate legs fall off?
This usually happens when the cookies are still warm when you pipe the legs. The heat melts the chocolate, and it slides right off. Make sure your cookies are completely cool, and let the chocolate set for at least 15 minutes before moving them. If your kitchen is warm, pop them in the fridge for 5 minutes to speed things along.
Can I make these cookies ahead of time?
Absolutely. You can bake the cookies up to 3 days in advance and store them in an airtight container. Pipe the legs on the day you plan to serve them for the best results. The legs stay crunchy for about 2 days, but they’re at their absolute best within the first 24 hours.
What if I can’t find candy eyes?
No problem. You can make your own eyes using white chocolate chips and a tiny dot of dark chocolate. Melt a few white chocolate chips, place a small dollop on the cookie, and use a toothpick to add a tiny black dot in the center. It takes a little more time, but they look just as cute.
How do I keep the legs from breaking during transport?
Place the cookies in a single layer in a sturdy container. If you need to stack them, put a layer of parchment paper or wax paper between each cookie. For extra protection, nestle the cookies in a bed of crumpled parchment paper so they don’t slide around. I’ve transported these to three different parties without a single broken leg using this method.
Conclusion
These spooky spider cookies with crunchy chocolate legs are the kind of recipe that makes Halloween baking feel like an event. They’re not complicated, they don’t require fancy skills, and they always, always get a reaction. Whether you’re making them for a classroom party, a Halloween dinner, or just a quiet night in with a scary movie, they deliver on every level.
What I love most about these cookies is how they bring people together. I’ve seen kids carefully count the legs before eating them. I’ve watched adults try to act cool while sneaking a second one. And I’ve had friends text me weeks later, asking for the recipe because their kids won’t stop talking about the spider cookies.
So go ahead and make a batch. Make them crooked. Make them silly. Make them exactly the way you want. And when someone asks you how you got the legs to stay on, just smile and tell them it’s a secret. Or better yet, send them the link to this post.
I’d love to see your spider cookies! Drop a comment below and tell me how they turned out. Did you try any variations? Did your kids help pipe the legs? Share your stories, and let’s make this Halloween the crunchiest one yet.
Pin This Recipe!

Spooky Spider Cookies with Crunchy Chocolate Legs
These spooky spider cookies with crunchy chocolate legs are the perfect Halloween treat. With a soft, dark chocolate cookie base and satisfyingly crisp chocolate legs, they’re fun to make and even more fun to eat.
- Prep Time: 30 minutes
- Cook Time: 12 minutes
- Total Time: 1 hour 15 minutes
- Yield: 24 cookies 1x
- Category: Dessert
- Cuisine: American
Ingredients
- 2 cups (240g) all-purpose flour
- 1 cup (226g) unsalted butter, softened
- 3/4 cup (150g) granulated sugar
- 1/2 cup (100g) packed brown sugar
- 1 large egg, room temperature
- 1 teaspoon vanilla extract
- 1/2 teaspoon baking soda
- 1/2 teaspoon salt
- 1/4 cup (20g) unsweetened cocoa powder
- 1 cup (175g) semi-sweet chocolate chips
- 1 cup (175g) dark chocolate melting wafers
- Candy eyes (about 24 pairs)
Instructions
- In a large mixing bowl, beat 1 cup of softened unsalted butter with 3/4 cup granulated sugar and 1/2 cup packed brown sugar on medium speed for about 3 minutes until light and fluffy. Scrape down the sides of the bowl halfway through.
- Add 1 large room-temperature egg and 1 teaspoon vanilla extract. Beat on low until just combined. The mixture might look slightly curdled, which is fine.
- In a separate bowl, whisk together 2 cups all-purpose flour, 1/2 teaspoon baking soda, 1/2 teaspoon salt, and 1/4 cup unsweetened cocoa powder.
- Gradually add the dry ingredients to the wet mixture, mixing on low speed until the last streaks of flour disappear. Fold in 1 cup semi-sweet chocolate chips with a spatula. The dough will be thick and slightly sticky.
- Cover the bowl with plastic wrap and refrigerate for at least 30 minutes.
- Preheat oven to 350°F (175°C). Line two baking sheets with parchment paper.
- Scoop rounded tablespoons of dough (about 1.5 inches in diameter) and place them 2 inches apart on the prepared baking sheets. Bake for 10-12 minutes. The edges should look set, but the centers will still appear slightly soft. Let them cool on the baking sheet for 5 minutes, then transfer to a cooling rack. Cool completely before adding legs.
- Place 1 cup dark chocolate melting wafers in a small microwave-safe bowl. Microwave in 20-second intervals, stirring after each, until completely smooth (about 60-80 seconds total).
- Transfer the melted chocolate to a piping bag or a Ziploc bag with a tiny corner snipped off. Working with one cooled cookie at a time, pipe four thin lines of chocolate on each side of the cookie to form the legs, curving slightly outward. Work quickly because the chocolate sets fast.
- While the chocolate legs are still wet, press two candy eyes onto the top of the cookie, near the front. If the chocolate has already set, dab a tiny dot of melted chocolate on the back of each eye to glue them on. Let the cookies sit at room temperature for about 15 minutes until the legs are fully set.
Notes
Don’t overbake the cookies; pull them out when edges are set and centers look slightly underdone. Let chocolate cool for about 2 minutes after melting before piping. Work in batches of 4-6 cookies at a time. If your kitchen is warm, pop finished cookies in the fridge for 10 minutes to help the chocolate set. Store in an airtight container at room temperature for up to 5 days. Freeze baked cookies without legs for up to 3 months.
Nutrition
- Serving Size: 1 cookie
- Calories: 185
- Sugar: 14
- Sodium: 85
- Fat: 10
- Saturated Fat: 6
- Carbohydrates: 24
- Fiber: 1
- Protein: 3
Keywords: Halloween cookies, spider cookies, chocolate cookies, spooky treats, Halloween baking, chocolate legs, kid-friendly cookies


