This was supposed to be a batch of my standard no-bake peanut butter bars—the ones I bring to every potluck and family dinner without fail. I had the recipe memorized, the ingredients laid out, and about twenty minutes before my nephew’s Halloween party started. But somewhere between answering a text about which candy to bring and trying to keep my dog from licking the mixing bowl, I grabbed the wrong chocolate. Instead of semi-sweet chips, I grabbed a bag of dark chocolate melting wafers I’d bought for a failed truffle experiment months ago. The pan was already lined, the peanut butter layer was chilling in the fridge, and honestly? I was already running late. I just poured the melted dark chocolate over the top, swirled it around with a toothpick in a panic, and figured I’d explain the darker color as “spooky chocolate” or something equally ridiculous.
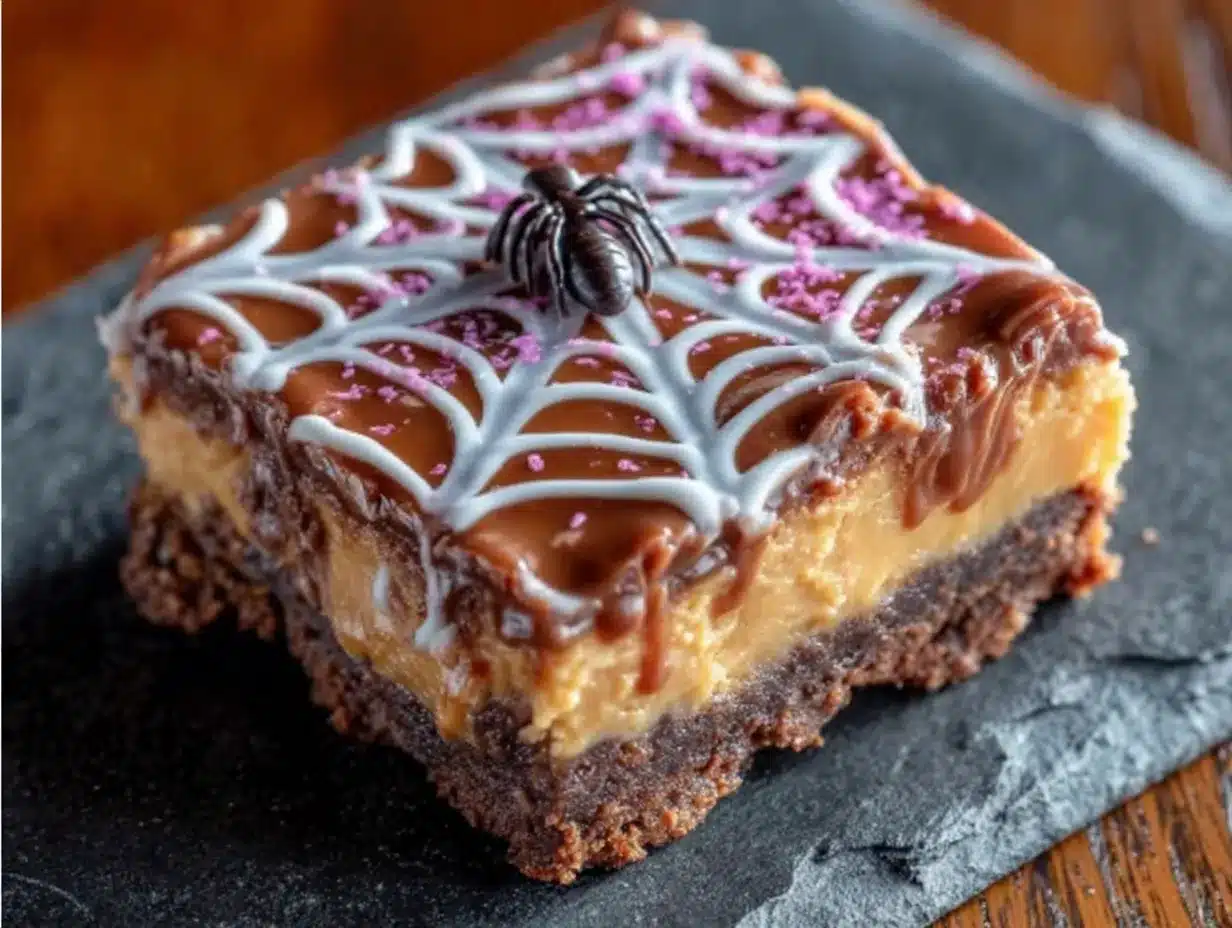
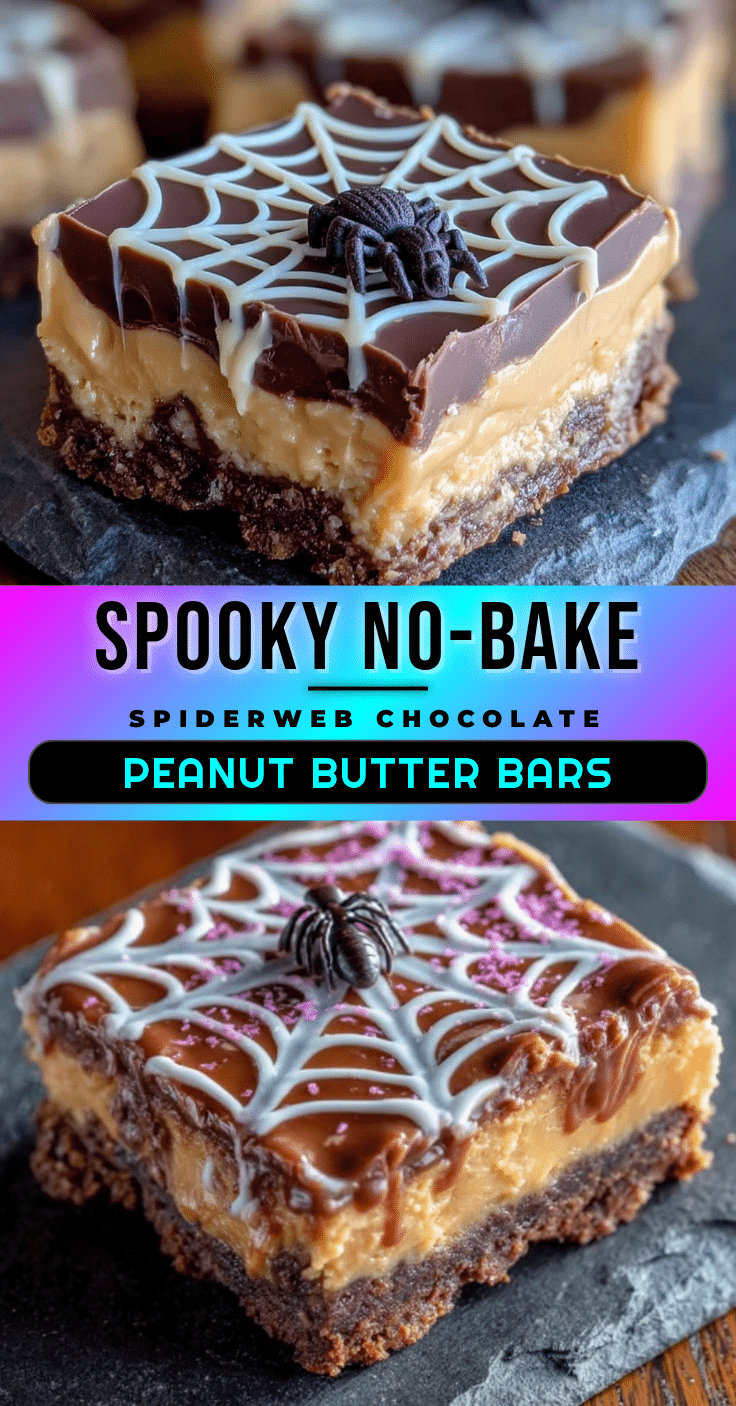
What came out of the fridge twenty minutes later was nothing like the plan—and way, way better. The dark chocolate set perfectly against the creamy peanut butter, and that accidental swirl I made with the toothpick? It looked exactly like a spiderweb. I mean, a happy little web stretched right across the top of the bars. My nephew took one bite, looked at me with those wide kid eyes, and said, “Auntie, these are the best Halloween thing ever.” That’s when I knew I’d stumbled onto something. Maybe you’ve been there—when a kitchen mistake turns into your new favorite thing, and you almost don’t want to admit how it happened because it sounds too good to be true. These spooky no-bake spiderweb chocolate peanut butter bars are that mistake. And honestly, I keep making them on purpose now.
Why You’ll Love This Recipe
Let me tell you why these bars have become my most-requested Halloween recipe, even beating out the fancy pumpkin cheesecake I spent three years perfecting. First off, they are ridiculously easy. I mean, if you can melt chocolate and stir peanut butter, you can make these. There is no oven involved, no candy thermometer, no complicated steps that require you to read the instructions three times before starting. You just mix, chill, swirl, and chill again. That is it.
- Quick & Easy: Comes together in under 20 minutes of active prep time. Perfect for those last-minute Halloween parties or when the kids suddenly announce they need treats for school tomorrow.
- Simple Ingredients: You probably have everything in your pantry right now. Peanut butter, butter, powdered sugar, graham crackers, and chocolate chips. No fancy grocery trips needed—I promise.
- Perfect for Halloween: The spiderweb design is impressive enough to steal the show at any spooky gathering, but it’s so simple that even a distracted cook (like me) can pull it off.
- Crowd-Pleaser: Kids love the fun design, and adults love the classic peanut butter and chocolate combo. I have never brought a pan of these home with leftovers. Not once.
- Unbelievably Delicious: The texture is this perfect mix of creamy, crunchy, and smooth. The peanut butter layer has a slight crumb from the graham crackers, and the dark chocolate topping cracks just a little when you bite into it.
What makes these different from every other peanut butter bar recipe out there? It is the spiderweb design, honestly. That accidental swirl turned into a signature look that makes people think you spent way more time than you actually did. Plus, the dark chocolate balances the sweetness of the peanut butter layer perfectly. It is not just another version—it is the best version, born from a genuine kitchen mistake.
These bars are the kind that make you close your eyes after the first bite. They are comfort food with a spooky twist—faster than baking, but with the same soul-soothing satisfaction. Perfect for impressing Halloween guests without any stress, or turning a simple Tuesday into something memorable.
What Ingredients You Will Need
This recipe uses simple, pantry-friendly ingredients to deliver that classic peanut butter and chocolate flavor with a fun Halloween twist. Most of these are staples you probably already have on hand, which makes this perfect for spontaneous baking sessions.
For the Peanut Butter Layer
- 1 cup creamy peanut butter (I recommend Skippy or Jif for the best texture—natural peanut butter can separate and make the layer oily)
- 1/2 cup unsalted butter, softened (adds richness and helps the layer set firmly)
- 2 cups powdered sugar (gives the layer that sweet, melt-in-your-mouth texture)
- 1 1/2 cups graham cracker crumbs (about 12 full sheets, crushed finely—adds that slight crunch and structure)
- 1 teaspoon vanilla extract (enhances the peanut butter flavor beautifully)
- Pinch of salt (balances the sweetness—don’t skip it!)
For the Chocolate Spiderweb Topping
- 1 1/2 cups dark chocolate chips (I use Ghirardelli 60% cacao—the bitterness contrasts perfectly with the sweet peanut butter)
- 1/4 cup white chocolate chips (for the spiderweb design—you can also use white candy melts)
- 1 tablespoon coconut oil or vegetable shortening (divided—helps the chocolate melt smoothly and set with a nice shine)
Ingredient Tips & Substitutions
For the peanut butter, stick with the processed kind for this recipe. I tried using natural peanut butter once because I was trying to be “healthy,” and the layer turned out greasy and crumbly. It still tasted okay, but it didn’t hold together well. If you need a nut-free version, sunflower seed butter works surprisingly well—just add an extra tablespoon of butter to help it set.
The graham cracker crumbs are important for texture, but you can substitute crushed vanilla wafers or even crushed pretzels for a sweet-salty twist. For a gluten-free option, use gluten-free graham crackers or crushed gluten-free cookies. I have made these with gluten-free graham crackers before, and honestly, nobody noticed the difference.
For the chocolate topping, dark chocolate is my preference because it balances the sweetness, but semi-sweet or milk chocolate work fine too. If you use milk chocolate, the bars will be sweeter overall, so you might want to reduce the powdered sugar in the peanut butter layer by a quarter cup.
Equipment Needed
You do not need any fancy equipment for these bars, which is part of their charm. Here is what you will need:
- 8×8-inch baking pan (a 9×9 works too, but the bars will be slightly thinner)
- Parchment paper (for lining the pan—makes lifting the bars out so much easier)
- Large mixing bowl (for the peanut butter layer)
- Medium microwave-safe bowls (for melting the chocolates separately)
- Electric hand mixer or stand mixer (you can mix by hand, but the mixer makes the peanut butter layer smoother)
- Spatula (for spreading layers evenly)
- Toothpick or skewer (for creating the spiderweb design)
- Measuring cups and spoons
- Ziploc bag or piping bag (for the white chocolate—a ziploc with the corner snipped works perfectly)
If you do not have an electric mixer, a sturdy wooden spoon and some elbow grease will work. I have made these in a pinch with just a fork, and they turned out fine—just a little more rustic in texture. The most important tool is that toothpick for the spiderweb design. I have used a fork, a chopstick, and even a paperclip in desperate times. The toothpick really does work best for those thin, delicate lines.
Preparation Method
Follow these steps carefully, and you will have spooky, delicious bars that look like you spent hours on them. I promise it is easier than it looks.
- Prepare the pan. Line an 8×8-inch baking pan with parchment paper, leaving some overhang on two opposite sides. This creates handles that make lifting the bars out later super easy. Lightly grease the parchment with butter or non-stick spray just to be safe.
- Make the peanut butter layer. In a large mixing bowl, beat together 1 cup creamy peanut butter and 1/2 cup softened unsalted butter until smooth and creamy—about 2 minutes with an electric mixer. You want it light and fluffy. Add 1 teaspoon vanilla extract and a pinch of salt, then beat again.
- Add the dry ingredients. Gradually add 2 cups powdered sugar and 1 1/2 cups graham cracker crumbs to the peanut butter mixture. Mix on low speed at first to avoid a sugar cloud, then increase to medium and beat until everything is well combined. The mixture should be thick and slightly crumbly but hold together when pressed. If it feels too dry, add a tablespoon of milk. If it feels too sticky, add another tablespoon of graham cracker crumbs.
- Press the layer into the pan. Transfer the peanut butter mixture to your prepared pan. Press it down firmly and evenly using your hands or the bottom of a measuring cup. Make sure it is compact—this helps the bars hold together when cut. Pop the pan in the refrigerator for 15-20 minutes while you prepare the chocolate topping.
- Melt the dark chocolate. In a microwave-safe bowl, combine 1 1/2 cups dark chocolate chips with 1/2 tablespoon coconut oil. Microwave in 30-second intervals, stirring after each, until completely smooth. Be careful not to overheat—chocolate burns easily and gets grainy. It usually takes me about 1 minute 30 seconds total.
- Pour the dark chocolate layer. Remove the pan from the fridge. Pour the melted dark chocolate over the chilled peanut butter layer. Spread it evenly with a spatula, making sure it reaches all the edges. Tap the pan gently on the counter to release any air bubbles.
- Melt the white chocolate. In a separate small microwave-safe bowl, melt 1/4 cup white chocolate chips with the remaining 1/2 tablespoon coconut oil. Use the same 30-second interval method. White chocolate burns even faster than dark, so watch it carefully.
- Create the spiderweb design. Transfer the melted white chocolate to a small ziploc bag. Snip off a tiny corner—like, really tiny, you can always cut more. Pipe concentric circles of white chocolate onto the dark chocolate layer, starting from the center and working outward. Space them about 1 inch apart. Then, using a toothpick, drag lines from the center outward through all the circles, like you are drawing spokes on a wheel. Wipe the toothpick clean between each drag for the best effect. Watch the web appear—it is so satisfying!
- Chill to set. Place the pan back in the refrigerator for at least 2 hours, or until the chocolate is completely firm. I usually let them chill overnight for the cleanest cuts. Do not rush this step—warm chocolate will squish when you cut it.
- Cut and serve. When fully set, lift the bars out of the pan using the parchment overhang. Place on a cutting board and use a sharp knife to cut into squares. For clean cuts, wipe the knife clean between each slice. I like to cut them into 16 squares for a nice serving size, but you can go bigger or smaller depending on your crowd.
Cooking Tips & Techniques
After making these bars probably a dozen times since that first accidental batch, I have learned a few things that make the process smoother. Let me share them so you do not have to learn the hard way.
Chill the peanut butter layer before adding the chocolate. This is non-negotiable. If you pour warm chocolate over a room-temperature peanut butter layer, the layers will blend together and you will lose that beautiful contrast. I learned this the hard way when I got impatient and ended up with muddy-looking bars. They still tasted fine, but the presentation was not nearly as impressive.
Use a sharp knife for cutting. A dull knife will drag through the chocolate and mess up your spiderweb design. Run the knife under hot water, wipe it dry, then make your cut. Clean the blade between each cut for the best results. I keep a damp paper towel next to my cutting board for this purpose.
Let the bars sit at room temperature for 5 minutes before cutting. If you cut them straight from the fridge, the chocolate can crack and shatter. A few minutes at room temperature makes the chocolate slightly more pliable and gives you cleaner edges. This was another lesson learned from a pan of shattered bars that looked more like a crime scene than a dessert.
Do not overmix the peanut butter layer. Once you add the graham cracker crumbs, mix just until combined. Overmixing can make the layer dense and tough instead of light and crumbly. You want it to hold together when pressed but still have that slight crumbly texture when you bite into it.
Timing is everything. I like to make the peanut butter layer and press it into the pan, then start the chocolate while it chills. This way, the chocolate is ready to pour as soon as the base is firm. It saves about 10 minutes and keeps the workflow smooth. Multitasking in the kitchen is my secret weapon for stress-free baking.
Variations & Adaptations
One of the best things about this recipe is how easy it is to customize. Here are some variations I have tried and loved.
Peanut Butter Swirl Variation: Instead of a solid peanut butter layer, reserve about 1/4 cup of the peanut butter mixture. Drop spoonfuls of it onto the dark chocolate before it sets, then swirl with a toothpick for a marbled effect. This adds extra peanut butter pockets throughout the chocolate layer—my nephew’s favorite version.
Spooky Sprinkle Version: After creating the spiderweb design, sprinkle orange and black Halloween sprinkles over the top before the chocolate sets. The sprinkles stick to the chocolate and add a fun crunch. I did this for a classroom party, and the kids went crazy for the extra color.
Crunchy Peanut Butter Option: Use crunchy peanut butter instead of creamy for added texture in the base layer. The little peanut pieces add a nice crunch that contrasts with the smooth chocolate. Just make sure the crunchy peanut butter is still the processed kind, not natural.
White Chocolate Spiderweb Alternative: For a reverse look, use white chocolate for the base layer and dark chocolate for the spiderweb design. The white chocolate base is sweeter, so I recommend using semi-sweet or even bittersweet chocolate for the web to balance the flavors. This version looks especially striking on a dessert table.
Gluten-Free Adaptation: Substitute gluten-free graham crackers or crushed gluten-free vanilla cookies for the regular graham crackers. I have tested this with Schar gluten-free graham crackers, and the texture is almost identical. Just make sure to check all your other ingredients for gluten if you are serving someone with celiac disease.
Serving & Storage Suggestions
These bars are best served cold or at room temperature, depending on your preference. I like them straight from the fridge because the chocolate has that satisfying snap when you bite into it. My sister prefers them at room temperature because the peanut butter layer is softer and creamier. Try both and see which you prefer.
For a Halloween party, arrange the bars on a black or orange platter for maximum spooky effect. You can add a few plastic spiders around the plate for decoration—just warn people they are fake! I once forgot to mention it, and my cousin nearly jumped out of her skin.
These bars pair beautifully with a cold glass of milk or a hot cup of coffee. The bitterness of the coffee balances the sweetness of the bars perfectly. For a grown-up Halloween party, they are amazing with a glass of bourbon or a dark stout beer.
Storage: Store the bars in an airtight container in the refrigerator for up to 1 week. They actually get better after a day or two as the flavors meld together. I have never had them last longer than that because they disappear too fast, but theoretically, they would keep for about 10 days.
Freezing: These bars freeze beautifully. Cut them into squares, place them on a baking sheet in a single layer, and freeze until solid. Then transfer to a freezer-safe container or ziploc bag, separating layers with parchment paper. They will keep for up to 3 months. Thaw in the refrigerator overnight before serving. I always keep a stash in my freezer for unexpected guests or last-minute Halloween parties.
Reheating: Do not reheat these bars—they are meant to be served cold or at room temperature. If you want a warm dessert, try microwaving a single bar for about 10 seconds. The chocolate gets slightly melty, and the peanut butter layer softens. It is a completely different experience, but a good one.
Nutritional Information & Benefits
Let’s be honest—these are a treat, not a health food. But knowing what is in them helps you enjoy them mindfully. Here is the estimated nutritional breakdown per bar (based on 16 servings):
| Nutrient | Amount per Serving |
|---|---|
| Calories | 285 |
| Total Fat | 18g |
| Saturated Fat | 8g |
| Cholesterol | 15mg |
| Sodium | 145mg |
| Total Carbohydrates | 30g |
| Dietary Fiber | 2g |
| Sugars | 22g |
| Protein | 5g |
The peanut butter provides a good amount of protein and healthy fats, while the dark chocolate offers antioxidants. The graham crackers add a bit of fiber. These are not low-calorie by any means, but they are made with real ingredients you can recognize. I feel better about serving these to my family than something from a box with ingredients I cannot pronounce.
For those with dietary concerns, these bars contain peanuts, dairy, and gluten (unless you use the gluten-free adaptation). They are egg-free, which makes them a great option for those with egg allergies. If you need a nut-free version, sunflower seed butter works well, as I mentioned earlier.
Conclusion
These spooky no-bake spiderweb chocolate peanut butter bars started as a happy accident, but they have become a Halloween tradition in my house. Every year, my nephew asks if I am bringing “the spiderweb bars” to his party, and every year, I pretend I have to check my schedule before saying yes. The truth is, I would never show up without them. They are that good.
I hope you give this recipe a try, whether you are planning a Halloween party, looking for a fun activity to do with kids, or just craving something sweet and chocolatey. Do not be afraid to make it your own—add your favorite sprinkles, try different chocolates, or experiment with the spiderweb design. The best recipes are the ones that evolve with the cook.
If you make these bars, I would love to hear about it! Leave a comment below and tell me how your spiderweb turned out. Did your kids help with the design? Did you try a fun variation? Share your photos on Pinterest and tag me—I love seeing your creations. And if you have any questions, just ask. I am always here to help.
Happy Halloween, and happy baking (or rather, no-baking)!
Frequently Asked Questions
Can I use natural peanut butter for this recipe?
I do not recommend it. Natural peanut butter has separated oils that can make the peanut butter layer greasy and prevent it from setting properly. Stick with processed peanut butter like Skippy or Jif for the best texture. If you only have natural peanut butter, stir it very well and add an extra tablespoon of butter to help it hold together.
How far in advance can I make these bars?
You can make them up to 3 days in advance and store them in the refrigerator. They actually taste better after a day or two as the flavors meld together. For longer storage, freeze them for up to 3 months. Just thaw in the refrigerator overnight before serving.
My spiderweb design did not turn out well. What did I do wrong?
There are a few common issues. If the white chocolate was too thick, it would not pipe smoothly—add a little more coconut oil to thin it out. If the dark chocolate was too cold, the white chocolate would not spread when you dragged the toothpick. Make sure the dark chocolate layer is still slightly warm when you add the white chocolate circles. Practice makes perfect, and even imperfect webs look great!
Can I double this recipe?
Absolutely! Double all the ingredients and use a 9×13-inch pan. The layers will be slightly thinner, so reduce the chilling time to about 1 hour for the peanut butter layer and 1 1/2 hours after adding the chocolate. You may need to adjust the spiderweb design for the larger surface area.
My bars are too hard to cut. What should I do?
Let them sit at room temperature for 5-10 minutes before cutting. If they are still too hard, run your knife under hot water, dry it, and make your cuts. The warmth of the knife will help glide through the chocolate. Clean the blade between each cut for the cleanest edges.
Pin This Recipe!
Spooky No-Bake Spiderweb Peanut Butter Bars
These spooky no-bake spiderweb chocolate peanut butter bars are a happy accident turned Halloween tradition. With a creamy peanut butter layer, dark chocolate topping, and an easy spiderweb design, they are quick, delicious, and perfect for any spooky gathering.
- Prep Time: 20 minutes
- Cook Time: 0 minutes
- Total Time: 2 hours 20 minutes (includes chilling)
- Yield: 16 servings 1x
- Category: Dessert
- Cuisine: American
Ingredients
- 1 cup creamy peanut butter (e.g., Skippy or Jif)
- 1/2 cup unsalted butter, softened
- 2 cups powdered sugar
- 1 1/2 cups graham cracker crumbs (about 12 full sheets, finely crushed)
- 1 teaspoon vanilla extract
- Pinch of salt
- 1 1/2 cups dark chocolate chips (e.g., Ghirardelli 60% cacao)
- 1/4 cup white chocolate chips
- 1 tablespoon coconut oil or vegetable shortening, divided
Instructions
- Line an 8×8-inch baking pan with parchment paper, leaving overhang on two opposite sides. Lightly grease the parchment with butter or non-stick spray.
- In a large mixing bowl, beat together 1 cup creamy peanut butter and 1/2 cup softened unsalted butter until smooth and creamy, about 2 minutes. Add 1 teaspoon vanilla extract and a pinch of salt, then beat again.
- Gradually add 2 cups powdered sugar and 1 1/2 cups graham cracker crumbs to the peanut butter mixture. Mix on low speed, then increase to medium and beat until well combined. The mixture should be thick and slightly crumbly but hold together when pressed. If too dry, add a tablespoon of milk; if too sticky, add another tablespoon of graham cracker crumbs.
- Transfer the peanut butter mixture to the prepared pan. Press it down firmly and evenly using your hands or the bottom of a measuring cup. Refrigerate for 15-20 minutes.
- In a microwave-safe bowl, combine 1 1/2 cups dark chocolate chips with 1/2 tablespoon coconut oil. Microwave in 30-second intervals, stirring after each, until completely smooth (about 1 minute 30 seconds total).
- Remove the pan from the fridge. Pour the melted dark chocolate over the chilled peanut butter layer and spread evenly with a spatula. Tap the pan gently on the counter to release air bubbles.
- In a separate small microwave-safe bowl, melt 1/4 cup white chocolate chips with the remaining 1/2 tablespoon coconut oil using the same 30-second interval method.
- Transfer the melted white chocolate to a small ziploc bag. Snip off a tiny corner. Pipe concentric circles of white chocolate onto the dark chocolate layer, starting from the center and working outward, spacing them about 1 inch apart. Using a toothpick, drag lines from the center outward through all the circles to create a spiderweb effect. Wipe the toothpick clean between each drag.
- Refrigerate the pan for at least 2 hours, or until the chocolate is completely firm (overnight is best for clean cuts).
- When fully set, lift the bars out of the pan using the parchment overhang. Place on a cutting board and cut into squares using a sharp knife, wiping the blade clean between each slice. Let bars sit at room temperature for 5 minutes before cutting for cleaner edges.
Notes
Chill the peanut butter layer before adding the chocolate to prevent layers from blending. Use a sharp knife for cutting and let bars sit at room temperature for 5 minutes before cutting to avoid cracking. Do not overmix the peanut butter layer. For best results, chill overnight.
Nutrition
- Serving Size: 1 bar
- Calories: 285
- Sugar: 22
- Sodium: 145
- Fat: 18
- Saturated Fat: 8
- Carbohydrates: 30
- Fiber: 2
- Protein: 5
Keywords: no-bake, peanut butter bars, spiderweb, Halloween, chocolate, easy dessert, no-bake dessert, peanut butter chocolate


