The PTA bake sale was in twelve hours and I’d completely forgotten. My phone buzzed with the reminder text—the one I’d ignored three days ago—and I felt that familiar cold wash of panic. Everyone else would be bringing those Pinterest-perfect creations, the kind with fondant and edible glitter and tiny little tags that probably matched their kitchen decor. I had apples. A bag of them, sitting in the crisper drawer, looking back at me with what felt like judgment. And a half-empty bag of Halloween candy my kids had already picked through, leaving behind the “good” stuff they didn’t actually like. You know—the Tootsie Rolls, the weird orange peanut chews, the fun-size chocolate bars that got squished in someone’s pocket. Honestly, I almost gave up and grabbed a box of store-bought cookies on the way. But then I remembered the jar of caramel bits I’d stashed after a failed baking experiment last fall. And suddenly, I had a plan. Not a fancy plan. Not a plan that would win any awards for presentation. But a plan that would get me out of the house with something that looked like I’d actually tried. These quick caramel apple slices with Halloween candy toppings saved me that night. They saved me from the shame of showing up empty-handed, from the judgment of the mom who always brings the perfect cupcakes, and from the expense of a last-minute bakery run. And here’s the kicker—they were the first thing gone. People grabbed them before the cupcakes. Before the brownies. Before the fancy fruit tart that probably cost forty dollars to make. I stood there, holding my little plate of apple slices, feeling sheepish and a little smug. I’ve been making them ever since, for Halloween parties, for after-school snacks, for those moments when you need something that looks like effort but takes about fifteen minutes. Maybe you’ve been there—staring into your pantry, willing something to appear. This is that something.
Why You’ll Love This Recipe
Let me tell you why these quick caramel apple slices with Halloween candy toppings have become my secret weapon for fall entertaining. I’ve tested this recipe more times than I care to admit—through sticky fingers, melted caramel disasters, and one particularly memorable incident involving a dog and a chocolate bar. Each time, I learned something that made it better.
- Ready in 15 Minutes: From start to finish, you’re looking at about fifteen minutes of active work. No boiling sugar, no candy thermometers, no complicated steps. This is weeknight-friendly, after-school-friendly, “I forgot about the party” friendly.
- Ingredients You Already Have: Apples, caramel bits, and leftover Halloween candy. That’s it. You don’t need to make a special trip to the store or buy fancy equipment. Raid your pantry and your kid’s candy stash.
- Perfect for Halloween Parties: These are the life of the party. Kids go crazy for them because they get to pick their candy topping. Adults love them because they’re nostalgic without being childish. Everyone wins.
- Kid-Friendly Activity: Get the kids involved. Let them dip the apples, sprinkle the toppings, arrange them on the platter. It’s a fun, low-stress way to spend time together without the mess of baking.
- Customizable to the Max: Have picky eaters? No problem. Let everyone top their own slices. It’s the perfect solution for parties where dietary restrictions and preferences vary wildly.
What makes these different from every other caramel apple recipe out there? It’s the candy toppings. Most recipes call for chopped nuts, sprinkles, or chocolate drizzle. Those are fine. They’re good, even. But they’re not fun. Halloween candy brings a level of excitement and nostalgia that plain toppings just can’t match. Plus, using candy means you’re reducing waste—turning those leftover treats into something new and special. This isn’t just another version of caramel apples. It’s your best version, because it’s the one that actually gets eaten.
What Ingredients You Will Need
This recipe uses simple, everyday ingredients to create something that feels special without the fuss. You probably have most of these in your kitchen right now, which is the whole point.
- Apples (4 medium): You want firm, crisp apples that can hold up to the caramel. Granny Smith is my go-to for their tartness, which balances the sweet caramel. Honeycrisp or Fuji work great too. Avoid mealy varieties like Red Delicious—they’ll fall apart. Look for apples that feel heavy for their size and have no soft spots. I’ve found that room temperature apples hold the caramel better than cold ones straight from the fridge.
- Caramel Bits (11 oz bag): These are a lifesaver. No unwrapping individual caramels, no worrying about them melting evenly. Kraft makes a good one, but any brand works. You’ll need about 2 cups. If you only have wrapped caramels, unwrap about 25-30 of them. The bits melt faster and more smoothly, which is why I prefer them for quick recipes like this.
- Heavy Cream (2 tablespoons): This thins the caramel just enough for dipping. Whole milk works in a pinch, but the cream gives a richer texture. Don’t use skim milk or half-and-half—they’ll make the caramel grainy. I’ve learned this the hard way, trust me.
- Halloween Candy Toppings (about 1 cup total): This is where you get creative. You need about 1/4 cup of each topping, chopped if necessary. Some great options:
- Crushed Butterfinger or Skor bars: For that toffee-crunch texture. They stay crunchy even on the caramel.
- Mini M&M’s or Reese’s Pieces: Colorful and fun. The candy coating holds up well.
- Chopped Reese’s Peanut Butter Cups: Because peanut butter and caramel is a match made in heaven. Freeze them for 10 minutes before chopping for cleaner cuts.
- Crushed Oreo cookies: Not candy, but a great option if you’re out of candy. The chocolate cookie crumb contrasts nicely with the smooth caramel.
- Lollipop Sticks or Skewers (optional): If you want the classic “apple on a stick” look. Not necessary for slices, but fun for presentation. I use bamboo skewers cut in half for a more rustic look.
- Sea Salt (flaky, for finishing): Optional but highly recommended. A sprinkle of flaky sea salt on top of the caramel before the candy transforms these from good to unforgettable. It cuts the sweetness and adds a professional touch.
Substitution Notes: For a dairy-free version, use coconut cream instead of heavy cream. The caramel won’t be quite as smooth, but it works. For a nut-free option, stick with candy that doesn’t contain nuts—M&M’s, Skittles, or crushed pretzels are all safe choices. If you’re avoiding artificial colors, look for naturally colored candy options or use crushed freeze-dried berries for a vibrant, natural topping.
Equipment Needed
You don’t need much for this recipe, which is part of its beauty. Here’s what you’ll want to have on hand:
- Sharp Knife and Cutting Board: For slicing the apples. A good chef’s knife makes clean, even slices. I’ve used a dull knife before and ended up with mangled apple pieces—not worth it.
- Small Saucepan: For melting the caramel. A heavy-bottomed saucepan distributes heat evenly and prevents scorching. If you don’t have one, a microwave-safe bowl works too—just use 50% power and stir every 30 seconds.
- Mixing Bowls: One for the caramel, one for each topping. Small bowls work fine. I use my smallest prep bowls to keep things organized.
- Parchment Paper or Silicone Mat: For placing the dipped slices on. Parchment paper is cheap and disposable. A silicone mat is reusable and the caramel peels off easily. Either works, but don’t use wax paper—the caramel will stick.
- Baking Sheet: To hold the parchment-lined slices. A rimmed baking sheet catches any drips. I use a half-sheet pan, but any size works.
- Small Offset Spatula or Butter Knife: For spreading the caramel evenly on the slices. Not strictly necessary, but it makes the process neater. I’ve used a regular dinner knife in a pinch.
- Tongs: For handling the apple slices during dipping. Keeps your fingers clean and gives you more control. If you don’t have tongs, two forks work fine.
Budget-Friendly Tip: Don’t have a silicone mat? Parchment paper is cheap and available at any grocery store. A baking sheet from the dollar store works perfectly. You don’t need fancy equipment—just something flat and non-stick to catch the drips.
Preparation Method
Let’s get down to business. This recipe moves fast, so read through the steps once before you start. Trust me, it’s easier that way.
- Prep your apples (5 minutes). Wash and dry your apples thoroughly. Any moisture on the skin will make the caramel slide right off—I learned this the hard way after watching my first batch of caramel pool sadly on the parchment paper. Cut each apple into 6-8 wedges, depending on size. Remove the core and seeds. For a nicer presentation, you can cut the slices at an angle. Pat the slices dry with a paper towel and arrange them on a plate. Pop them in the fridge for 10 minutes while you prepare the caramel—cold apples help the caramel set faster.
- Prep your toppings (3 minutes). While the apples chill, get your candy toppings ready. Place each topping in its own small bowl. If you’re using candy bars, chop them into small pieces—about the size of a pea. For M&M’s or Reese’s Pieces, no chopping needed. If you’re using Oreos, crush them in a ziplock bag with a rolling pin. The key is to have everything ready before the caramel is melted, because once it’s ready, you need to move fast.
- Melt the caramel (5 minutes). In a small saucepan, combine the caramel bits and heavy cream. Warm over low heat, stirring constantly with a rubber spatula or wooden spoon. This is not the time to walk away. Caramel burns easily, and burnt caramel smells awful and tastes worse. Stir until the mixture is completely smooth and glossy—about 3-4 minutes. If it seems too thick, add another tablespoon of cream. Too thin? Let it cook for another minute, stirring. The consistency should be like warm honey—thick enough to coat the apple but thin enough to drip slightly.
- Set up your dipping station (2 minutes). Line a baking sheet with parchment paper or a silicone mat. Arrange your topping bowls in a row next to the saucepan. Have your apple slices ready on a plate. This assembly-line setup makes the process smooth and prevents the caramel from cooling too much. If you’re using lollipop sticks, insert them into the apple slices now—push them about halfway through the slice, angling slightly upward.
- Dip the apple slices (10 minutes). Working with one slice at a time, hold it by the stick or use tongs to grip it. Dip the cut side of the apple into the warm caramel, letting any excess drip back into the pan. You want an even coating—about 1/8 inch thick. Don’t worry if it’s not perfect; the toppings will cover any imperfections. Place the dipped slice on the parchment-lined baking sheet. Repeat with remaining slices, working quickly. If the caramel starts to thicken, return it to low heat for 30 seconds and stir.
- Add the toppings (5 minutes). While the caramel is still wet and sticky, sprinkle your chosen topping over each slice. Press gently with your fingers to help the topping adhere. You can do a single topping per slice or get creative with combinations. I like to do a few of each topping so everyone can choose their favorite. Work in batches of 4-5 slices at a time so the caramel doesn’t set before you add the toppings.
- Set and serve (10 minutes). Let the finished slices sit at room temperature for about 10 minutes to allow the caramel to set. If you’re in a hurry, pop them in the fridge for 5 minutes. The caramel should be firm but not hard—it should give slightly when you bite into it. If you added sea salt, sprinkle it on just before serving for the best texture contrast.
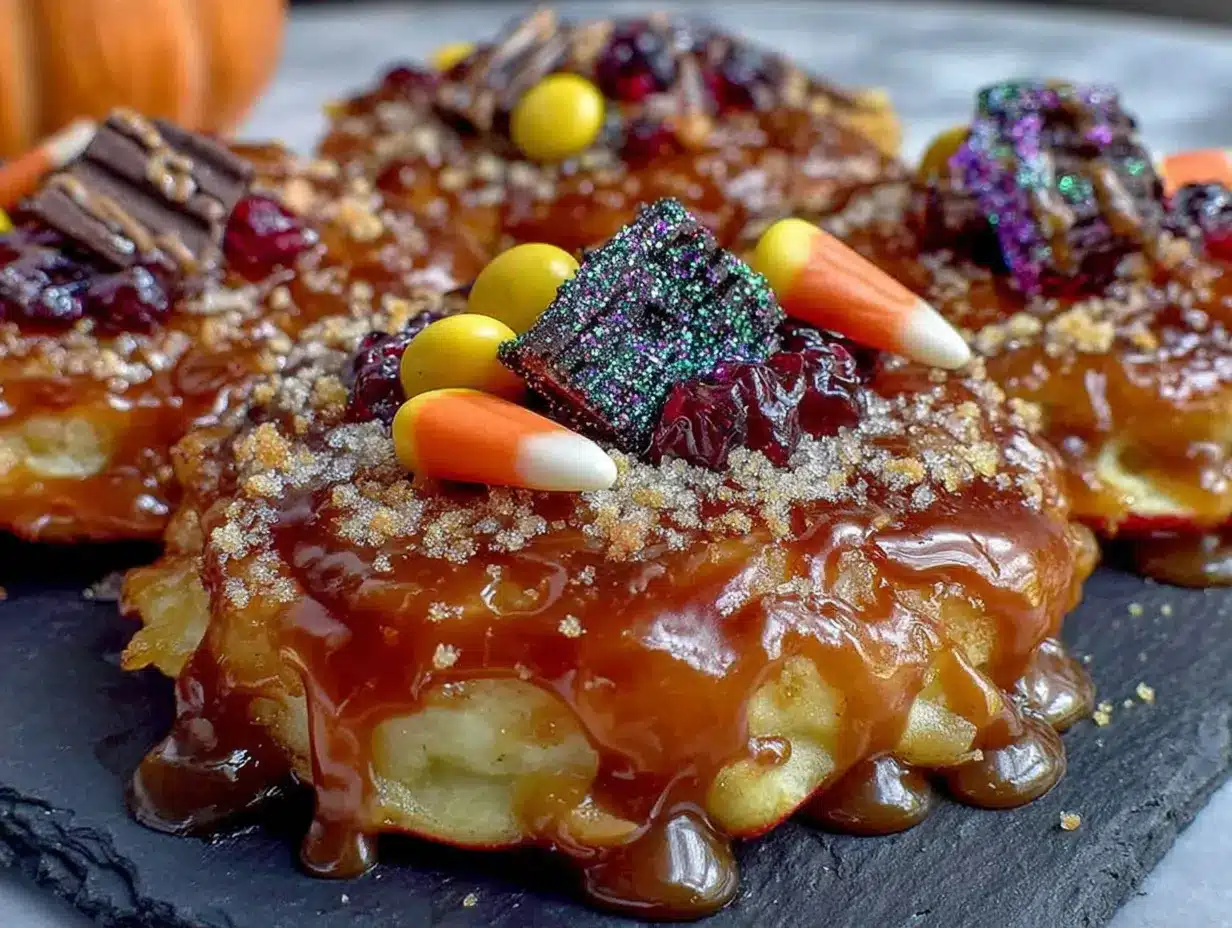
Sensory Cues: The caramel should look glossy and smooth, like melted amber. When you dip the apple, you should hear a slight sizzle if the apple is cold. The topping should stick immediately—if it slides off, the caramel has cooled too much. The finished slices should look like little works of art, with the candy creating a colorful, textured surface against the dark caramel and pale apple.
Cooking Tips & Techniques
I’ve made these quick caramel apple slices with Halloween candy toppings more times than I can count, and I’ve made every mistake in the book. Here’s what I’ve learned so you don’t have to.
The biggest mistake? Using cold caramel. I once tried to rush the process and dipped apples into caramel that hadn’t fully melted. The result was lumpy, uneven coating that looked like a science experiment gone wrong. Always wait until the caramel is completely smooth and glossy before you start dipping.
Another common error: Overcrowding the pan. When you’re melting the caramel, it needs room to move. If you’re doubling the recipe, use a larger saucepan. I’ve had caramel seize up because I tried to melt too much in too small a pan. It’s not salvageable once it seizes—you have to start over.
Timing is everything. The caramel sets fast, especially if your apples are cold. Have everything ready before you start melting. I learned this after frantically chopping candy while my caramel hardened in the pan. Now I prep all my toppings first, then melt the caramel. It saves so much stress.
Multitasking strategy: While the caramel is melting, have your kids or helpers start arranging the toppings in bowls. If you’re working alone, set up your station before you turn on the stove. The actual dipping and topping takes about 10 minutes, but the setup makes or breaks the experience.
For consistent results: Use the same size apple slices. If some are thick and some are thin, they’ll cook (or rather, set) unevenly. I aim for slices about 1/2 inch thick at the widest point. Also, resist the urge to double-dip. Once an apple slice has been dipped, don’t dip it again—you’ll end up with a thick, gloppy mess.
One more thing: If your caramel gets too thick while you’re working, don’t add water. Water makes caramel grainy. Instead, add a splash of heavy cream and stir over low heat. It’ll smooth right out.
Variations & Adaptations
This recipe is endlessly adaptable. Here are some of my favorite variations, all tested and approved by my family and friends.
Dietary Adaptations:
- Vegan Version: Use coconut cream instead of heavy cream and vegan caramel bits (check the label—some brands contain dairy). Top with vegan chocolate candies or crushed nuts. The coconut flavor is subtle and actually complements the apple nicely.
- Gluten-Free Version: Most caramel bits and candy are naturally gluten-free, but always check labels. Skip any toppings that contain wheat, like Oreos or certain candy bars. Stick with M&M’s, Reese’s Pieces, or chopped nuts.
- Low-Sugar Version: Use sugar-free caramel sauce (the kind you’d use for ice cream) and top with crushed nuts, unsweetened coconut flakes, or a sprinkle of cinnamon. The apples provide natural sweetness, so you won’t miss the sugar as much as you’d think.
Seasonal Variations:
- Fall Harvest: Use Honeycrisp apples and top with crushed pecans, a drizzle of maple syrup, and a sprinkle of cinnamon. This version screams autumn and is perfect for Thanksgiving leftovers.
- Winter Wonderland: Use Fuji apples and top with crushed peppermint candies and white chocolate drizzle. The red and white contrast is gorgeous on a holiday platter.
- Summer Fun: Use Granny Smith apples and top with crushed freeze-dried strawberries and a drizzle of dark chocolate. The tartness of the apple and the sweetness of the strawberry is a perfect summer combo.
Flavor Twists:
- Salted Pretzel Crunch: Top with crushed salted pretzels and a drizzle of melted white chocolate. The salty-sweet combo is addictive.
- S’mores Style: Top with crushed graham crackers, mini marshmallows, and chocolate drizzle. It’s like a campfire in apple form.
- Trail Mix Madness: Top with a mix of chopped peanuts, raisins, and chocolate chips. This one is great for hiking snacks or lunchbox treats.
Serving & Storage Suggestions
These quick caramel apple slices with Halloween candy toppings are best served within a few hours of making them, but they’ll last longer if stored properly.
Serving Temperature: Serve at room temperature or slightly chilled. The caramel is at its best when it’s firm but not hard—it should give slightly when you bite into it. If you’ve refrigerated them, let them sit out for 10 minutes before serving.
Presentation Ideas: Arrange the slices on a large wooden board or platter, grouping similar toppings together. I like to fan them out in a circle for a dramatic effect. For parties, label each topping so guests know what they’re getting. A small dish of extra caramel on the side is always a hit for those who want extra dipping.
Complementary Dishes: These pair beautifully with a warm cup of apple cider or a mug of hot chocolate. For a full dessert spread, serve alongside pumpkin pie, cinnamon sugar cookies, or a cheese board with sharp cheddar and aged gouda. The contrast of sweet and savory is surprisingly good.
Storage Instructions: Store leftover slices in an airtight container in the refrigerator for up to 3 days. Place a sheet of parchment paper between layers to prevent sticking. The caramel will soften slightly over time, but the flavor remains. Do not store at room temperature—the caramel will get too soft and the apples will brown.
Reheating Tips: These are best eaten cold or at room temperature, but if you want to refresh them, microwave individual slices for 10 seconds. The caramel will soften and the apple will warm slightly. Don’t overdo it, or the apple will get mushy.
How Flavors Develop: The flavors actually meld together nicely after a day in the fridge. The caramel absorbs some of the apple’s tartness, and the candy toppings soften slightly, creating a more cohesive bite. Some people prefer them this way. I like them both ways—fresh for the crunch, day-old for the flavor.
Nutritional Information & Benefits
Let’s be real—these are a treat. But they’re not as bad as you might think, especially compared to store-bought caramel apples that are loaded with preservatives and artificial ingredients.
Estimated Nutritional Values (per slice, using Granny Smith apples and Butterfinger topping):
- Calories: 180-220
- Fat: 8-10g
- Carbohydrates: 28-32g
- Fiber: 3-4g
- Sugar: 22-26g
- Protein: 2-3g
Health Benefits of Key Ingredients:
- Apples: Rich in fiber, vitamin C, and antioxidants. The pectin in apples supports gut health and helps regulate blood sugar. Plus, they’re hydrating and low in calories.
- Caramel: Okay, it’s mostly sugar and butter. But in moderation, it provides quick energy and satisfies sweet cravings, which can help prevent overindulging in less healthy options.
- Candy Toppings: Some candies contain nuts, which provide healthy fats and protein. Dark chocolate options offer antioxidants. Even the sugar provides a mood boost—sometimes that’s exactly what you need.
Dietary Considerations: This recipe is vegetarian and can be made vegan, gluten-free, or nut-free with simple substitutions. Always check candy labels for allergens, especially if serving to children. The main allergens are dairy (in the caramel and some candies), nuts (in some candy toppings), and soy (in some chocolate products).
Conclusion
These quick caramel apple slices with Halloween candy toppings have become a fall staple in my house, and I have a feeling they’ll become one in yours too. They’re the kind of recipe that saves you when you’re in a pinch, impresses people without requiring real effort, and makes everyone feel like a kid again. I love them because they’re forgiving—you can mess up the caramel, use the wrong apples, forget to chill them, and they’ll still taste amazing. They’re not fussy or demanding. They’re just good, honest food that brings people together.
So go ahead—raid your kid’s candy stash, grab some apples, and give these a try. Customize them with whatever toppings you have on hand. Make them your own. And when someone asks for the recipe, just smile and say it’s a secret. I won’t tell.
I’d love to hear how yours turn out! Drop a comment below and let me know what toppings you used. Did you try a variation I didn’t mention? Share it with the community. And if you loved this recipe, don’t forget to pin it on Pinterest or share it with a friend who needs a last-minute Halloween treat. Happy snacking!
Frequently Asked Questions
Can I use pre-made caramel sauce instead of caramel bits?
You can, but the texture will be different. Pre-made sauce is thinner and won’t set as firmly on the apple slices. If you use it, chill the slices for at least 30 minutes before serving, and expect a messier eating experience. It’s still delicious, just not as neat.
How do I prevent the apple slices from browning?
The caramel coating actually helps prevent browning by sealing the apple from air exposure. For extra protection, toss the sliced apples in a mixture of 1 tablespoon lemon juice and 1 cup water before dipping. Pat them dry thoroughly before adding caramel.
Can I make these ahead of time for a party?
Absolutely! Make them up to 24 hours in advance and store them in an airtight container in the refrigerator. Let them sit at room temperature for 15 minutes before serving. The caramel will soften slightly, but the apples stay crisp and the toppings remain crunchy.
What’s the best way to chop sticky candy bars?
Pop the candy bars in the freezer for 10-15 minutes before chopping. The cold temperature makes them less sticky and easier to cut into clean pieces. Use a sharp chef’s knife and a cutting board, and wipe the knife clean between cuts if needed.
Can I use other fruits besides apples?
Definitely! Pears work beautifully—just make sure they’re firm and not too ripe. Banana slices are fun but delicate. Even pineapple chunks or strawberry halves can work. Adjust the dipping technique based on the fruit’s texture, and expect different setting times for the caramel.
Pin This Recipe!

Quick Caramel Apple Slices with 3 Easy Candy Toppings

These quick caramel apple slices with Halloween candy toppings are the perfect last-minute treat for parties, bake sales, or after-school snacks. Ready in just 15 minutes, they use simple ingredients you already have and are endlessly customizable.
- Prep Time: 15 minutes
- Cook Time: 5 minutes
- Total Time: 20 minutes
- Yield: 4 servings 1x
- Category: Dessert
- Cuisine: American
Ingredients
- 4 medium apples (Granny Smith, Honeycrisp, or Fuji)
- 11 oz bag caramel bits (about 2 cups)
- 2 tablespoons heavy cream
- 1 cup Halloween candy toppings (e.g., crushed Butterfinger or Skor bars, mini M&M’s or Reese’s Pieces, chopped Reese’s Peanut Butter Cups, crushed Oreo cookies)
- Lollipop sticks or skewers (optional)
- Flaky sea salt (optional, for finishing)
Instructions
- Wash and dry apples thoroughly. Cut each apple into 6-8 wedges, removing core and seeds. Pat slices dry and refrigerate for 10 minutes.
- While apples chill, prepare candy toppings: chop candy bars into pea-sized pieces, leave M&M’s or Reese’s Pieces whole, crush Oreos in a bag. Place each topping in a small bowl.
- In a small saucepan, combine caramel bits and heavy cream. Warm over low heat, stirring constantly, until smooth and glossy (3-4 minutes). If too thick, add another tablespoon of cream.
- Line a baking sheet with parchment paper or a silicone mat. Arrange topping bowls and apple slices near the saucepan. Insert lollipop sticks into slices if using.
- Working one slice at a time, dip cut side into warm caramel, letting excess drip off. Place on prepared baking sheet. Repeat quickly; if caramel thickens, reheat gently.
- While caramel is still wet, sprinkle chosen toppings over each slice, pressing gently to adhere. Work in batches of 4-5 slices.
- Let slices sit at room temperature for 10 minutes (or refrigerate 5 minutes) to set caramel. Sprinkle with sea salt just before serving if desired.
Notes
For dairy-free version, use coconut cream instead of heavy cream. For nut-free, use M&M’s, Skittles, or crushed pretzels. Cold apples help caramel set faster. Have all toppings ready before melting caramel to avoid hardening. If caramel gets too thick, add a splash of heavy cream, not water.
Nutrition
- Serving Size: 1 slice
- Calories: 200
- Sugar: 24
- Sodium: 120
- Fat: 9
- Saturated Fat: 4
- Carbohydrates: 30
- Fiber: 3.5
- Protein: 2.5
Keywords: caramel apple slices, Halloween candy toppings, quick dessert, easy apple recipe, fall treat, kid-friendly, last-minute dessert


