There used to be a tiny diner off Highway 99 called The Silver Skillet that made the most incredible cheesy rice skillet you could imagine. When they shut down back in 2018—something about a health inspection and a broken fryer that never got fixed—I honestly felt a little lost. That skillet was my go-to after late shifts, and nothing else quite scratched that itch.
After fourteen tries—some burned, some soupy, one where the cheese turned into a weird plastic-like layer—I finally got it. This Easy Cheesy Ground Beef and Rice Skillet recipe is the one that made me stop chasing that memory and start enjoying the present. The funny thing? I think my version is actually better than the original. Not that I’d ever say that out loud if the old cook was listening.
You know that feeling when you take that first bite and everything just clicks? That’s what this recipe delivers. It’s the kind of meal that makes you wonder why you ever ordered takeout in the first place. And honestly, it comes together in about thirty minutes with one pan. Let me show you how it’s done.
Why You’ll Love This Recipe
After testing this recipe more times than I care to admit, here is exactly why it earned a permanent spot in my weekly rotation. I’ve had friends text me for the recipe after one bite, and even my picky nephew asked for seconds—which is basically a miracle.
- Quick & Easy: From start to finish, this meal is on the table in about 30 minutes. Perfect for those nights when you walk in the door hungry and need dinner now.
- Simple Ingredients: No fancy grocery trips required. Ground beef, rice, cheese, and a few pantry staples—that’s it. You probably have most of this already.
- Perfect for Busy Weeknights: This skillet works for those chaotic evenings when everyone is hangry and you need something comforting fast.
- Crowd-Pleaser: Kids love the cheesy goodness, adults appreciate the hearty flavor, and everyone goes back for more.
- Unbelievably Delicious: The way the cheese melts into the rice and beef creates this creamy, savory situation that is pure comfort food magic.
What makes this recipe different from all the other ground beef and rice skillets out there? It’s the technique. I brown the beef until it’s deeply caramelized, then let the rice toast slightly before adding the liquid. That extra step creates layers of flavor that make this taste like it simmered all day when it really came together in half an hour.
This isn’t just another weeknight dinner—it’s the kind that makes you close your eyes after that first forkful. It’s comfort food reimagined: hearty, cheesy, and deeply satisfying without requiring a complicated ingredient list or hours in the kitchen.
What Ingredients You Will Need
This recipe uses simple, wholesome ingredients that work together to create something truly special. Most of these are pantry staples, which means you can make this on a whim without a special grocery run.
- Ground beef (1 pound): I prefer 80/20 for the best flavor. The fat adds richness that leaner blends just can’t match. If you’re watching your fat intake, 85/15 works fine too.
- Long-grain white rice (1 cup): This gives the best texture. Basmati or jasmine work beautifully too. Avoid instant rice—it turns mushy and doesn’t absorb the flavors the same way.
- Yellow onion (1 medium, diced): Adds that savory base flavor that builds the whole dish. Sweet onions work great if that’s what you have.
- Garlic (3 cloves, minced): Fresh garlic makes a real difference here. I’ve tried the jarred stuff in a pinch, and honestly, fresh is worth the extra thirty seconds.
- Beef broth (2 cups): Use low-sodium so you can control the salt level. Better than Bouillon is my go-to brand—the flavor is just deeper and richer than most store-bought broths.
- Diced tomatoes (1 can, 14.5 ounces, undrained): Fire-roasted if you can find them. They add a subtle smokiness that makes this skillet extra special.
- Shredded cheddar cheese (1 ½ cups): Sharp cheddar gives the most flavor. Shred it yourself from a block—the pre-shredded stuff has anti-caking agents that prevent smooth melting.
- Chili powder (1 teaspoon): Adds warmth without heat. Adjust based on your preference.
- Cumin (½ teaspoon): That earthy, slightly nutty flavor that makes everything taste more complex.
- Paprika (½ teaspoon): Smoked paprika adds a lovely depth, but regular works perfectly too.
- Salt and black pepper (to taste): Don’t be shy with the pepper—it balances the richness beautifully.
- Olive oil (1 tablespoon): For browning the beef and sautéing the aromatics.
- Fresh parsley (for garnish, optional): Adds a pop of color and freshness that cuts through the richness.
For substitutions, ground turkey or chicken works wonderfully if you want a lighter option. Use brown rice, but increase the cooking time to about 45 minutes and add an extra ¼ cup of broth. For a dairy-free version, try your favorite plant-based shredded cheese—just know the melt won’t be quite as luxurious.
Equipment Needed
One of the best things about this recipe is how little equipment it requires. You don’t need a fancy kitchen to pull this off.
- Large skillet or Dutch oven (12-inch): A deep, heavy-bottomed skillet works best. Cast iron gives amazing even heat, but a good non-stick or stainless steel pan works perfectly too. I use my trusty Lodge cast iron for this—it’s seen more meals than I can count.
- Wooden spoon or spatula: For breaking up the beef and stirring everything together. A flat-edged wooden spoon is my favorite tool here.
- Cutting board and knife: For dicing the onion and mincing the garlic. A sharp knife makes this step much more pleasant.
- Measuring cups and spoons: For accurate ingredient portions. Eyeballing works for some recipes, but this one benefits from proper measurements.
- Cheese grater: If you’re shredding your own cheese (which I highly recommend). A box grater is perfectly fine.
- Lid that fits your skillet: Crucial for the steaming phase. If your skillet doesn’t have a lid, a baking sheet works in a pinch.
Don’t own a cast iron skillet? No worries. A deep non-stick pan from a budget-friendly brand works great. The key is having a pan large enough to hold everything without crowding.
Preparation Method
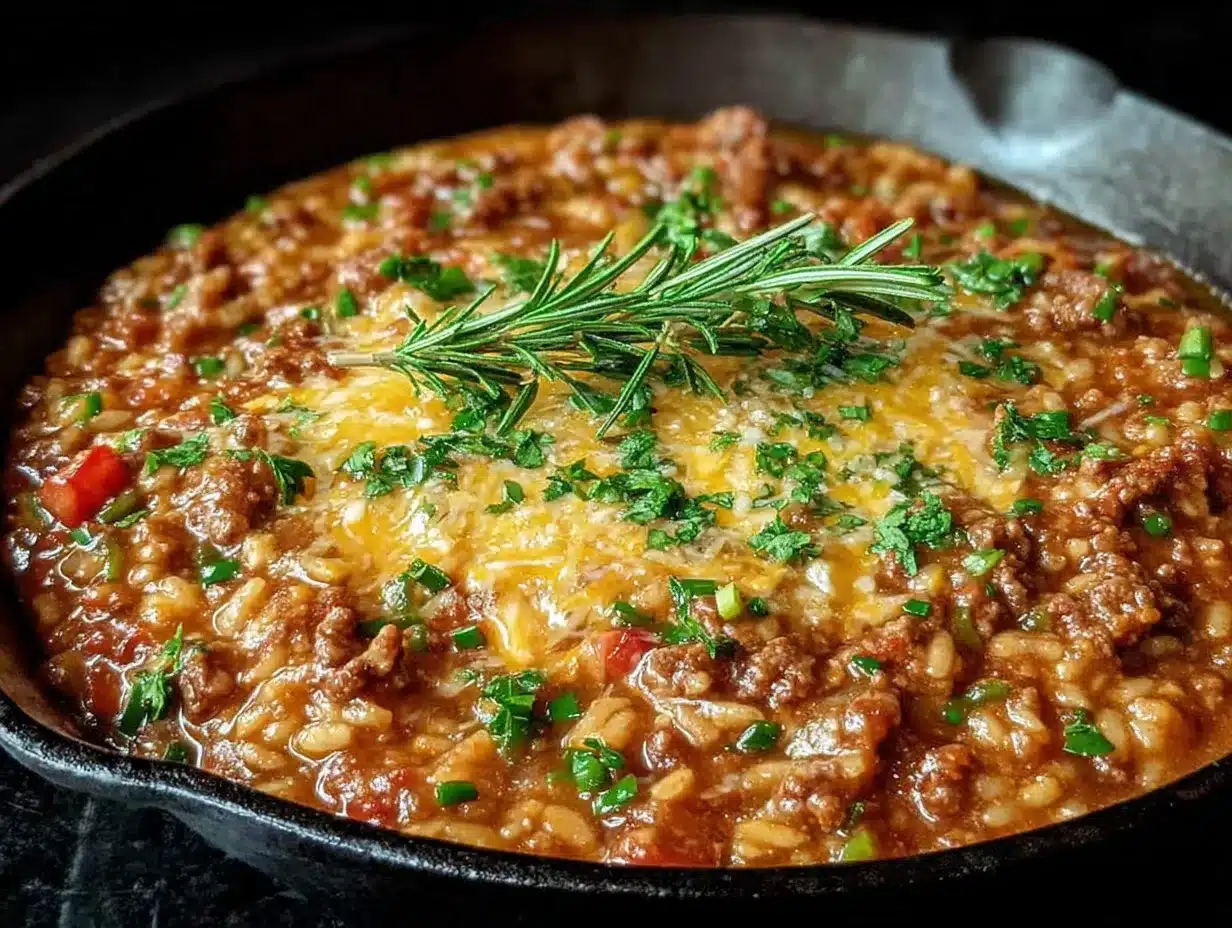
Let’s get cooking. This comes together faster than you’d expect, so have everything prepped and ready before you start.
- Prep your ingredients first. Dice the onion, mince the garlic, and shred the cheese if you’re doing it yourself. Measure out the rice, broth, and spices. Having everything ready makes the process smooth and stress-free.
- Heat the olive oil in your large skillet over medium-high heat. You want it shimmering but not smoking—about 2 minutes.
- Add the ground beef and cook for 5-6 minutes, breaking it up with your wooden spoon as it browns. Don’t stir constantly—let it sit for a minute between stirs to develop that beautiful brown crust. This is where the flavor lives.
- Remove the beef with a slotted spoon and set it aside in a bowl. Leave about 1 tablespoon of drippings in the pan. If there’s too much, pour off the excess.
- Add the diced onion to the hot pan and cook for 3-4 minutes until softened and translucent. Scrape up any brown bits from the bottom—that’s pure flavor.
- Add the garlic and cook for 30 seconds until fragrant. Watch it carefully—burned garlic turns bitter fast.
- Add the rice and stir for 1-2 minutes until it starts to toast slightly. You’ll hear it crackle and smell a nutty aroma. This step makes a real difference in the final texture.
- Pour in the beef broth and undrained diced tomatoes. Stir in the chili powder, cumin, paprika, salt, and pepper. Bring everything to a boil.
- Return the beef to the pan and stir to combine. Reduce the heat to low, cover with the lid, and let it simmer for 18-20 minutes. Don’t peek too often—every time you lift that lid, steam escapes and cooking time increases.
- Check the rice at the 18-minute mark. It should be tender and most of the liquid absorbed. If it’s still liquidy, cook uncovered for 2-3 more minutes. If it’s dry but the rice isn’t done, add ¼ cup more broth.
- Remove from heat and sprinkle the shredded cheddar cheese evenly over the top. Cover again for 2-3 minutes until the cheese melts into a glorious, gooey blanket.
- Garnish with fresh parsley if you’re using it. Serve immediately while that cheese is still stretchy and warm.
One thing I learned the hard way: don’t rush the browning step. That deep caramelization on the beef is what separates a good skillet from a great one. The first few times I made this, I was too impatient and ended up with gray, sad beef. Trust the process.
Cooking Tips & Techniques
Over the years, I’ve made every mistake you can imagine with this recipe. Here’s what I’ve learned so you don’t have to repeat my failures.
Don’t skip toasting the rice. This is the step that elevates this dish from fine to fantastic. That brief sauté in the hot pan with the aromatics gives the rice a nutty depth that carries through the whole dish. It takes two extra minutes and makes all the difference.
Watch your heat levels. Once you add the broth and cover the pan, keep it at a gentle simmer—not a rolling boil. High heat will cook off the liquid too fast and leave you with undercooked rice in a dry pan. Ask me how I know this. (Spoiler: it was not delicious.)
Let it rest before serving. That two-minute rest with the lid on after adding the cheese isn’t just for melting—it lets the rice finish absorbing any remaining liquid and allows the flavors to settle together. I know it’s hard to wait, but it’s worth it.
Shred your own cheese. I cannot emphasize this enough. Pre-shredded cheese is coated with cellulose and other anti-caking agents that prevent smooth melting. Freshly shredded cheddar melts into a silky, cohesive layer that coats every grain of rice. The difference is night and day.
Taste and adjust. Before you add the cheese, taste the rice and beef mixture. Does it need more salt? A pinch of cayenne for heat? A squeeze of lime for brightness? This is your chance to make it exactly how you like it.
One common mistake: adding too much liquid because you’re worried about the rice cooking. Trust the ratios—1 cup of rice to 2 cups of liquid plus the juice from the tomatoes is exactly right. More liquid just makes mushy rice.
Variations & Adaptations
This recipe is wonderfully flexible. Here are some ways to make it your own.
Tex-Mex Version: Add ½ cup of corn kernels and a can of drained black beans along with the broth. Top with pickled jalapeños and a dollop of sour cream. This version disappears fast at potlucks.
Vegetarian Option: Swap the ground beef for a plant-based crumble or two cans of black beans. Use vegetable broth instead of beef broth. The texture is slightly different, but the flavor is still deeply satisfying.
Spicy Kick: Add a diced jalapeño with the onion, use pepper jack cheese instead of cheddar, and stir in a teaspoon of hot sauce before serving. My husband requests this version weekly.
Low-Carb Adaptation: Replace the rice with cauliflower rice. Sauté the cauliflower rice in the pan for 3-4 minutes before adding the beef back, then reduce the broth to ½ cup and simmer for only 5 minutes. It’s lighter but still hits that comfort food spot.
Extra Veggie Version: Add diced bell peppers and zucchini along with the onion. Stir in a handful of spinach right before adding the cheese. The vegetables add color, nutrients, and texture without overwhelming the dish.
Cheese Lover’s Dream: Use a blend of cheddar, Monterey Jack, and a little cream cheese stirred in before the shredded cheese goes on top. It’s indulgent, but sometimes that’s exactly what dinner needs to be.
I once made a Greek-inspired version with ground lamb, oregano, feta cheese, and a squeeze of lemon at the end. It was completely different but absolutely wonderful. Don’t be afraid to experiment—this skillet is forgiving.
Serving & Storage Suggestions
This skillet is hearty enough to be a complete meal on its own, but a few simple sides can round it out beautifully.
Serving temperature: Serve this hot, straight from the skillet. That gooey cheese and tender rice are at their absolute best fresh off the stove. I like to bring the whole skillet to the table for a casual family-style presentation.
What to serve alongside: A simple green salad with a bright vinaigrette cuts through the richness perfectly. Steamed broccoli or roasted green beans add color and crunch. Warm tortillas or crusty bread are great for sopping up every last bit of cheesy goodness. For a complete meal, try serving it with a side of black bean and corn salad for extra freshness.
Storage instructions: Let the skillet cool completely, then transfer leftovers to an airtight container. It will keep in the refrigerator for up to 4 days. The rice will absorb more liquid as it sits, so don’t be surprised if it’s slightly thicker the next day.
Freezing: This recipe freezes well for up to 3 months. Portion it into individual containers for easy lunches. Thaw overnight in the refrigerator before reheating.
Reheating: The best way to reheat is in a skillet over medium-low heat with a splash of broth or water to loosen it up. Stir occasionally until heated through—about 5-7 minutes. The microwave works in a pinch, but the texture won’t be quite as nice. If microwaving, cover the bowl and heat in 30-second bursts, stirring between each.
The flavors actually develop and deepen overnight. Leftovers the next day often taste even better than the first serving—if you can believe that.
Nutritional Information & Benefits
Here’s the nutritional breakdown for one serving (about 1 ½ cups, based on 4 servings):
| Nutrient | Amount |
|---|---|
| Calories | 485 |
| Protein | 32g |
| Carbohydrates | 42g |
| Fat | 20g |
| Saturated Fat | 9g |
| Fiber | 2g |
| Sodium | 680mg |
This meal offers a solid balance of protein from the beef and cheese, carbohydrates from the rice for sustained energy, and calcium from the dairy. The tomatoes provide lycopene and vitamin C, while the onions and garlic offer antioxidants and anti-inflammatory benefits.
For those watching their sodium, use low-sodium broth and reduce the added salt. You can also swap in brown rice for extra fiber and nutrients, though the cooking time will increase slightly.
This isn’t a health food—it’s comfort food made with real ingredients. But it’s honest cooking that nourishes both body and soul, and sometimes that’s exactly what we need.
Conclusion
This Easy Cheesy Ground Beef and Rice Skillet is proof that simple ingredients, treated with care, can create something truly memorable. It’s the dinner I turn to when I need a guarantee—a recipe that never fails to satisfy, never stresses me out, and always leaves everyone at the table happy.
Whether you’re feeding a hungry family on a Tuesday night or just craving something warm and comforting after a long day, this skillet delivers. Don’t be afraid to make it your own—swap in your favorite cheese, add extra vegetables, or turn up the heat with some chili flakes. The beauty of this recipe is how adaptable it is while still being foolproof.
I’d love to hear how it turns out for you. Did you try a variation that became your new favorite? Did your kids ask for seconds? Drop a comment below and share your experience—I read every single one and I’m always looking for new ideas to try in my own kitchen.
Now go make that skillet dinner you’ve been craving. You deserve it.
Frequently Asked Questions
Can I use ground turkey instead of beef?
Absolutely. Ground turkey works wonderfully in this recipe. Just add a tablespoon of olive oil when cooking it since turkey is leaner, and don’t skip the browning step—it needs that caramelization for flavor.
Why is my rice still hard after 20 minutes?
A few possible reasons: the heat was too low, the lid wasn’t tight enough, or you lifted the lid too often during cooking. Next time, make sure you’re at a gentle simmer (not just warm) and keep that lid on tight.
Can I make this in a slow cooker?
You can, but the texture will be different. Brown the beef and onions first on the stovetop, then transfer everything except the cheese to the slow cooker. Cook on low for 2-3 hours, then add the cheese at the end. The rice will be softer than the stovetop version.
How do I make this gluten-free?
This recipe is naturally gluten-free as written! Just double-check your beef broth label—some brands add wheat-based ingredients. Otherwise, you’re good to go.
Can I double this recipe?
Yes, but use a larger pan or Dutch oven. A 12-inch skillet is perfect for a single batch. For a double batch, use a 5-6 quart Dutch oven and increase the cooking time by about 5 minutes. You may need to brown the beef in batches for the best results.
Pin This Recipe!

Easy Cheesy Ground Beef and Rice Skillet Recipe

A quick and easy one-pan meal featuring ground beef, rice, and melted cheddar cheese. Ready in about 30 minutes, this comforting skillet dinner is perfect for busy weeknights and is a guaranteed crowd-pleaser.
- Prep Time: 10 minutes
- Cook Time: 25 minutes
- Total Time: 35 minutes
- Yield: 4 servings 1x
- Category: Main Course
- Cuisine: American
Ingredients
- 1 pound ground beef (80/20 preferred)
- 1 cup long-grain white rice
- 1 medium yellow onion, diced
- 3 cloves garlic, minced
- 2 cups low-sodium beef broth
- 1 can (14.5 ounces) diced tomatoes, undrained (fire-roasted preferred)
- 1 ½ cups shredded sharp cheddar cheese
- 1 teaspoon chili powder
- ½ teaspoon cumin
- ½ teaspoon paprika (smoked preferred)
- Salt and black pepper to taste
- 1 tablespoon olive oil
- Fresh parsley for garnish (optional)
Instructions
- Prep your ingredients first. Dice the onion, mince the garlic, and shred the cheese if doing it yourself. Measure out the rice, broth, and spices.
- Heat the olive oil in a large skillet over medium-high heat until shimmering, about 2 minutes.
- Add the ground beef and cook for 5-6 minutes, breaking it up with a wooden spoon, until deeply browned. Remove beef with a slotted spoon and set aside, leaving about 1 tablespoon of drippings in the pan.
- Add the diced onion to the hot pan and cook for 3-4 minutes until softened and translucent, scraping up any brown bits.
- Add the garlic and cook for 30 seconds until fragrant.
- Add the rice and stir for 1-2 minutes until it starts to toast slightly and smells nutty.
- Pour in the beef broth and undrained diced tomatoes. Stir in chili powder, cumin, paprika, salt, and pepper. Bring to a boil.
- Return the beef to the pan and stir to combine. Reduce heat to low, cover, and simmer for 18-20 minutes. Avoid lifting the lid too often.
- Check the rice at 18 minutes. It should be tender and most liquid absorbed. If still liquidy, cook uncovered for 2-3 more minutes. If dry but rice not done, add ¼ cup more broth.
- Remove from heat and sprinkle shredded cheddar cheese evenly over the top. Cover for 2-3 minutes until cheese is melted.
- Garnish with fresh parsley if desired. Serve immediately.
Notes
Don’t skip toasting the rice for extra nutty flavor. Shred your own cheese for best melting. Let the skillet rest for 2 minutes after adding cheese before serving. For substitutions: ground turkey or chicken works; use brown rice with increased cooking time (45 minutes) and extra ¼ cup broth; for dairy-free, use plant-based cheese.
Nutrition
- Serving Size: 1 ½ cups
- Calories: 485
- Sodium: 680
- Fat: 20
- Saturated Fat: 9
- Carbohydrates: 42
- Fiber: 2
- Protein: 32
Keywords: ground beef, rice, cheese, skillet, weeknight dinner, comfort food, one-pan meal


