I was digging through my glove compartment last Tuesday, searching for a lost parking receipt, when a crumpled paper bag slid out from under the passenger seat. The faint smell of cinnamon and brown sugar hit me—and suddenly I was eleven years old in my neighbor Mrs. Kowalski’s kitchen, watching her peel apples over the newspaper spread across her worn Formica table. She’d let me scoop the salted caramel from the jar she kept hidden behind the flour canister, her fingers sticky and patient as she showed me how to crimp the edges just so. I haven’t thought about those afternoons in years. Mrs. K moved to Florida back when I was in high school, and I never did learn her trick for getting the crust that perfectly flaky. But honestly, I’ve been trying ever since.
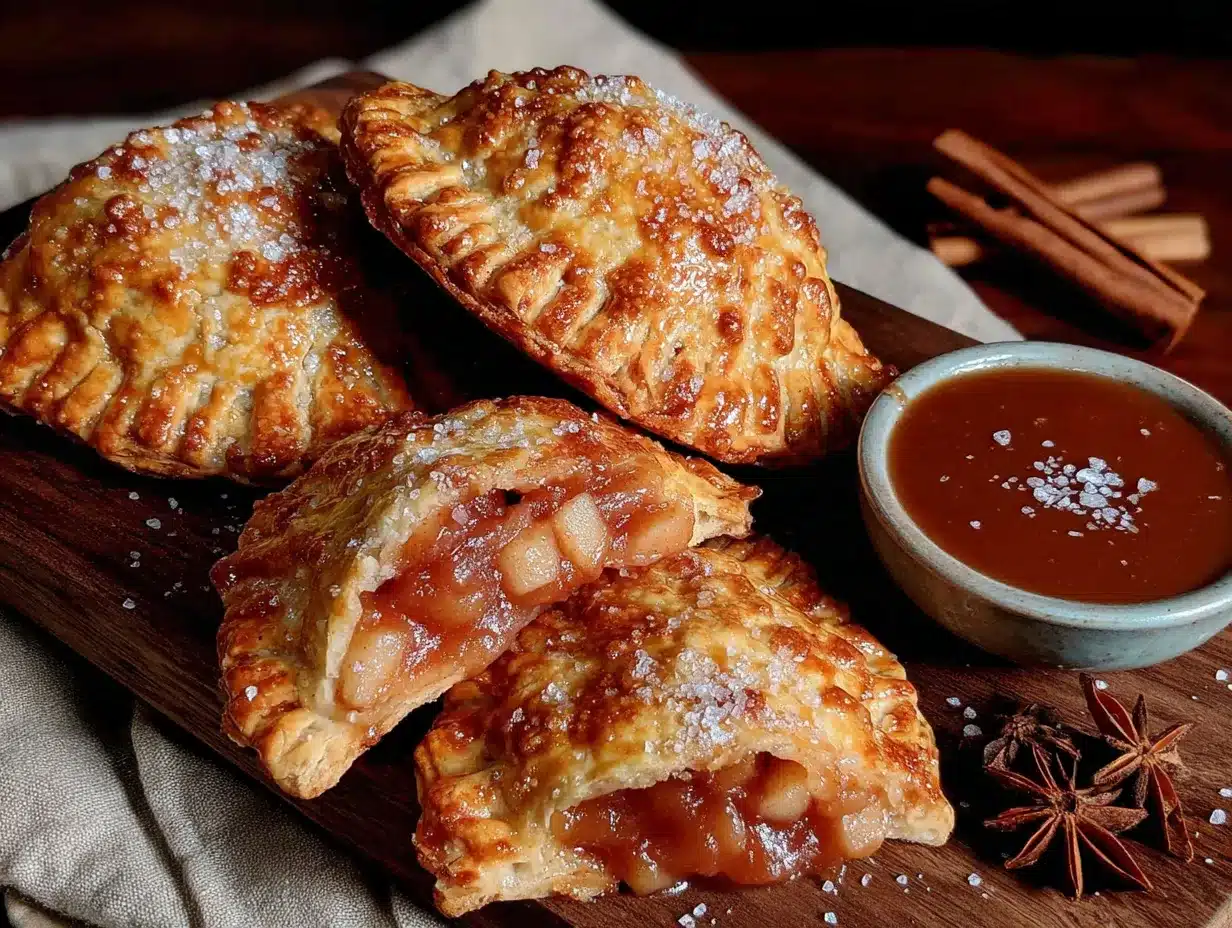
These salted caramel apple hand pies are my best attempt at catching that feeling again—the one where the kitchen gets warm and the air turns sweet and everything slows down for a minute. They’re not fancy, let me tell you. They’re the kind of thing you make on a Sunday when the leaves are finally turning and you realize you’ve been craving something cozy for weeks without even knowing it. I messed up the first batch pretty badly—forgot to chill the dough long enough and ended up with more of a caramel puddle situation than a proper pie. But that second batch? That one got it right. The pastry stayed tender, the apples softened just enough, and that salted caramel oozed out in all the right places.
Maybe you’ve been there too—standing in your kitchen with a pile of apples and no real plan, just a hunch that something good could happen if you gave it a try. That’s exactly where these hand pies come in. They’re forgiving, they’re portable, and they taste like the best parts of fall wrapped up in a little pastry pocket. I keep making them because they remind me that some things are worth getting right—even if it takes a few tries to get there.
Why You’ll Love This Recipe
I’ve tested this recipe more times than I care to admit—through burnt bottoms, leaky fillings, and one memorable incident involving a runaway caramel situation that nearly ruined my favorite baking sheet. So trust me when I say these hand pies are worth every single attempt. Here’s why they’ve become my go-to fall bake:
- Quick & Easy: From start to finish, you’re looking at about an hour. The active prep time is even less—maybe 20 minutes if you’re moving at a relaxed pace. Perfect for those afternoons when the baking itch hits but you don’t want to commit to a full pie.
- Simple Ingredients: Nothing weird here. Apples, butter, flour, sugar, caramel—all things you probably already have kicking around your kitchen. No specialty store trips required.
- Perfect for Fall Gatherings: These little pies were made for apple picking trips, bonfire nights, Thanksgiving leftovers, or just a quiet Tuesday with a cup of tea. They travel well, which is more than I can say for most pies I’ve made.
- Crowd-Pleaser: I brought a batch to my book club last month and they vanished before we even got to chapter two. Kids love them, adults love them, and people who claim they “don’t do dessert” somehow always find room for one.
- Unbelievably Delicious: The combination of tender apples, rich salted caramel, and buttery flaky pastry is the kind of thing that makes you close your eyes after the first bite. It’s comfort food, pure and simple.
What makes these different from other apple hand pie recipes? It’s the caramel, honestly. Most recipes just toss in some sugar and hope for the best. But I’ve figured out that folding the salted caramel right into the apple filling—not just drizzling it on top—gives you that gooey, irresistible center in every single bite. Plus, I use a trick with cold butter in the pastry that my neighbor never got around to teaching me, but I figured out through trial and error. It makes the crust impossibly flaky without being fussy.
This isn’t just another apple recipe. It’s the kind that makes you pause mid-bite and think, yeah, this is exactly what fall should taste like.
What Ingredients You Will Need
This recipe uses simple, honest ingredients to create something that feels way more special than it should. Most of these are pantry staples, especially if you’ve done any fall baking before. Let me walk you through what you’ll need and why each one matters.
For the Pastry
- 2 ½ cups all-purpose flour (I prefer Gold Medal for consistent results, but any standard brand works fine)
- 1 teaspoon salt (fine sea salt or table salt—just not the coarse stuff)
- 1 tablespoon granulated sugar (just a touch to help with browning)
- 1 cup unsalted butter, very cold and cut into small cubes (this is non-negotiable—cold butter equals flaky pastry. I pop mine in the freezer for 15 minutes before cutting)
- 6-8 tablespoons ice water (you might not need all of it, so add slowly)
For the Apple Filling
- 3 medium apples, peeled and diced into ¼-inch pieces (I use Honeycrisp or Granny Smith—the first for sweetness, the second for tartness that cuts through the caramel. A mix of both is my favorite)
- 2 tablespoons unsalted butter
- ¼ cup brown sugar, packed (light or dark both work—dark gives a deeper molasses flavor)
- 1 teaspoon ground cinnamon
- ¼ teaspoon ground nutmeg (freshly grated if you have it, but pre-ground is fine)
- ⅛ teaspoon ground cloves (optional, but I love the warmth it adds)
- 1 tablespoon lemon juice (keeps the apples from browning and brightens the flavor)
- 1 teaspoon vanilla extract
- Pinch of salt
For the Salted Caramel
- ½ cup granulated sugar
- 2 tablespoons unsalted butter, softened
- ¼ cup heavy cream, at room temperature (cold cream will seize the caramel—trust me, I learned this the hard way)
- ½ teaspoon flaky sea salt (plus more for sprinkling on top—Maldon is my go-to)
For Assembly
- 1 large egg, beaten with 1 tablespoon water (for egg wash)
- Turbinado or coarse sugar (for sprinkling on top—the crunch is everything)
A few notes on substitutions: If you need a dairy-free version, use cold vegan butter in the pastry and coconut cream in the caramel. For gluten-free, I’ve had good luck with a 1:1 gluten-free flour blend, though the texture will be slightly more delicate. And if you’re short on time, store-bought pie crust works in a pinch—just make sure it’s the refrigerated kind, not the frozen deep-dish shells.
Equipment Needed
You don’t need a ton of fancy equipment for these hand pies, which is part of why I love making them. Here’s what you’ll want to have on hand:
- Baking sheet (a standard half-sheet pan works perfectly—line it with parchment paper for easy cleanup)
- Rolling pin (I use a French-style tapered pin, but any rolling pin will do. No rolling pin? A wine bottle works in a pinch—I’ve been there)
- Large bowl (for mixing the pastry dough)
- Pastry cutter or two forks (for cutting butter into flour. Your hands work too, just work quickly so the butter doesn’t warm up)
- Medium skillet (for cooking the apple filling)
- Small saucepan (for making the caramel—a light-colored pan helps you see the color change)
- Pastry brush (for egg wash)
- Sharp knife or pizza cutter (for cutting the pastry)
- Measuring cups and spoons
- Parchment paper
- Wire cooling rack
If you don’t have a pastry cutter, honestly, two knives work just fine—just cut the butter into the flour in opposite directions until it looks like coarse meal. And if you’re making these with kids, skip the fancy tools and let them use their hands. It’s messier, but it’s more fun.
Preparation Method
Alright, let’s get to the good part. I’ll walk you through this step by step, including all the little things I wish someone had told me the first time around.
Step 1: Make the Pastry Dough
In a large bowl, whisk together the flour, salt, and sugar. Add the cold butter cubes and toss to coat them in the flour. Using a pastry cutter or your fingertips, work the butter into the flour until the mixture resembles coarse meal with some pea-sized butter pieces remaining. Don’t overwork it—those little bits of butter are what create flaky layers. Drizzle 6 tablespoons of ice water over the mixture and stir with a fork until the dough just comes together. If it seems dry, add the remaining water, one tablespoon at a time. Turn the dough out onto a lightly floured surface, shape it into a disc, wrap it in plastic wrap, and refrigerate for at least 30 minutes. (I’ve left it overnight before and it was even better the next day.)
Step 2: Make the Salted Caramel
While the dough chills, make your caramel. Place the granulated sugar in a small saucepan over medium heat. Watch it carefully as it melts—it’ll start to turn amber around the edges first. Swirl the pan gently (don’t stir!) until all the sugar has dissolved and turned a deep golden color. This takes about 5-7 minutes. Remove from heat and whisk in the softened butter until melted and smooth. Slowly drizzle in the heavy cream while whisking constantly—it will bubble up dramatically, so be careful. Whisk in the flaky sea salt. Let it cool slightly while you prepare the apples. (Pro tip: if it seizes up on you, just warm it gently over low heat while whisking. It happens to everyone.)
Step 3: Cook the Apple Filling
In a medium skillet over medium heat, melt the 2 tablespoons of butter. Add the diced apples, brown sugar, cinnamon, nutmeg, cloves (if using), and a pinch of salt. Cook for 5-6 minutes, stirring occasionally, until the apples have softened slightly but still hold their shape. You want them tender but not mushy—they’ll continue cooking in the oven. Stir in the lemon juice and vanilla extract. Remove from heat and let cool completely. (I spread mine on a plate to speed up the cooling process. Warm filling will melt your pastry, and nobody wants that.)
Step 4: Assemble the Hand Pies
Preheat your oven to 375°F (190°C) and line a baking sheet with parchment paper. On a lightly floured surface, roll out the chilled dough to about ⅛-inch thickness. Use a sharp knife or pizza cutter to cut out rectangles—I aim for about 4×5 inches, but honestly, they don’t need to be perfect. You should get about 8-10 pieces, depending on how you cut them.
Spoon about 2 tablespoons of the cooled apple filling onto one half of each rectangle, leaving a ½-inch border around the edges. Drizzle about 1 teaspoon of the salted caramel over the apples. (Don’t go overboard here—too much caramel and it’ll leak out during baking. I speak from experience.)
Fold the empty half of the dough over the filling to create a rectangle. Press the edges firmly to seal, then crimp with a fork. Cut 2-3 small slits in the top of each pie to let steam escape. Place the pies on the prepared baking sheet, leaving about 2 inches between each one.
Step 5: Bake
Brush each hand pie with the egg wash, then sprinkle generously with turbinado sugar and a tiny pinch of flaky sea salt. Bake for 20-25 minutes, until the pastry is golden brown and you can see the caramel bubbling through the slits. Let them cool on the baking sheet for 10 minutes before transferring to a wire rack. They’ll be extremely hot inside, so resist the urge to bite into one right away. (I’ve burned my tongue more times than I’d like to admit.)
Cooking Tips & Techniques
After making these hand pies more times than I can count, I’ve picked up a few tricks that make a real difference. Let me share what I’ve learned—including the mistakes I’ve made so you don’t have to repeat them.
Keep everything cold. This is the single most important rule for flaky pastry. Your butter should be straight from the fridge, your water should be ice cold, and if your hands run warm like mine, run them under cold water before handling the dough. I once tried to rush the process on a warm September afternoon and ended up with dense, tough pastry that tasted fine but had zero flake. Never again.
Don’t skip the chilling step. That 30 minutes in the fridge isn’t optional—it lets the gluten relax and the butter firm up again. If you’re making these ahead, you can refrigerate the dough for up to two days. Just wrap it tightly so it doesn’t pick up any fridge smells.
Watch your caramel like a hawk. Sugar can go from golden to burnt in about 30 seconds. I’ve ruined more batches than I want to think about by walking away to check my phone. Stay close, keep the heat at medium, and trust your eyes more than the timer.
Seal those edges well. A leaky hand pie is a sad hand pie. After you press the edges with a fork, give them one more little pinch to make sure there are no gaps. And those steam vents? They’re not optional—without them, your pies might explode in the oven. (Dramatic? Maybe. But I’ve seen it happen.)
Work in batches if needed. If your kitchen is warm, the dough will start getting soft after the first few pies. Just pop the whole baking sheet back in the fridge for 10 minutes before baking. It makes a huge difference in how the pastry holds its shape.
Variations & Adaptations
One of the best things about this recipe is how flexible it is. Here are some ways I’ve adapted it over the years:
Apple Variations: Not a fan of Honeycrisp or Granny Smith? Try Fuji for extra sweetness, or Pink Lady for a nice balance. In the fall, I love using a mix of whatever I picked at the orchard that week. Each apple variety brings something different to the table.
Spice It Up: The cinnamon-nutmeg-clove combo is classic, but feel free to experiment. Cardamom adds a lovely floral note, ginger brings warmth, and a pinch of allspice gives it that old-fashioned flavor. I once added a tiny bit of black pepper to the filling and it was unexpectedly amazing—just a hint of heat that played off the caramel.
Dietary Adaptations: For a vegan version, use cold vegan butter in the pastry and coconut cream in the caramel. The texture will be slightly different, but still delicious. For gluten-free, a good 1:1 flour blend works well, though the dough will be more delicate to work with. Just be gentle when rolling and folding.
Different Shapes: Who says hand pies have to be rectangles? Use a round cookie cutter for mini pies, cut them into triangles, or get creative with seasonal shapes. I made leaf-shaped ones for Thanksgiving last year and they were a huge hit.
Savory Twist: Okay, this is a weird one, but hear me out—skip the caramel and add some sharp cheddar cheese to the pastry. It sounds strange, but apple and cheddar is a classic combination for a reason. I tried it on a whim and now I make a batch every fall just for myself.
Serving & Storage Suggestions
These hand pies are best served slightly warm, when the caramel is still a little gooey and the pastry is at its flakiest. Let them cool for about 10-15 minutes after baking—long enough that you won’t burn your mouth, but short enough that they’re still cozy.
For serving, I like to dust them with a little powdered sugar or drizzle with extra caramel. A scoop of vanilla ice cream on the side is never a bad idea, and a cup of hot apple cider or coffee makes it a full fall experience. If you’re feeling fancy, a dollop of whipped cream and a sprinkle of cinnamon takes them over the top.
These also make great gifts. I’ve wrapped them in little cellophane bags tied with twine and handed them out to neighbors, coworkers, and anyone who looked like they needed a pick-me-up. They travel surprisingly well, though I’d recommend packing them in a single layer so they don’t get squished.
Storage: Keep leftover hand pies in an airtight container at room temperature for up to 2 days, or in the refrigerator for up to 5 days. The pastry will soften slightly in the fridge, but they’re still delicious. To reheat, pop them in a 300°F oven for 5-7 minutes, or in the microwave for about 15 seconds if you’re in a hurry. (The microwave will soften the pastry, so the oven is better if you want that crispy texture back.)
You can also freeze unbaked hand pies. Assemble them completely, place them on a baking sheet, and freeze until solid. Then transfer to a freezer bag and store for up to 3 months. Bake straight from frozen, adding 5-7 minutes to the baking time. I do this every fall so I can have hand pies whenever the craving hits.
The flavors actually get better after a day or two—the caramel soaks into the apples a little more, and everything melds together beautifully. Not that they usually last that long in my house.
Nutritional Information & Benefits
Let’s be real—these are a treat, not a health food. But that doesn’t mean they’re without their merits. Each hand pie (based on a batch of 8) contains approximately:
- Calories: 320-350
- Fat: 18g
- Carbohydrates: 40g
- Protein: 4g
- Fiber: 2g
- Sugar: 22g
On the upside, apples are a good source of fiber and vitamin C, especially if you leave the peels on (though I usually don’t for hand pies). Cinnamon has anti-inflammatory properties, and a little bit of butter isn’t going to derail your health goals. Plus, there’s something to be said for the mental health benefits of baking—the rhythm of measuring and mixing, the smell filling your kitchen, the satisfaction of creating something with your own hands.
If you’re watching your sugar intake, you can reduce the caramel or skip it altogether. The apple filling is plenty sweet on its own. And if you’re dairy-free or gluten-free, the substitutions I mentioned earlier work beautifully.
I try not to overthink the nutrition side of things. Food is about more than numbers, and sometimes a hand pie is exactly what you need.
Conclusion
These salted caramel apple hand pies have become my fall tradition, and I hope they become yours too. They’re not complicated, they don’t require special skills, and they deliver way more than you’d expect from such a simple recipe. The flaky pastry, the tender apples, that unexpected hit of salted caramel—it all comes together in a way that feels special without being fussy.
What I love most about this recipe is how adaptable it is. Make it your own—swap in your favorite apples, adjust the spices, play with the shapes. Baking should feel creative, not rigid. And if your first batch doesn’t turn out perfect? That’s okay. Mine didn’t either. Keep trying, keep tasting, and don’t forget to share.
I’d love to hear how these turn out for you. Drop a comment below and let me know what variations you tried, or tag me in your photos if you share them online. Happy fall baking, friend—I’m raising a warm hand pie in your direction.
Frequently Asked Questions
Can I use store-bought pie crust for these hand pies?
Absolutely. If you’re short on time or just not in the mood to make pastry from scratch, refrigerated pie crust works perfectly. Just roll it out slightly thinner than it comes in the package, and proceed with the recipe as written. The texture won’t be quite as flaky, but they’ll still be delicious.
What’s the best apple for hand pies?
I recommend a mix of Honeycrisp and Granny Smith. Honeycrisp adds natural sweetness and holds its shape well, while Granny Smith brings that tartness that balances the caramel. Fuji, Pink Lady, or Braeburn are also great choices. Avoid Red Delicious—they turn mushy and don’t have enough flavor.
Why did my hand pies leak in the oven?
Leaking usually happens for one of three reasons: the filling was too warm when you assembled them, you overfilled them, or the edges weren’t sealed properly. Make sure your filling is completely cool, use about 2 tablespoons per pie, and crimp those edges well. The steam vents are important too—they prevent pressure from building up inside.
Can I make these ahead of time?
Yes! You can make the dough up to 2 days ahead and keep it refrigerated. The filling can be made a day in advance and stored in the fridge. You can also assemble the hand pies completely and freeze them unbaked for up to 3 months. Bake straight from frozen, adding a few extra minutes to the baking time.
How do I reheat leftover hand pies?
The best way is in a 300°F oven for 5-7 minutes—this helps the pastry crisp back up. The microwave works in a pinch (about 15 seconds), but the crust will be softer. If you’re reheating from frozen, let them thaw at room temperature first, then warm in the oven.
Pin This Recipe!

Cozy Salted Caramel Apple Hand Pies: Easy Fall Baking

These salted caramel apple hand pies are the perfect fall treat—flaky pastry filled with tender apples and gooey salted caramel. They’re quick, easy, and guaranteed to disappear at any gathering.
- Prep Time: 20 minutes
- Cook Time: 25 minutes
- Total Time: 1 hour
- Yield: 8 servings 1x
- Category: Dessert
- Cuisine: American
Ingredients
- 2 ½ cups all-purpose flour
- 1 teaspoon salt
- 1 tablespoon granulated sugar
- 1 cup unsalted butter, very cold and cut into small cubes
- 6–8 tablespoons ice water
- 3 medium apples, peeled and diced into ¼-inch pieces (Honeycrisp or Granny Smith recommended)
- 2 tablespoons unsalted butter
- ¼ cup brown sugar, packed
- 1 teaspoon ground cinnamon
- ¼ teaspoon ground nutmeg
- ⅛ teaspoon ground cloves (optional)
- 1 tablespoon lemon juice
- 1 teaspoon vanilla extract
- Pinch of salt
- ½ cup granulated sugar
- 2 tablespoons unsalted butter, softened
- ¼ cup heavy cream, at room temperature
- ½ teaspoon flaky sea salt
- 1 large egg, beaten with 1 tablespoon water
- Turbinado or coarse sugar for sprinkling
Instructions
- Make the pastry dough: In a large bowl, whisk together flour, salt, and sugar. Add cold butter cubes and toss to coat. Using a pastry cutter or fingertips, work butter into flour until mixture resembles coarse meal with some pea-sized butter pieces. Drizzle 6 tablespoons ice water over mixture and stir with a fork until dough just comes together. Add remaining water if needed. Shape into a disc, wrap in plastic, and refrigerate for at least 30 minutes.
- Make the salted caramel: Place granulated sugar in a small saucepan over medium heat. Swirl pan gently until sugar melts and turns deep golden (5-7 minutes). Remove from heat, whisk in softened butter until smooth. Slowly drizzle in heavy cream while whisking constantly. Whisk in flaky sea salt. Let cool slightly.
- Cook the apple filling: In a medium skillet over medium heat, melt 2 tablespoons butter. Add diced apples, brown sugar, cinnamon, nutmeg, cloves (if using), and a pinch of salt. Cook 5-6 minutes until apples soften slightly. Stir in lemon juice and vanilla. Remove from heat and let cool completely.
- Assemble the hand pies: Preheat oven to 375°F (190°C) and line a baking sheet with parchment paper. On a floured surface, roll out chilled dough to ⅛-inch thickness. Cut into rectangles (about 4×5 inches). Spoon about 2 tablespoons cooled apple filling onto one half of each rectangle, leaving a ½-inch border. Drizzle about 1 teaspoon salted caramel over apples. Fold empty half over filling, press edges to seal, and crimp with a fork. Cut 2-3 small slits in top of each pie. Place on prepared baki…
- Bake: Brush each hand pie with egg wash, sprinkle with turbinado sugar and a tiny pinch of flaky sea salt. Bake for 20-25 minutes until golden brown. Cool on baking sheet for 10 minutes before transferring to a wire rack.
Notes
Keep all ingredients cold for flaky pastry. Don’t skip chilling the dough. Watch caramel carefully to avoid burning. Seal edges well to prevent leaking. Work in batches if kitchen is warm. Hand pies can be frozen unbaked for up to 3 months.
Nutrition
- Serving Size: 1 hand pie
- Calories: 335
- Sugar: 22
- Sodium: 280
- Fat: 18
- Saturated Fat: 11
- Carbohydrates: 40
- Fiber: 2
- Protein: 4
Keywords: apple hand pies, salted caramel, fall baking, hand pies, apple dessert, easy pie recipe