“You seriously have to try this cake,” my friend texted as I wiped chocolate smudges off my fingers. It was late evening, and honestly, I was barely keeping up with dinner plans and work deadlines. But that message about an Oreo ice cream cake felt like a tiny rescue call. I figured, why not? I’d been messing around in the kitchen with desserts a bit too much lately, mostly to soothe a week that felt like a never-ending loop of chaos.
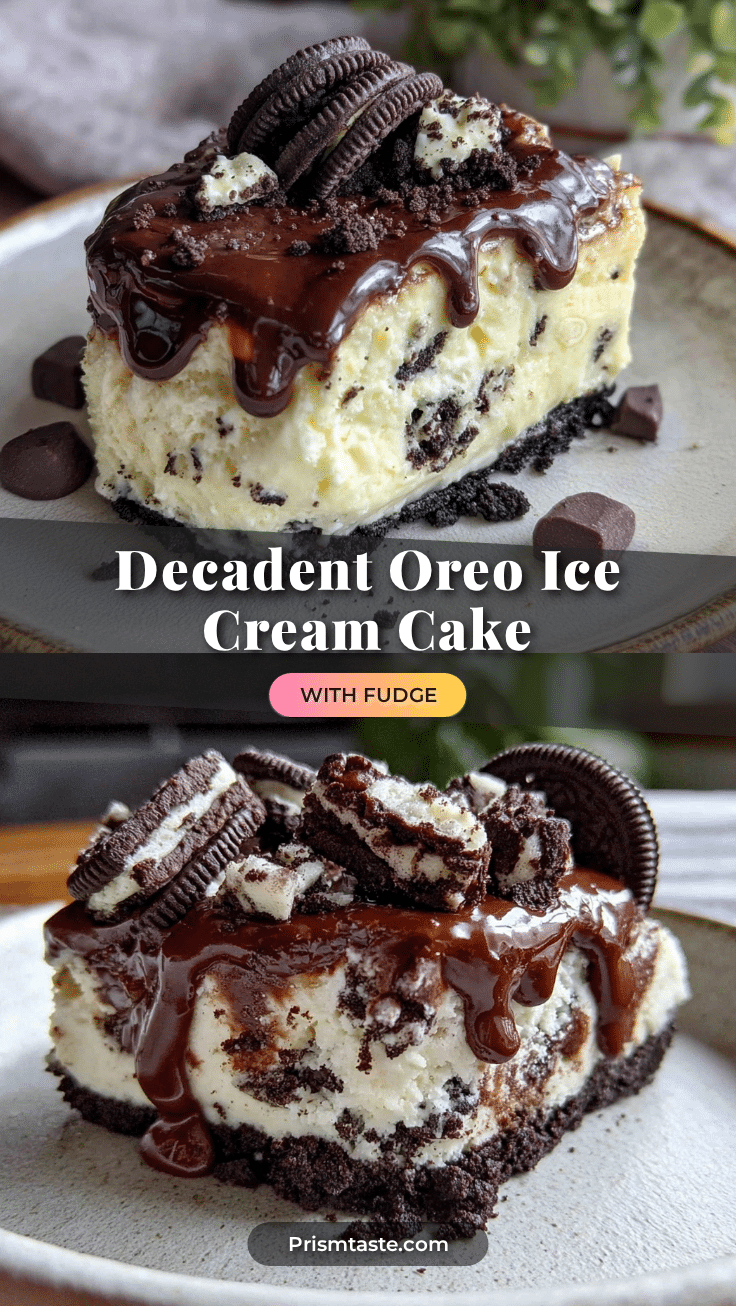
The first time I made this Decadent Oreo Ice Cream Cake with Hot Fudge Layer, it was supposed to be “just a quick treat” for a small get-together. Instead, it turned into this star of the night—people kept asking how I pulled off that gooey hot fudge swirl and the perfect Oreo crunch. It’s funny because I didn’t plan on making something so fancy that night. The hot fudge layer? That was a spur-of-the-moment idea when I realized the ice cream alone needed a little extra “oomph.”
Now, this cake sits in my mental recipe vault as the one I make when I want to impress but don’t want a dozen steps weighing me down. It’s cool, creamy, and honestly, a bit indulgent in the best way. I keep coming back to it, especially when I want that cozy, indulgent vibe without the fuss. And if you’re someone who’s ever felt a little overwhelmed but secretly craves something sweet and satisfying, this might just be your new go-to.
There’s something quietly satisfying about the way the fudge melts into the ice cream, and those Oreo bits add this crunch that wakes up every bite. So yeah, this isn’t just another dessert recipe—it’s the one that somehow makes everything pause and feel a little more special.
Why You’ll Love This Recipe
This Decadent Oreo Ice Cream Cake with Hot Fudge Layer isn’t your everyday frozen treat. I’ve tested it more times than I can count, tweaked the fudge recipe for that perfect velvety texture, and honestly, it’s become a family favorite that’s impossible to resist.
- Quick & Easy: You can assemble this cake in about 20 minutes, making it perfect for last-minute celebrations or when you need a sweet fix fast.
- Simple Ingredients: No need for specialty stores here. Grab your favorite Oreos, some good quality vanilla ice cream, and basic pantry staples for the fudge.
- Perfect for Celebrations: Whether it’s a birthday, a casual dinner party, or just a weekend treat, this cake fits every occasion effortlessly.
- Crowd-Pleaser: Kids love the Oreo crunch, adults appreciate the rich fudge, and everyone comes back for seconds.
- Unbelievably Delicious: The secret’s in the hot fudge layer that melts just enough into the ice cream, creating a texture and flavor combo that feels like pure indulgence.
What sets this recipe apart is the balance between creamy ice cream, crunchy Oreos, and that luscious, easy hot fudge layer that you can make on the stovetop without breaking a sweat. I’ve tried versions with pre-made fudge sauces, but honestly, nothing beats the homemade touch here.
Plus, it’s flexible. You can swap in dairy-free ice cream or add a splash of espresso to the fudge for a grown-up twist. This cake isn’t just dessert; it’s the kind of treat that makes you close your eyes and savor the moment, no matter what kind of day you’re having.
What Ingredients You Will Need
This recipe uses simple, wholesome ingredients to deliver bold flavor and satisfying texture without the fuss. Most are pantry staples, and you might already have everything on hand.
- For the Oreo Base:
- 24 Oreo cookies (regular or double-stuff for extra creaminess)
- 4 tablespoons unsalted butter, melted (adds richness and helps bind)
- For the Ice Cream Layer:
- 1.5 quarts (1.4 liters) vanilla ice cream, softened slightly (I prefer Haagen-Dazs or Ben & Jerry’s for creaminess)
- For the Hot Fudge Layer:
- 1 cup (200 g) granulated sugar
- ⅔ cup (65 g) unsweetened cocoa powder (use Dutch-processed for deeper flavor)
- ½ cup (120 ml) heavy cream
- 4 tablespoons unsalted butter, cubed
- 1 teaspoon pure vanilla extract
- Pinch of salt (balances the sweetness)
- Optional Toppings:
- Crushed Oreos for garnish
- Whipped cream
- Fresh berries (seasonal touch)
If you want a dairy-free version, swap out the ice cream with coconut milk-based varieties and use coconut cream instead of heavy cream in the fudge. For a gluten-free option, choose gluten-free sandwich cookies instead of Oreos.
Equipment Needed
- 9-inch (23 cm) springform pan or a similarly sized cake pan with removable sides (makes unmolding easier)
- Mixing bowls – medium and small
- Small saucepan for the hot fudge
- Rubber spatula for folding and smoothing the ice cream layer
- Food processor or plastic bag and rolling pin to crush Oreos
- Measuring cups and spoons
- A whisk for the fudge sauce
If you don’t have a springform pan, a regular cake pan lined with parchment paper works just fine. Just be extra gentle when removing the cake. I’ve made this with a silicone loaf pan too—it’s not traditional, but hey, it still tastes great. For the hot fudge, a heavy-bottomed saucepan helps prevent burning, but any small pan will do.
Preparation Method
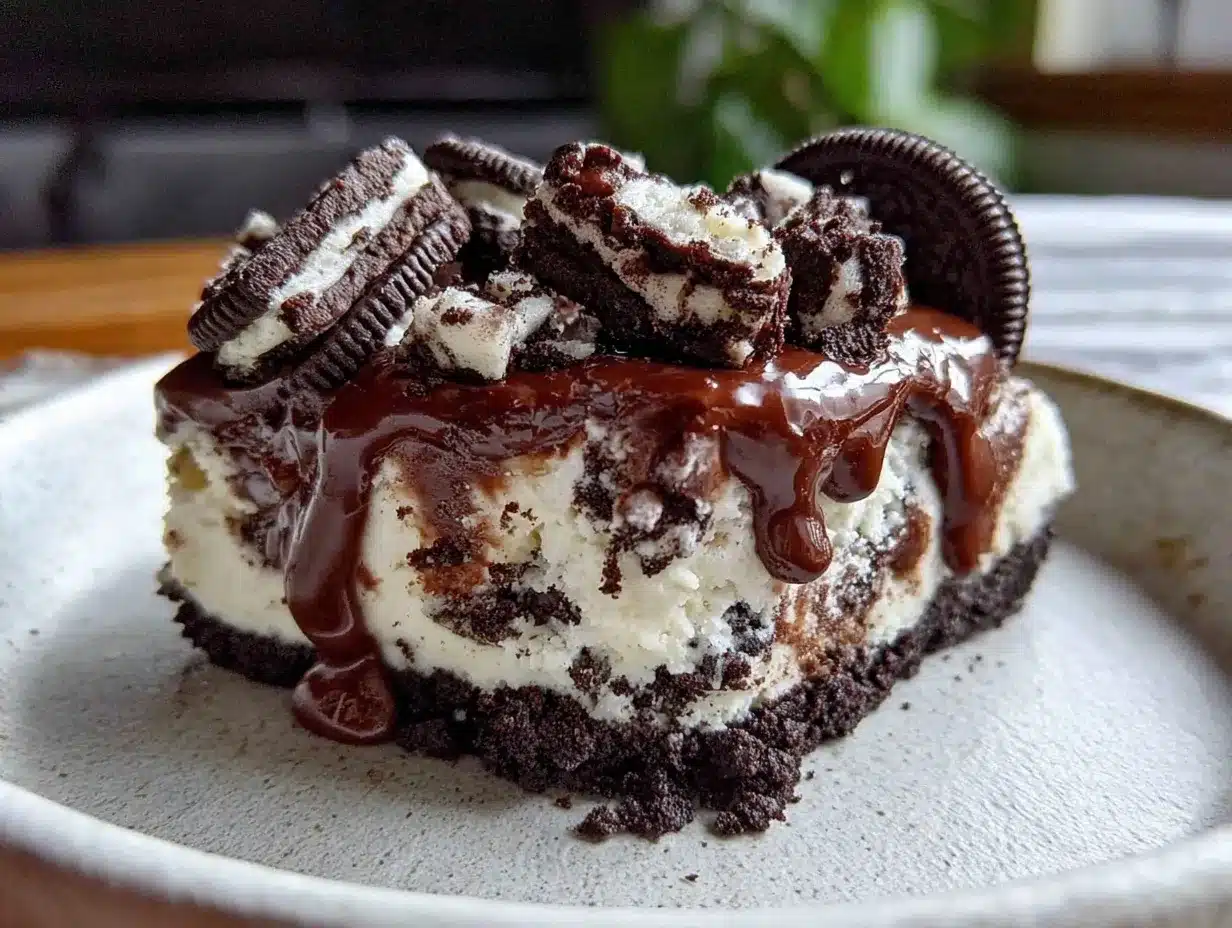
- Prepare the Oreo base: Crush the Oreos finely using a food processor or place them in a sealed plastic bag and bash with a rolling pin. Mix the crushed cookies with melted butter until the mixture resembles wet sand. Press this firmly into the bottom of your springform pan. Chill in the fridge for 15 minutes to set while you prepare the next layers.
- Make the hot fudge layer: In a small saucepan over medium heat, whisk together sugar and cocoa powder until combined. Gradually add heavy cream, stirring constantly to prevent lumps. Bring to a gentle simmer for about 3-5 minutes until the mixture thickens slightly. Remove from heat and stir in butter, vanilla extract, and a pinch of salt. Let it cool for 10 minutes—warm but not hot.
- Assemble the cake: Spread half of the softened vanilla ice cream evenly over the chilled Oreo crust. Pour the cooled hot fudge layer over the ice cream, swirling slightly with a spatula for a marbled effect. Top with the remaining ice cream and smooth the surface carefully.
- Freeze the cake: Cover the cake tightly with plastic wrap or foil and place it in the freezer for at least 4 hours or overnight. This helps the layers set perfectly and flavors meld beautifully.
- Serving prep: About 15 minutes before serving, remove the cake from the freezer and let it sit at room temperature to soften slightly. Run a warm knife around the edges before releasing the springform pan to get clean slices.
Pro tip: If your fudge hardens too much in the fridge, a quick zap in the microwave for 10-15 seconds softens it right up, making it easier to spread or swirl.
Cooking Tips & Techniques
Here are some insights I picked up while making this cake over and over:
- Softening the ice cream: Don’t melt it completely—just soften enough to spread easily. If it’s too soft, the cake becomes messy and hard to slice.
- Crushing Oreos: Aim for mostly fine crumbs with a few bigger chunks for that satisfying crunch. Too coarse, and the base won’t hold well; too fine, and it feels too dense.
- Hot fudge texture: The fudge should be pourable but thick enough to hold shape. Stirring constantly while simmering keeps it smooth and silky.
- Chilling times: Don’t rush the freezing step. It’s tempting, but the cake slices cleaner and tastes better when fully set.
- Knife tips: Use a sharp knife dipped in hot water and wiped dry before slicing. It helps cut through the layers cleanly without dragging the ice cream.
- Multitasking: While the fudge cools, crush your Oreos and soften the ice cream. This keeps the assembly smooth and stress-free.
I remember burning a batch of fudge once because I got distracted—lesson learned: stay close and stir often! Also, freezing the cake uncovered for the first 30 minutes before wrapping prevents condensation, which can make the crust soggy.
Variations & Adaptations
This Oreo ice cream cake is a great canvas for creativity. Here are some ways to switch things up:
- Peanut Butter Twist: Mix ½ cup creamy peanut butter into the softened ice cream for a rich, nutty layer that pairs beautifully with Oreos.
- Mint Oreo Version: Swap regular Oreos with mint-flavored ones and add a few drops of peppermint extract to the hot fudge for a refreshing holiday feel.
- Dairy-Free Option: Use coconut or almond milk-based ice cream and substitute heavy cream with full-fat coconut milk in the fudge sauce. It still gets that luscious texture.
- Mini Cake Cups: Make individual servings by layering crushed Oreos, ice cream, and fudge in small jars or ramekins—perfect for parties or portion control.
- Espresso Infusion: Add 1 teaspoon instant espresso powder to the fudge mixture for a subtle mocha flavor that deepens the chocolate.
One time, I tried adding a layer of crushed salted pretzels between the fudge and ice cream; it brought an unexpected salty crunch that my family couldn’t stop talking about.
Serving & Storage Suggestions
This cake is best served slightly softened so the layers meld perfectly on your tongue. Slice with a warm knife and plate with a dollop of whipped cream or fresh berries for a pop of color and brightness.
It pairs wonderfully with a cup of strong coffee or a chilled glass of milk to balance the rich flavors. For a fun contrast, I sometimes serve it alongside a fresh fruit salad to cut through the sweetness.
Store leftovers tightly wrapped in plastic wrap or an airtight container in the freezer. It keeps well for up to two weeks. When reheating, avoid microwaving directly—just let slices sit at room temperature for 10-15 minutes before enjoying again.
Over time in the freezer, the hot fudge layer can firm up more, adding a slightly fudgier bite, which I find delightful. Just let the cake soften a bit before serving to enjoy that perfect texture.
Nutritional Information & Benefits
This recipe is a treat, so expect indulgence—but there are some perks in the ingredients too. Oreos provide a nostalgic crunch, and the vanilla ice cream brings calcium and protein, especially if you opt for brands that fortify their products.
The cocoa powder in the hot fudge is rich in antioxidants, which is a nice bonus, and using real butter adds a bit of wholesome fat that gives that satisfying mouthfeel.
For those monitoring dietary needs, this recipe can be adapted to gluten-free or dairy-free versions as mentioned earlier. Just be mindful of the sugar content if you’re watching intake.
Honestly, it’s a dessert meant to be enjoyed mindfully and shared with loved ones—that’s part of its charm and wellness in life’s balance.
Conclusion
This Decadent Oreo Ice Cream Cake with Hot Fudge Layer holds a special spot in my recipe rotation because it’s truly one of those desserts that delivers big flavor without a million steps. It’s creamy, crunchy, chocolaty, and just plain fun to make.
Feel free to tweak it—maybe add your favorite cookie or a new twist on the fudge. I love how forgiving and customizable this cake is, making it perfect for any occasion or mood.
Making this cake reminds me that sometimes, the best treats are the ones you can put together quickly but enjoy slowly with good company. If you try it, I’d love to hear how you made it your own or what little surprises you added along the way.
Here’s to sweet moments and simple pleasures—you deserve them.
Frequently Asked Questions
- Can I use other cookies instead of Oreos?
Yes, sandwich cookies like Golden Oreos or even chocolate chip cookies can work. Just crush them finely for the base. - How long can I store the ice cream cake?
Stored properly in the freezer, it stays fresh for up to two weeks. Wrap tightly to avoid freezer burn. - Can I make the hot fudge layer ahead of time?
Absolutely! Make it a day ahead and store it in the fridge. Warm slightly before pouring over the ice cream layer. - What’s the best way to slice the cake?
Use a sharp knife dipped in hot water and wiped dry before each cut. This helps you get clean slices without smushing the layers. - Is there a way to make this cake vegan?
Yes! Use dairy-free ice cream and substitute the butter and cream in the fudge with coconut-based alternatives. Use vegan cookies as well.
For a hearty dinner before this sweet treat, you might enjoy something like the cozy slow cooker beef ragu or the easy slow cooker salsa verde chicken burrito bowls. Both recipes offer comforting flavors that contrast nicely with the cool, rich dessert to follow.
Pin This Recipe!
Decadent Oreo Ice Cream Cake Recipe with Easy Hot Fudge Layer Tutorial

A cool, creamy, and indulgent Oreo ice cream cake featuring a crunchy Oreo base and a luscious homemade hot fudge layer. Perfect for celebrations or a quick sweet fix.
- Prep Time: 20 minutes
- Cook Time: 10 minutes
- Total Time: 4 hours 30 minutes
- Yield: 12 servings 1x
- Category: Dessert
- Cuisine: American
Ingredients
- 24 Oreo cookies (regular or double-stuff)
- 4 tablespoons unsalted butter, melted
- 1.5 quarts vanilla ice cream, softened slightly
- 1 cup granulated sugar
- 2/3 cup unsweetened cocoa powder (Dutch-processed preferred)
- 1/2 cup heavy cream
- 4 tablespoons unsalted butter, cubed
- 1 teaspoon pure vanilla extract
- Pinch of salt
- Optional toppings: crushed Oreos, whipped cream, fresh berries
Instructions
- Crush the Oreos finely using a food processor or place them in a sealed plastic bag and bash with a rolling pin.
- Mix the crushed cookies with melted butter until the mixture resembles wet sand.
- Press this firmly into the bottom of a 9-inch springform pan and chill in the fridge for 15 minutes.
- In a small saucepan over medium heat, whisk together sugar and cocoa powder until combined.
- Gradually add heavy cream, stirring constantly to prevent lumps.
- Bring to a gentle simmer for 3-5 minutes until the mixture thickens slightly.
- Remove from heat and stir in butter, vanilla extract, and a pinch of salt.
- Let the hot fudge cool for 10 minutes until warm but not hot.
- Spread half of the softened vanilla ice cream evenly over the chilled Oreo crust.
- Pour the cooled hot fudge layer over the ice cream, swirling slightly with a spatula for a marbled effect.
- Top with the remaining ice cream and smooth the surface carefully.
- Cover the cake tightly with plastic wrap or foil and freeze for at least 4 hours or overnight.
- About 15 minutes before serving, remove the cake from the freezer and let it sit at room temperature to soften slightly.
- Run a warm knife around the edges before releasing the springform pan to get clean slices.
Notes
Do not melt the ice cream completely; soften just enough to spread. Use a sharp knife dipped in hot water and wiped dry for clean slices. If fudge hardens too much, microwave for 10-15 seconds to soften. Freeze uncovered for 30 minutes before wrapping to prevent condensation.
Nutrition
- Serving Size: 1 slice (1/12th of c
- Calories: 380
- Sugar: 32
- Sodium: 210
- Fat: 22
- Saturated Fat: 13
- Carbohydrates: 42
- Fiber: 2
- Protein: 5
Keywords: Oreo ice cream cake, hot fudge layer, easy dessert, no bake cake, Oreo dessert, ice cream cake recipe, homemade hot fudge