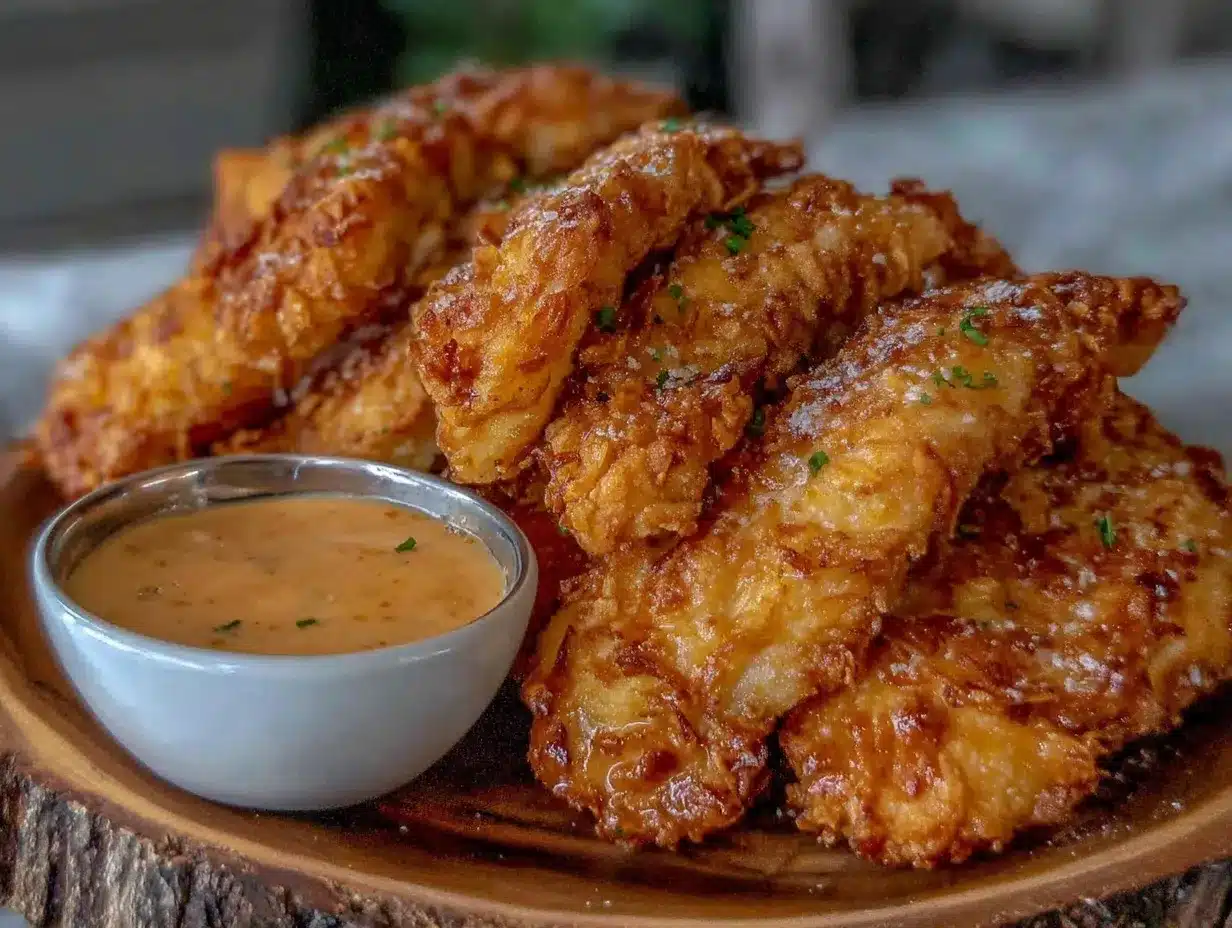
“You won’t believe how close this comes to the real deal,” my friend said as she bit into my homemade chicken fingers one evening. Honestly, that moment stuck with me. I’d spent weeks fiddling with batter blends and sauce ratios, trying to nail the magic behind Raising Cane’s famous chicken fingers and that addictive signature sauce. I wasn’t even a fast food fanatic, but I was curious—could homemade ever match up? It started one rainy night when the craving hit hard, and running out for takeout felt like too much hassle. I threw together a batch with whatever I had, skeptical it’d be anything special.
But the crunch? Spot on. The seasoning? Perfectly balanced—not too salty, just right. And that sauce? Let’s just say I caught myself dipping everything into it. I found myself making this recipe three times that week (not kidding), each time tweaking it slightly, until it felt just right. It’s funny how a simple craving can turn into a bit of an obsession, especially when the results are this satisfying. Like many, I appreciate quick meals that feel like a treat, and these chicken fingers deliver—crispy, juicy, and accompanied by a sauce that’s tangy, creamy, and… well, unforgettable.
So, here we are. This recipe isn’t just a copycat; it’s a little kitchen triumph that brings that Raising Cane’s experience home—without the drive-thru wait or mystery ingredients. If you’ve ever wondered how to make crispy chicken fingers with that signature sauce, I’m sharing the exact recipe I trust for flavor, texture, and that comforting familiarity. It’s become a staple, whether it’s a solo late-night snack or a casual crowd pleaser. And honestly? It’s the kind of dish that makes you pause for a moment and appreciate the simple pleasures of well-made food.
Why You’ll Love This Recipe
Having tested this recipe countless times, I can confidently say it hits all the right notes for anyone craving Raising Cane’s chicken fingers without stepping outside. Here’s what makes these chicken fingers stand out:
- Quick & Easy: From prep to plate in about 30 minutes, making it perfect for busy weeknights or unexpected guests.
- Simple Ingredients: No complicated or exotic items here—just pantry staples and everyday basics.
- Perfect for Any Occasion: Whether you’re hosting a casual game day or craving a cozy dinner, these fingers fit the bill.
- Crowd-Pleaser: Kids and adults alike love the crunchy texture and flavorful bite—always a hit at gatherings.
- Unbelievably Delicious: The crispy, golden breading paired with juicy chicken and that signature sauce is a comfort food combo that feels special.
What sets this recipe apart is the triple-dip batter method, which creates that ultra-crisp crust without being greasy. Plus, the signature sauce uses a clever balance of mayo, ketchup, Worcestershire, and a hint of garlic powder that’s just… spot on. It’s not just a copycat; it’s my best version—tested, tweaked, and family-approved. This recipe delivers that familiar taste while letting you control exactly what goes in, making it a trusted favorite to pull out when you want something satisfying but homemade.
What Ingredients You Will Need
This recipe relies on straightforward, wholesome ingredients to capture that bold flavor and crisp texture without fuss. Most of these are pantry staples, so you probably have them on hand already.
- For the Chicken Fingers:
- Chicken tenderloins – about 1 pound (450 grams), trimmed (fresh or thawed)
- Buttermilk – 1 cup (240 ml), for tenderizing (can substitute with milk + 1 tbsp lemon juice)
- All-purpose flour – 1 ½ cups (180 grams), for coating
- Cornstarch – ½ cup (65 grams), helps with crispiness
- Garlic powder – 1 teaspoon
- Onion powder – 1 teaspoon
- Paprika – 1 teaspoon, adds color and subtle smokiness
- Cayenne pepper – ½ teaspoon, optional for a mild kick
- Salt – 1 ½ teaspoons, adjust to taste
- Black pepper – 1 teaspoon, freshly ground preferred
- Vegetable oil – for frying (about 4 cups or 1 liter), I prefer canola or peanut oil for high smoke point
- For the Signature Sauce:
- Mayonnaise – ½ cup (120 ml), use a good quality brand like Hellmann’s for best flavor
- Ketchup – 2 tablespoons (30 ml), provides sweetness and tang
- Worcestershire sauce – 1 teaspoon, adds depth
- Garlic powder – ½ teaspoon
- Black pepper – ¼ teaspoon
- Hot sauce – a few dashes (optional), for subtle heat
For an easy gluten-free alternative, swap the all-purpose flour with a 1:1 gluten-free baking flour blend, and use gluten-free Worcestershire sauce. If you prefer a dairy-free sauce, try using vegan mayo and a splash of apple cider vinegar instead of Worcestershire.
Equipment Needed
- Deep frying pan or heavy-bottomed skillet – a 10-inch (25 cm) pan works well for shallow frying
- Thermometer – a candy or deep-fry thermometer is handy to keep oil temperature steady around 350°F (175°C)
- Mixing bowls – at least two, one for buttermilk soak and one for flour coating
- Tongs or slotted spoon – for flipping and removing chicken fingers
- Wire rack and baking sheet – to drain excess oil and keep the fingers crispy
- Measuring cups and spoons – for precise seasoning
If you don’t have a thermometer, test the oil by dropping a pinch of flour—if it sizzles immediately, you’re good to go. I’ve also had success with an air fryer for a lighter version, though it won’t have quite the same classic crunch. For those on a budget, a heavy skillet and careful temperature control works just fine!
Preparation Method
- Marinate the Chicken: Place the chicken tenderloins in a bowl and pour over the buttermilk. Stir gently to coat all pieces. Cover and refrigerate for at least 30 minutes (or up to 4 hours). This step tenderizes the meat and helps the coating stick.
- Prepare the Breading: In a separate large bowl, whisk together the flour, cornstarch, garlic powder, onion powder, paprika, cayenne pepper, salt, and black pepper until evenly combined. This seasoning mix is key to that Raising Cane’s flavor.
- Set Up the Dredging Station: Remove chicken from buttermilk, letting excess drip off. Dip each piece back into the flour mixture, pressing gently to coat. For extra crunch, dip the coated chicken again in buttermilk and then back into the flour mixture a second time. This double-dipping creates that famous crispy crust.
- Heat the Oil: Pour oil into your pan to about 1 to 1 ½ inches deep. Heat over medium-high until it reaches 350°F (175°C). Use a thermometer if you have one, or test with a bit of flour. Maintaining oil temperature is crucial—too hot, and the crust burns; too cool, and the chicken gets greasy.
- Fry the Chicken: Carefully place chicken fingers in the hot oil, working in batches to avoid overcrowding. Fry for about 3 to 4 minutes per side, or until golden brown and cooked through (internal temperature should reach 165°F or 74°C). The edges should be crisp and the meat juicy.
- Drain and Rest: Transfer fried chicken to a wire rack set over a baking sheet to drain excess oil. This helps keep the crust crispy instead of soggy.
- Make the Signature Sauce: While chicken fries, whisk together mayonnaise, ketchup, Worcestershire sauce, garlic powder, black pepper, and hot sauce in a small bowl. Taste and adjust seasoning as needed. Chill until ready to serve.
- Serve: Plate the crispy chicken fingers with a generous side of the signature sauce. Don’t forget some crisp fries or a fresh salad to round out the meal.
Quick tip: If the sauce feels too thick, add a splash of water or lemon juice to loosen it up. Also, resting the chicken on a wire rack rather than paper towels makes a huge difference in keeping that crunch intact. I sometimes make a batch and keep them warm in a 200°F (95°C) oven while frying the rest.
Cooking Tips & Techniques
One thing I learned is that the buttermilk soak isn’t just about flavor—it actually tenderizes the chicken, making it juicy inside. Skipping this step usually results in drier fingers. Also, don’t rush the oil temperature. Use a thermometer or the flour test to keep it steady. Lower temps mean oily chicken; hotter temps can burn the breading before the chicken cooks through.
Double-dipping the chicken in the flour and buttermilk mixture creates a thicker crust that’s crispy, yet not heavy. This step might feel like extra work, but the texture payoff is worth it. When frying, avoid crowding the pan—that drops the oil temperature and leads to greasy fingers.
In my early attempts, I sometimes used all flour without cornstarch, and the crust was less crunchy. Adding cornstarch is a simple trick that makes a big difference. Also, seasoning the flour mix well is essential—you want every bite to have that familiar Raising Cane’s zing.
Multitasking tip: While the chicken marinates, prep your sauce and seasoning mix to save time. This recipe pairs nicely with easy sides like in my sheet pan loaded fajita bowl for a full meal that’s fuss-free.
Variations & Adaptations
This recipe is versatile enough to fit different dietary needs and flavor preferences:
- Spicy Version: Add extra cayenne pepper or hot sauce to the batter and sauce for a kick that wakes up the taste buds.
- Oven-Baked Alternative: For a lighter take, bake the coated chicken fingers on a parchment-lined sheet at 425°F (220°C) for 20-25 minutes, flipping halfway. They won’t match the deep-fried crunch but are still delicious.
- Gluten-Free Option: Use a gluten-free flour blend and cornstarch mix. Double-check Worcestershire sauce for gluten content or swap with tamari.
- Dairy-Free Sauce: Swap mayo for vegan mayo and omit Worcestershire sauce or substitute with coconut aminos for a dairy-free, vegan-friendly dip.
- Personal Twist: I’ve tried adding a bit of smoked paprika and dried thyme to the flour mix to give a subtle herbaceous note, which pairs beautifully with the signature sauce.
Feel free to experiment with seasoning blends or dipping sauces! Sometimes I serve these with a creamy honey mustard or a spicy chipotle mayo for fun alternatives.
Serving & Storage Suggestions
Serve these chicken fingers hot and crispy straight from the fryer for the best experience. They pair wonderfully with classic fries, coleslaw, or a crisp green salad. For drinks, a cold lemonade or iced tea complements the tangy sauce nicely.
If you have leftovers, store cooled chicken fingers in an airtight container in the refrigerator for up to 3 days. To reheat, use a toaster oven or conventional oven at 350°F (175°C) for 8-10 minutes to bring back the crunch. Microwaving makes them soggy, so it’s best avoided.
The signature sauce can be refrigerated for up to a week—flavors tend to deepen after sitting a day or two. I often make the sauce ahead, which lets the garlic and Worcestershire notes develop more complexity.
For a quick meal prep idea, pair these with my budget-friendly loaded pasta bake or even the freezer-friendly loaded burritos for a full menu that covers different cravings throughout the week.
Nutritional Information & Benefits
Each serving (roughly 4 fingers with sauce) contains approximately 450-500 calories, with about 25 grams of protein and 30 grams of fat. The use of buttermilk adds beneficial probiotics and tenderizes the chicken naturally. The flour and cornstarch combination keeps the breading light yet crispy.
This recipe is gluten-free adaptable and can be made dairy-free with simple substitutions. While fried, using fresh oil and proper temperature control reduces excess oil absorption, making it less greasy than typical fast-food versions. Plus, chicken tenderloins are a lean protein source, making this a satisfying and protein-rich dish.
For those keeping an eye on sodium, adjust the seasoning accordingly or try low-sodium mayo and ketchup options.
Conclusion
These Crispy Copycat Raising Cane’s Chicken Fingers with Signature Sauce have become one of my go-to recipes when I want that perfect balance of crunchy, juicy, and tangy without leaving the house. It’s a recipe I trust to deliver familiar comfort with a homemade touch. The thoughtful seasoning and double-dip technique really make a difference, and the sauce is a little bowl of magic that pulls it all together.
Whether you’re cooking for one or feeding a small crowd, this recipe is flexible enough to customize while still keeping that classic Raising Cane’s charm. I love how it satisfies cravings without any mystery ingredients or shortcuts. Give it a try and see for yourself why this recipe keeps popping up in my kitchen (and hopefully yours too!).
If you do make it, share your tweaks or favorite sides—I always enjoy hearing how others put their spin on this dish. Happy cooking!
FAQs About Crispy Copycat Raising Cane’s Chicken Fingers
How can I make the chicken fingers extra crispy?
Double-dipping the chicken in buttermilk and flour mixture and frying at a steady 350°F (175°C) helps create that ultra-crispy crust. Using cornstarch in the coating also boosts crispiness.
Can I bake these chicken fingers instead of frying?
Yes! Bake them at 425°F (220°C) for 20-25 minutes, flipping halfway. They won’t be as crunchy as fried but still tasty and healthier.
What’s the best way to store leftovers?
Keep leftover chicken fingers in an airtight container in the fridge for up to 3 days. Reheat in an oven or toaster oven to maintain crispiness.
Is the signature sauce dairy-free?
The original sauce contains mayonnaise, which usually has eggs but no dairy. For dairy-free or vegan options, use vegan mayo and omit Worcestershire or use a substitute.
Can I make this recipe gluten-free?
Absolutely! Substitute the all-purpose flour with a gluten-free baking mix and check your Worcestershire sauce is gluten-free. The rest of the ingredients are naturally gluten-free.
Pin This Recipe!
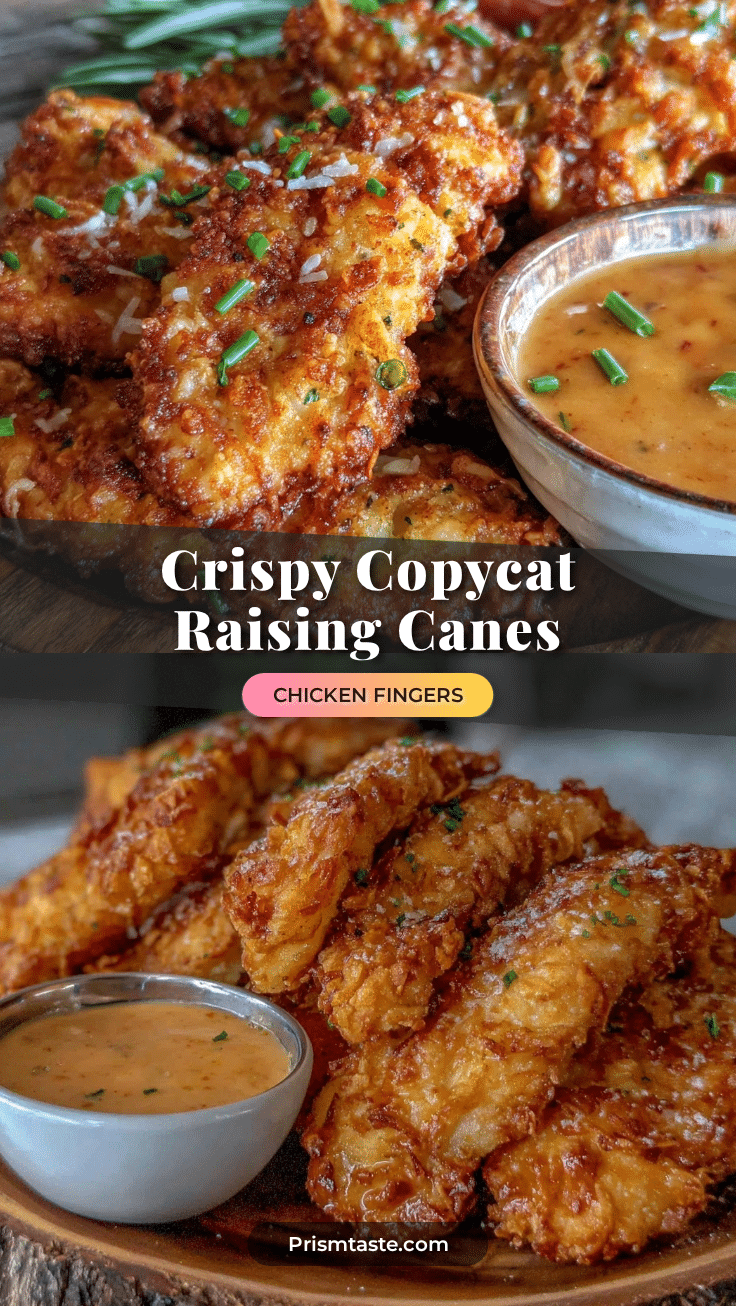
Crispy Copycat Raising Canes Chicken Fingers Recipe with Signature Sauce Easy and Best

This recipe replicates Raising Cane’s famous chicken fingers with a crispy, juicy texture and a tangy, creamy signature sauce. Quick and easy to prepare, it’s perfect for a satisfying homemade comfort meal.
- Prep Time: 10 minutes
- Cook Time: 20 minutes
- Total Time: 30 minutes
- Yield: 4 servings 1x
- Category: Main Course
- Cuisine: American
Ingredients
- 1 pound (450 grams) chicken tenderloins, trimmed (fresh or thawed)
- 1 cup (240 ml) buttermilk (or milk + 1 tbsp lemon juice as substitute)
- 1 ½ cups (180 grams) all-purpose flour (or gluten-free baking flour blend for GF option)
- ½ cup (65 grams) cornstarch
- 1 teaspoon garlic powder
- 1 teaspoon onion powder
- 1 teaspoon paprika
- ½ teaspoon cayenne pepper (optional)
- 1 ½ teaspoons salt, adjust to taste
- 1 teaspoon black pepper, freshly ground preferred
- About 4 cups (1 liter) vegetable oil for frying (canola or peanut oil preferred)
- ½ cup (120 ml) mayonnaise (use vegan mayo for dairy-free)
- 2 tablespoons (30 ml) ketchup
- 1 teaspoon Worcestershire sauce (use gluten-free or omit for dairy-free)
- ½ teaspoon garlic powder (for sauce)
- ¼ teaspoon black pepper (for sauce)
- Hot sauce, a few dashes (optional)
Instructions
- Place chicken tenderloins in a bowl and pour over the buttermilk. Stir gently to coat all pieces. Cover and refrigerate for at least 30 minutes or up to 4 hours.
- In a separate large bowl, whisk together flour, cornstarch, garlic powder, onion powder, paprika, cayenne pepper, salt, and black pepper until evenly combined.
- Remove chicken from buttermilk, letting excess drip off. Dip each piece into the flour mixture, pressing gently to coat.
- For extra crunch, dip the coated chicken again in buttermilk and then back into the flour mixture a second time.
- Pour oil into a deep frying pan or heavy-bottomed skillet to about 1 to 1 ½ inches deep. Heat over medium-high until oil reaches 350°F (175°C).
- Carefully place chicken fingers in hot oil in batches to avoid overcrowding. Fry for about 3 to 4 minutes per side until golden brown and cooked through (internal temperature 165°F or 74°C).
- Transfer fried chicken to a wire rack set over a baking sheet to drain excess oil and keep crust crispy.
- While chicken fries, whisk together mayonnaise, ketchup, Worcestershire sauce, garlic powder, black pepper, and hot sauce in a small bowl. Chill until ready to serve.
- Serve crispy chicken fingers with a generous side of the signature sauce.
Notes
Maintain oil temperature at 350°F (175°C) for best results. Double-dipping the chicken in buttermilk and flour mixture creates an ultra-crispy crust. Rest chicken on a wire rack instead of paper towels to keep crust crispy. Sauce can be thinned with water or lemon juice if too thick. Leftovers store well in the fridge for up to 3 days and reheat best in an oven or toaster oven to maintain crispiness.
Nutrition
- Serving Size: Approximately 4 chic
- Calories: 475
- Sugar: 3
- Sodium: 700
- Fat: 30
- Saturated Fat: 5
- Carbohydrates: 30
- Fiber: 1
- Protein: 25
Keywords: chicken fingers, Raising Cane's copycat, crispy chicken, signature sauce, fried chicken, homemade chicken fingers, easy chicken recipe