By the third time I made mummy hot dogs that week, I realized I had a problem. Not a bad problem, mind you — more like the kind where you find yourself staring at a tube of crescent dough at 10 PM on a Tuesday, wondering if it’s weird to make Halloween snacks in September. The first batch came out looking more like sad, bandaged worms than actual mummies. The second batch? I got a little carried away with the dough strips and ended up with what can only be described as a hot dog cocoon. But that third batch — that was the one where everything clicked. The dough wrapped just loose enough to show little peeks of the hot dog underneath. The mustard eyes were perfectly dotty. My kids actually stopped fighting over who got the last one.
Look, I know mummy hot dogs aren’t exactly gourmet cooking. But there’s something about them that just works. Maybe it’s how ridiculously easy they come together. Maybe it’s the way they make even the grumpiest kid crack a smile. Or maybe — and this is what I keep coming back to — it’s that they actually taste good. The crescent dough gets all golden and buttery while the hot dog stays juicy inside. It’s a simple little snack that somehow feels like a celebration. And honestly? We could all use more of that.
These easy mummy hot dogs with crescent dough have become my secret weapon for October. School parties, Halloween movie nights, even just a random Wednesday when the kids need cheering up. They take about 20 minutes from start to finish, which means I can make them without any grand planning. Just a few ingredients, a baking sheet, and a little bit of patience while you wrap those dough strips around each hot dog. I promise you, once you make these once, you’ll understand why I made them three times in a single week.
Why You’ll Love This Recipe
I’ve tested this recipe more times than I care to admit, and here’s what I’ve learned: these mummy hot dogs are the perfect balance of fun and foolproof. You don’t need any special skills or fancy equipment. If you can open a can of crescent dough and wrap a strip around a hot dog, you’ve got this handled.
- Quick & Easy: From fridge to table in under 20 minutes. Seriously, preheat the oven, wrap the hot dogs, and by the time the oven is ready, you’re almost done.
- Simple Ingredients: You only need three things — hot dogs, crescent dough, and a little mustard for the eyes. That’s it. No fancy grocery store runs required.
- Perfect for Halloween: Whether it’s a school party, a trunk-or-treat event, or just a spooky movie night at home, these little guys steal the show every single time.
- Crowd-Pleaser: I’ve yet to meet a kid (or adult, let’s be honest) who doesn’t love these. They’re cute, they’re tasty, and they’re just plain fun to eat.
- Unbelievably Delicious: The crescent dough bakes up flaky and golden, while the hot dog stays plump and juicy. Dip them in ketchup or mustard, and it’s pure comfort food magic.
What sets this recipe apart from other versions you might find online is the little tricks I’ve picked up along the way. Like how cutting the dough into thinner strips gives you a more mummy-like look, or how leaving small gaps between the wraps lets the hot dog peek through for that authentic bandaged effect. I’ve also figured out the perfect baking time so the dough is fully cooked but not burnt — because nobody wants a crispy mummy.
Honestly, this is one of those recipes that makes you feel like a kitchen hero without actually doing much work. The kids think you’re some kind of Halloween wizard, and you get to enjoy watching them devour these adorable little mummies. It’s a win-win situation if I’ve ever seen one.
What Ingredients You Will Need
This recipe keeps things wonderfully simple. You don’t need a long list of obscure ingredients — just a few pantry staples that come together to create something genuinely fun and delicious. Here’s everything you’ll need:
- Hot dogs (8 count): Use your favorite brand. I personally like beef hot dogs for their flavor, but turkey or chicken hot dogs work great too. If you’re feeling fancy, you can even use jumbo hot dogs — just adjust the baking time by a minute or two. (Pro tip: look for hot dogs that are uniform in size so they cook evenly.)
- Crescent roll dough (1 can, 8 oz): This is the magic ingredient. Pillsbury is my go-to brand because it’s reliable and widely available. You’ll get 8 triangles per can, which perfectly matches 8 hot dogs. Make sure it’s the regular crescent dough, not the seamless sheet — the perforated triangles are what make the mummy wrapping so easy.
- Yellow mustard (for the eyes): You only need a tiny amount for the mummy eyes. Yellow mustard gives the best color contrast against the golden dough. If you’re not a mustard fan, you can use ketchup or even small dots of sriracha for a spicy twist.
- Optional: Cooking spray or parchment paper: I recommend lining your baking sheet with parchment paper for easy cleanup. If you don’t have parchment, a light spray of non-stick cooking spray works just fine.
See what I mean? Three main ingredients and you’re good to go. The beauty of this recipe is that it’s incredibly forgiving. You can swap out the hot dogs for sausage links, use dairy-free crescent dough if you can find it, or even make your own dough from scratch if you’re feeling ambitious (though honestly, the canned stuff works perfectly here).
One thing I’ve learned from making these so many times: let your crescent dough sit at room temperature for about 5 minutes before you unroll it. Cold dough tends to crack when you try to separate the triangles, and warm dough is much more pliable for cutting into strips. Just don’t let it sit out too long, or it gets sticky and hard to work with.
Equipment Needed
You don’t need a fully stocked kitchen to make these mummy hot dogs. Here’s what you’ll need:
- Baking sheet: A standard half-sheet pan works perfectly. If you only have a smaller pan, just make sure the hot dogs aren’t touching each other so they brown evenly.
- Parchment paper or silicone baking mat: This makes cleanup a breeze. I’ve forgotten to line my pan before and ended up scrubbing stuck-on dough — not fun. Trust me on this one.
- Sharp knife or pizza cutter: For cutting the crescent dough into thin strips. A pizza cutter actually works better than a knife because it doesn’t drag the dough. I learned this the hard way after mangling a few triangles.
- Small bowl (for mustard dots): You’ll need a tiny dish to hold the mustard for the eyes. A ramekin or small custard cup works great.
- Toothpick or skewer: This is optional but helpful for dotting the mustard eyes onto the baked mummies. You can also just use the tip of a knife if you don’t have a toothpick handy.
- Cooling rack: Not strictly necessary, but it helps the mummies cool evenly so the bottoms don’t get soggy. If you don’t have one, just transfer them to a plate after a minute or two.
That’s really it. No stand mixer, no special gadgets, nothing fancy. This is the kind of recipe that proves you don’t need expensive equipment to make something memorable.
Preparation Method
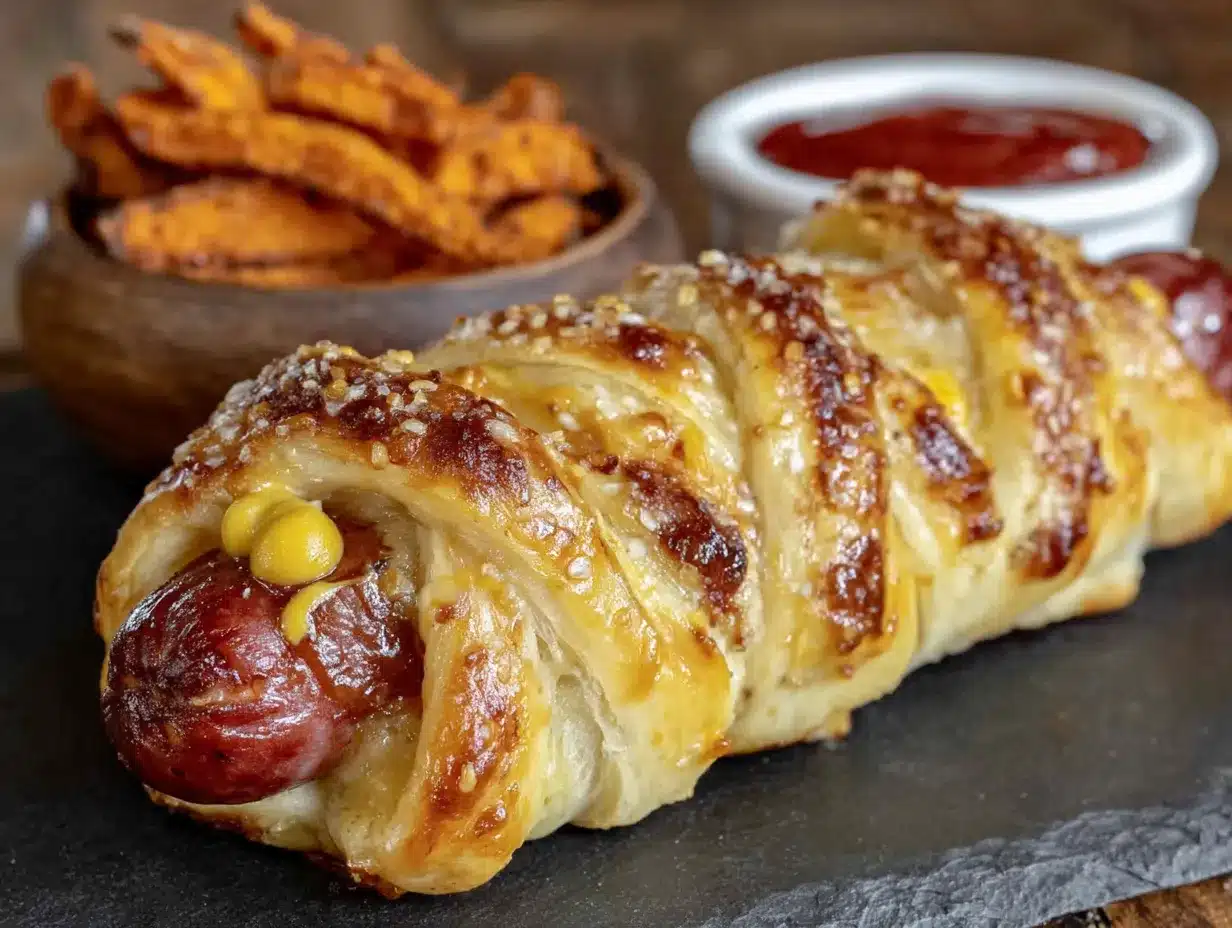
Alright, let’s get to the fun part. Here’s how to make these easy mummy hot dogs step by step:
- Preheat your oven to 375°F (190°C). Line a baking sheet with parchment paper or a silicone baking mat. This is one of those steps you don’t want to skip — trust me, cleanup is so much easier.
- Prepare the crescent dough. Open the can of crescent rolls carefully — I always jump when it pops, even after all these years. Unroll the dough and separate it into 8 triangles along the perforated lines. Place the triangles on a clean cutting board.
- Cut the dough into strips. Using a sharp knife or pizza cutter, slice each triangle lengthwise into 3-4 thin strips. The strips should be about 1/4 to 1/2 inch wide. Don’t worry if they’re not perfectly even — that actually adds to the mummy look. (I’ve found that cutting 4 strips per triangle gives the best mummy effect, but 3 strips work fine if you want thicker wraps.)
- Wrap the hot dogs. Take one hot dog and place it at one end of a dough strip. Wrap the strip around the hot dog at a slight angle, leaving small gaps so some of the hot dog shows through. Continue wrapping with more strips until the hot dog is mostly covered. The gaps are what make it look like a mummy, so don’t wrap too tightly or too close together. Repeat with the remaining hot dogs and dough strips.
- Place on baking sheet. Arrange the wrapped hot dogs on the prepared baking sheet, leaving about 1 inch of space between each one. Make sure the ends of the dough strips are tucked underneath so they don’t unravel during baking.
- Bake for 10-12 minutes. Pop the baking sheet into the preheated oven and bake until the dough is golden brown and the hot dogs are heated through. The exact time will depend on your oven — start checking at 10 minutes. You’re looking for a nice golden-brown color, not dark brown.
- Add the eyes. Remove the baking sheet from the oven and let the mummy hot dogs cool for 2-3 minutes. While they’re still warm, use a toothpick or the tip of a knife to dot two small mustard eyes onto each mummy. The warmth helps the mustard stick, but you don’t want them too hot or the mustard will run.
- Serve immediately. Transfer the mummy hot dogs to a serving platter and watch them disappear. They’re best enjoyed warm, right out of the oven.
A few things I’ve learned from making these over and over: if the dough strips are sticking to your fingers, dip your fingertips in a little flour. Also, don’t overthink the wrapping — imperfect wraps actually look more like real mummy bandages. And if a strip tears? Just press it back together. The dough is forgiving that way.
Cooking Tips & Techniques
After making these mummy hot dogs more times than I can count, I’ve picked up a few tricks that make the process smoother and the results better. Here’s what I wish someone had told me before my first attempt:
Don’t overwork the dough. Crescent dough is delicate, and the more you handle it, the tougher it gets. Cut your strips quickly and wrap them loosely. If the dough starts feeling warm and sticky, pop it in the fridge for 5 minutes to firm up.
Leave those gaps. The whole point of mummy hot dogs is that they look like little wrapped mummies. If you cover the entire hot dog with dough, it just looks like a bread-wrapped sausage. Leave small spaces between the strips so the hot dog peeks through — that’s what gives them that spooky, bandaged look.
Watch the baking time. Ovens vary, so keep an eye on your mummies during the last few minutes of baking. You want the dough golden brown, not dark brown. If your oven runs hot, check at 9 minutes. If it runs cool, you might need the full 12 minutes. The hot dogs are already cooked, so you’re really just baking the dough.
Make the eyes after baking. I tried adding mustard eyes before baking once, and they just baked into weird brown spots. Wait until the mummies come out of the oven, let them cool for a couple minutes, then add the eyes. They’ll look much cuter and more defined.
Work in batches if needed. If you’re making a big batch for a party, don’t crowd the baking sheet. The hot dogs need space around them so the dough bakes evenly. Use two baking sheets if you have to, or bake in batches. The first batch will stay warm while the second batch bakes.
One mistake I made early on: using too much dough per hot dog. I thought more strips would look better, but it just made them look like doughy blobs. Stick to 3-4 strips per hot dog, and leave those gaps. Less is more here.
Variations & Adaptations
One of the best things about this recipe is how easy it is to customize. Here are some variations I’ve tried and loved:
Cheesy Mummy Hot Dogs: Before wrapping the hot dogs, cut a slit lengthwise down the center and stuff it with a thin strip of cheddar or mozzarella cheese. The cheese melts as the dough bakes, creating a gooey surprise inside. Just be careful — the cheese gets hot!
Spicy Mummy Dogs: Swap regular hot dogs for spicy sausage links or chorizo. You can also brush the dough strips with a little hot sauce mixed with melted butter before baking for an extra kick. My husband loves this version for game day snacks — it pairs perfectly with perfect loaded buffalo chicken dip for a full spread.
Vegetarian Option: Use your favorite plant-based hot dogs or sausage links. They wrap and bake the same way, and even the pickiest eaters won’t notice the difference. Just check the baking time on the package — some plant-based options need a minute or two less.
Breakfast Mummies: This is a fun twist I discovered by accident. Use breakfast sausage links instead of hot dogs, and serve them with maple syrup for dipping. They’re perfect for Halloween morning breakfast before school.
Gluten-Free Adaptation: If you need a gluten-free option, look for gluten-free crescent dough (it exists, though it can be harder to find). Alternatively, you can use gluten-free puff pastry sheets cut into strips. The texture will be slightly different, but they still look and taste great.
I’ve also experimented with different dipping sauces — ketchup, mustard, ranch dressing, even sriracha mayo. Each one brings a different vibe to the mummies. My kids swear by ketchup, but I’m partial to a little honey mustard myself.
Serving & Storage Suggestions
These mummy hot dogs are best served warm, right after the eyes go on. The dough is at its flakiest and most delicious straight from the oven. Arrange them on a platter with a bowl of dipping sauce in the center — ketchup, mustard, or even a little warm cheese sauce for extra indulgence.
If you’re serving them at a party, you can keep them warm in a 200°F (93°C) oven for up to 30 minutes. Just place them on a baking sheet and cover loosely with foil. Don’t seal them tight, or the dough will get soggy. I’ve done this for school parties and trunk-or-treat events, and they stay perfectly warm and crispy.
For storage, let any leftovers cool completely, then place them in an airtight container in the refrigerator. They’ll keep for up to 3 days. The dough will soften a bit in the fridge, but they still taste good — especially if you reheat them properly.
To reheat, pop them in a 350°F (175°C) oven for 5-7 minutes, or until warmed through. You can also use an air fryer at 350°F for 3-4 minutes — this actually crisps the dough back up nicely. I wouldn’t recommend the microwave unless you’re in a real hurry, because the dough gets chewy and sad. If you do microwave them, just do 15-second intervals and eat them right away.
One thing I love about this recipe: the flavors actually hold up well over time. The mustard eyes might bleed a little into the dough after a day in the fridge, but honestly, it just adds to the mummy vibe. If you’re making these for a party the next day, I’d recommend adding the mustard eyes fresh right before serving.
Nutritional Information & Benefits
Let’s be real — these mummy hot dogs aren’t health food. But they’re a fun treat, and sometimes that’s exactly what we need. Here’s the estimated nutritional breakdown per serving (one mummy hot dog):
- Calories: Approximately 210-250
- Protein: 7-9 grams
- Carbohydrates: 18-22 grams
- Fat: 12-15 grams
- Sodium: 500-650 mg
If you’re looking to make these a little lighter, you can use turkey or chicken hot dogs, which have less fat and fewer calories. The crescent dough is harder to lighten up, but you can find reduced-fat crescent rolls at most grocery stores. They bake up a little differently — slightly less flaky — but they work in a pinch.
On the plus side, hot dogs do provide a decent amount of protein, which makes these more satisfying than a purely carb-heavy snack. And let’s be honest — the joy factor here is off the charts. Sometimes food is about more than just nutrients. It’s about making memories, sharing a laugh, and watching kids light up when they see a plate of adorable mummies staring back at them.
These mummy hot dogs are also a great option for Halloween parties where you need something that appeals to both kids and adults. They’re familiar enough to be comforting, but fun enough to feel special. And at around 250 calories each, you can enjoy one (or two) without derailing your whole day.
Conclusion
If there’s one recipe I hope you try this Halloween, it’s these easy mummy hot dogs with crescent dough. They’re quick, they’re fun, and they deliver every single time. Whether you’re making them for a classroom party, a spooky movie night, or just because your kids need a little mid-week pick-me-up, these little mummies never disappoint.
I love how this recipe lets you be creative without any pressure. You can make them as neat or as messy as you want. You can add cheese, spice them up, or keep them classic. They’re forgiving, they’re fast, and they taste amazing — what more could you ask for from a Halloween snack?
So go ahead, grab a can of crescent dough and some hot dogs, and give these a try. I promise you’ll be amazed at how something so simple can bring so much joy. And when you make them — because I know you will — come back and let me know how they turned out. Did your kids love them? Did you try a fun variation? I’d love to hear all about it in the comments below!
Frequently Asked Questions
Can I make these mummy hot dogs ahead of time?
You can assemble them up to 24 hours in advance. Just wrap the hot dogs with the dough strips, place them on a parchment-lined baking sheet, cover with plastic wrap, and refrigerate. When you’re ready to bake, add an extra minute or two to the baking time since they’ll be cold from the fridge. I wouldn’t recommend freezing them before baking — the dough gets weird when it thaws.
What if I don’t have crescent dough?
No problem! You can use puff pastry sheets cut into thin strips instead. The texture will be a little flakier and less tender, but they still look great. You can also use refrigerated pizza dough rolled thin and cut into strips — just keep in mind it will be a bit chewier. I’ve even used flour tortillas cut into strips in a pinch, though they don’t brown the same way.
How do I keep the dough from unraveling during baking?
Make sure the ends of the dough strips are tucked underneath the hot dog when you place them on the baking sheet. The weight of the hot dog will hold them in place as they bake. Also, don’t wrap too loosely — you want the strips to have a little tension, just not so tight that they squeeze the hot dog.
Can I use different types of mustard for the eyes?
Absolutely! Yellow mustard gives the best color contrast, but you can use Dijon for a more subtle look or spicy brown mustard for a kick. Ketchup works too, though it tends to spread more. For a really cute effect, you can use small dots of sriracha for red eyes — perfect for vampire hot dogs!
How do I make these for a large crowd?
This recipe scales beautifully. Just multiply the ingredients by however many hot dogs you need. The key is to work in batches so you don’t crowd the baking sheet. You can also set up an assembly line — have one person cutting dough strips and another person wrapping. It’s actually a fun activity to do with kids or friends before a party. For a full Halloween spread, these pair wonderfully with easy slow cooker buffalo chicken sliders for a crowd-pleasing menu.
Pin This Recipe!
Easy Mummy Hot Dogs with Crescent Dough (20-Minute Recipe)

These easy mummy hot dogs with crescent dough are the perfect Halloween snack. Ready in under 20 minutes with just three ingredients, they’re fun, foolproof, and a crowd-pleaser for kids and adults alike.
- Prep Time: 10 minutes
- Cook Time: 12 minutes
- Total Time: 22 minutes
- Yield: 8 servings 1x
- Category: Appetizer
- Cuisine: American
Ingredients
- 8 hot dogs (beef, turkey, or chicken)
- 1 can (8 oz) crescent roll dough (e.g., Pillsbury)
- Yellow mustard (for the eyes)
- Optional: Cooking spray or parchment paper
Instructions
- Preheat your oven to 375°F (190°C). Line a baking sheet with parchment paper or a silicone baking mat.
- Open the can of crescent rolls carefully. Unroll the dough and separate it into 8 triangles along the perforated lines. Place the triangles on a clean cutting board.
- Using a sharp knife or pizza cutter, slice each triangle lengthwise into 3-4 thin strips, about 1/4 to 1/2 inch wide.
- Take one hot dog and place it at one end of a dough strip. Wrap the strip around the hot dog at a slight angle, leaving small gaps so some of the hot dog shows through. Continue wrapping with more strips until the hot dog is mostly covered. Repeat with the remaining hot dogs and dough strips.
- Arrange the wrapped hot dogs on the prepared baking sheet, leaving about 1 inch of space between each one. Tuck the ends of the dough strips underneath so they don’t unravel during baking.
- Bake for 10-12 minutes, until the dough is golden brown and the hot dogs are heated through.
- Remove the baking sheet from the oven and let the mummy hot dogs cool for 2-3 minutes. While still warm, use a toothpick or the tip of a knife to dot two small mustard eyes onto each mummy.
- Serve immediately. They’re best enjoyed warm.
Notes
Let crescent dough sit at room temperature for 5 minutes before unrolling to prevent cracking. Cut dough into 3-4 thin strips per triangle for best mummy effect. Leave gaps between strips for authentic bandaged look. Add mustard eyes after baking to prevent them from baking into brown spots. For best results, serve warm. Leftovers can be stored in an airtight container in the refrigerator for up to 3 days and reheated in a 350°F oven for 5-7 minutes or in an air fryer at 350°F for 3-4 minutes.
Nutrition
- Serving Size: 1 mummy hot dog
- Calories: 230
- Sugar: 4
- Sodium: 575
- Fat: 13.5
- Saturated Fat: 4.5
- Carbohydrates: 20
- Protein: 8
Keywords: mummy hot dogs, Halloween snacks, crescent dough hot dogs, easy Halloween recipe, kid-friendly snacks, spooky appetizers


