Introduction
The first time I bit into a freshly filled cannoli, the world just went quiet for a second—the shell was crisp, golden, and almost shattered at the touch, while the ricotta filling was cool, sweet, and so creamy it nearly melted on my tongue. The scent of orange zest and just a whisper of cinnamon wafted up, making me close my eyes for a moment (you know, the kind of pause where you just savor every bit). Let’s face it, the allure of a perfect homemade cannoli with authentic ricotta filling is hard to resist—those bakery treats you see lined up in glass cases? They always called my name as a kid, especially when I’d visit my Nonna in her tiny kitchen, apron dusted with flour, hands working magic with dough and ricotta.
I’ll never forget the rainy Sunday when I decided to try making cannoli from scratch. It was a little ambitious, maybe, but the thought of recreating that nostalgic flavor (and honestly, getting to lick the ricotta spoon) was just too tempting. My family hovered nearby, not so secretly hoping I’d mess up so they could “help” with the taste tests. By the time the shells were cooling on the rack, I caught my sister sneaking a warm one—she said she couldn’t help it because the kitchen smelled like an Italian pastry shop. That’s when I knew I was onto something special.
Homemade cannoli are dangerously easy to love, and they’re perfect for everything from holiday dessert trays to impressing friends at a potluck. There’s something pure and comforting about the combination of a crisp shell and a rich ricotta filling. Every batch I make disappears—fast! After plenty of “research” (taste tests, of course), this cannoli recipe is now a family staple. It’s the kind of dessert that feels like a warm hug, and you’re going to want to bookmark this one for whenever you need a little taste of Italy at home.
Why You’ll Love This Recipe
If you’ve ever stood in front of a bakery case, torn between buying a whole box of cannoli or pretending you’ll just have one, this perfect homemade cannoli recipe with authentic ricotta filling will make your decision easy. Over years of tinkering (and a few hilarious shell flops), I’ve learned exactly what works—so you get bakery-worthy results in your own kitchen without the stress. Here’s why this recipe has become a go-to in my house, and why it’ll win you over, too:
- Quick & Easy: The dough comes together in under 20 minutes, plus you can prep the filling ahead. Perfect for when you need an impressive dessert but don’t have all day.
- Simple Ingredients: You won’t have to hunt for anything fancy. Most of these are pantry staples—flour, sugar, eggs, and a good tub of ricotta (I’m partial to Galbani or whole-milk from the Italian deli if you can find it).
- Perfect for Any Occasion: Homemade cannoli bring a wow factor to birthdays, brunches, or just a cozy family dinner. I’ve even brought them to baby showers (major hit).
- Crowd-Pleaser: Kids love the sweet, creamy filling, and adults appreciate the authentic, not-too-sweet ricotta flavor. I’ve never seen leftovers—seriously!
- Unbelievably Delicious: These cannoli have the crispest shells and a filling that’s light, not cloying, with just the right citrusy pop. That balance? It’s everything.
What makes this cannoli recipe different? It’s all about the details—draining the ricotta overnight for a smooth, not grainy, filling; kneading the dough just enough for that perfect crackle; and a touch of Marsala for authentic flavor. I even roll the shells a bit thinner than most, so they’re extra crisp (a trick I picked up from an old bakery in Palermo).
This isn’t just a sweet treat—it’s a moment of comfort and celebration, all in one. The first bite is pure “close your eyes and sigh” territory. And you can absolutely make these ahead for stress-free entertaining (or just a secret stash for yourself). Trust me, once you try this recipe, you’ll feel like you’ve discovered a little piece of Italy—without the plane ticket.
What Ingredients You Will Need
This perfect homemade cannoli recipe with authentic ricotta filling keeps things simple but classic. You’ll find most of these ingredients in your pantry, and a few are easy to swap if you need to. Here’s what you’ll need for the shells and filling, plus a couple of fun finishing touches!
- For the Shells:
- 2 cups (250g) all-purpose flour (plus extra for dusting)
- 2 tablespoons (25g) granulated sugar
- 1/2 teaspoon kosher salt
- 1 teaspoon unsweetened cocoa powder (adds depth)
- 1 tablespoon (15g) unsalted butter, cold and diced
- 1 large egg (room temperature)
- 1/3 cup (80ml) Marsala wine (classic, but you can sub dry white wine or even a splash of apple cider vinegar in a pinch)
- 1 tablespoon (15ml) white wine vinegar (adds crispness)
- Vegetable oil, for frying (I usually use canola or sunflower—it keeps things light)
- For the Authentic Ricotta Filling:
- 2 cups (500g) whole milk ricotta cheese (drained overnight for best texture—avoid pre-whipped if you can)
- 3/4 cup (90g) powdered sugar (more or less to taste)
- 1 teaspoon pure vanilla extract
- 1/2 teaspoon ground cinnamon
- Zest of 1 small orange (or lemon, if you like a brighter note)
- 2 tablespoons (25g) mini chocolate chips (I use Ghirardelli or Guittard)
- Optional: 2 tablespoons (20g) chopped candied citrus peel or pistachios (for a festive Sicilian touch)
- For Topping & Decoration:
- Extra mini chocolate chips, pistachios, or candied orange peel
- Powdered sugar, for dusting
A few notes: If you’re gluten-free, swap in a 1:1 gluten-free flour blend (Bob’s Red Mill works great). You can sub dairy-free ricotta for a vegan version (Kite Hill is my go-to). And if you don’t like citrus, just skip the zest—it’ll still be delicious. In summer, I sometimes fold in fresh berries for a twist.
Ingredient shopping tip: For the smoothest filling, use high-quality, whole milk ricotta and let it drain in the fridge overnight—it makes all the difference. If you want a little extra richness, add a spoonful of mascarpone (not traditional, but oh-so-good).
Equipment Needed
- Cannoli molds/tubes: Essential for that classic shape. If you don’t have them, roll up pieces of foil into thick tubes—works in a pinch!
- Rolling pin: For rolling the dough thin. A wine bottle (cleaned!) is a decent substitute if you’re desperate.
- Large bowl: For mixing the dough and filling.
- Fine mesh sieve or cheesecloth: For draining ricotta. Cheesecloth is my favorite, but a coffee filter in a strainer works for small batches.
- Slotted spoon or tongs: For removing shells from oil safely.
- Medium saucepan or deep fryer: Any heavy-bottomed pot will do. I use my old Dutch oven.
- Paper towels: For draining excess oil from fried shells.
- Piping bag (or zip-top bag): For filling the cannoli neatly. You can also use a spoon if you don’t mind a little mess.
- Mixing spatula or wooden spoon: For stirring up the filling and dough.
Personal tip: My first cannoli shells turned out a little wonky because I didn’t roll them thin enough. Don’t be afraid to get them almost see-through—just flour your surface well! And if you’re on a budget, you can find affordable cannoli tubes online or at Italian grocery stores. Wash and dry them thoroughly after frying to keep them rust-free.
Preparation Method
-
Drain the Ricotta (8 hours or overnight):
Place ricotta in a fine mesh sieve or cheesecloth-lined strainer set over a bowl. Cover and refrigerate for at least 8 hours or overnight. This step is crucial for a creamy, not watery, filling—don’t skip it! -
Make the Dough (20 minutes):
In a large bowl, whisk together flour, sugar, salt, and cocoa powder. Add cold butter and rub it in with your fingers until the mix looks sandy. In a small bowl, whisk egg, Marsala, and vinegar. Pour wet ingredients into the dry, mixing with a fork until a shaggy dough forms. Turn onto a floured surface and knead gently for 3-4 minutes until smooth, but not sticky. Wrap in plastic and let rest at room temperature for 30 minutes. -
Roll and Cut Shells (15 minutes):
Divide dough in half (keeps it manageable). Roll each piece as thin as possible—aim for about 1/16 inch (1.5mm). Use a 4-inch (10cm) round cutter or glass to cut circles. Reroll scraps for extra shells. -
Shape on Tubes (10 minutes):
Lightly oil cannoli tubes. Wrap each dough circle around a tube, sealing the edge with a dab of water or egg white. Press gently—don’t overlap too much or they’ll stick. -
Fry the Shells (15-20 minutes):
Heat 2 inches (5cm) of oil in a deep pot to 350°F (175°C). Fry a few shells at a time, turning with tongs until golden brown (about 1-2 minutes per batch). Remove with a slotted spoon and drain on paper towels. Cool slightly, then gently slide shells off tubes. (If shells stick, twist lightly—not too hard or they can crack.) -
Make the Ricotta Filling (10 minutes):
In a bowl, combine drained ricotta, powdered sugar, vanilla, cinnamon, and orange zest. Mix until smooth. Fold in mini chocolate chips and candied peel or pistachios if using. Taste and adjust sweetness as you like. -
Fill and Garnish (10 minutes):
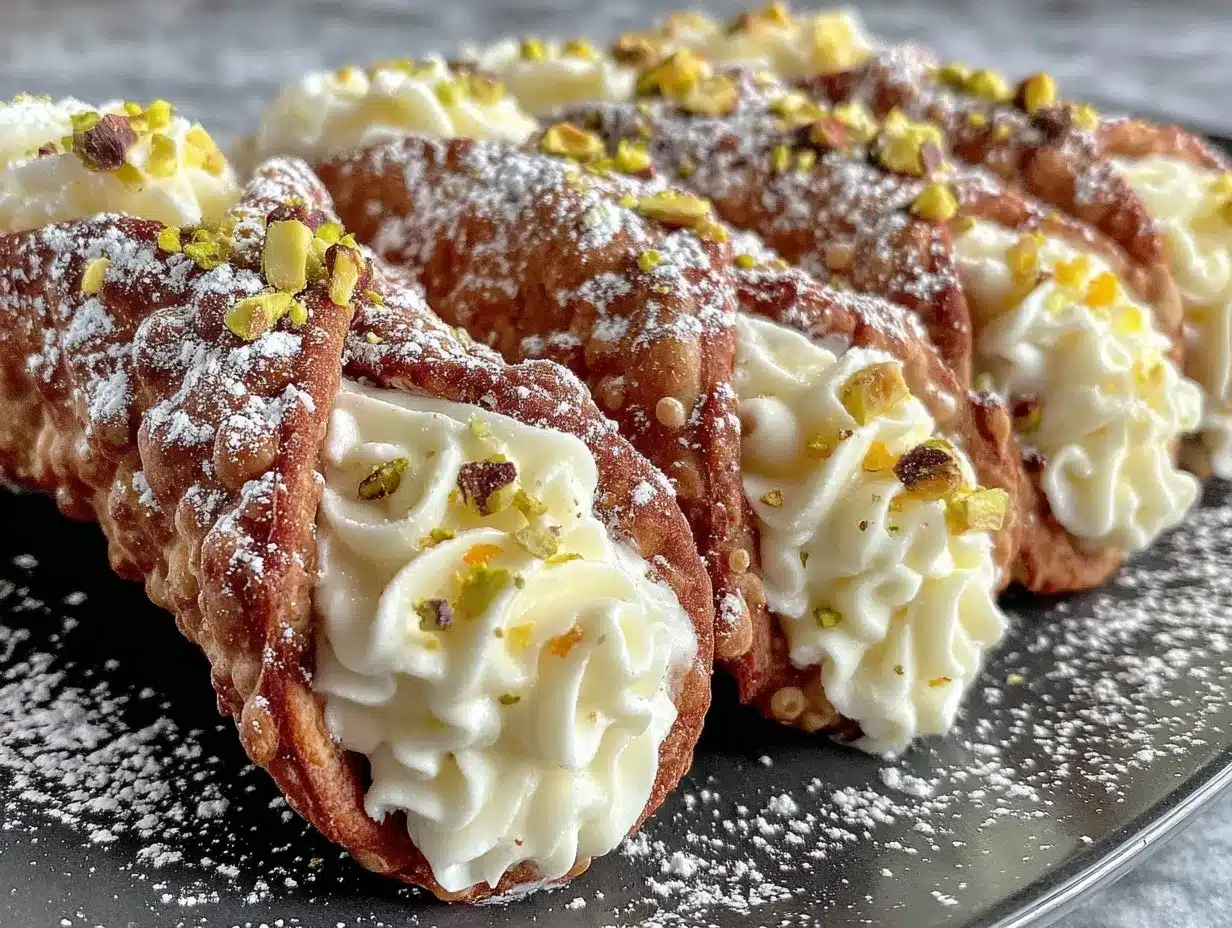
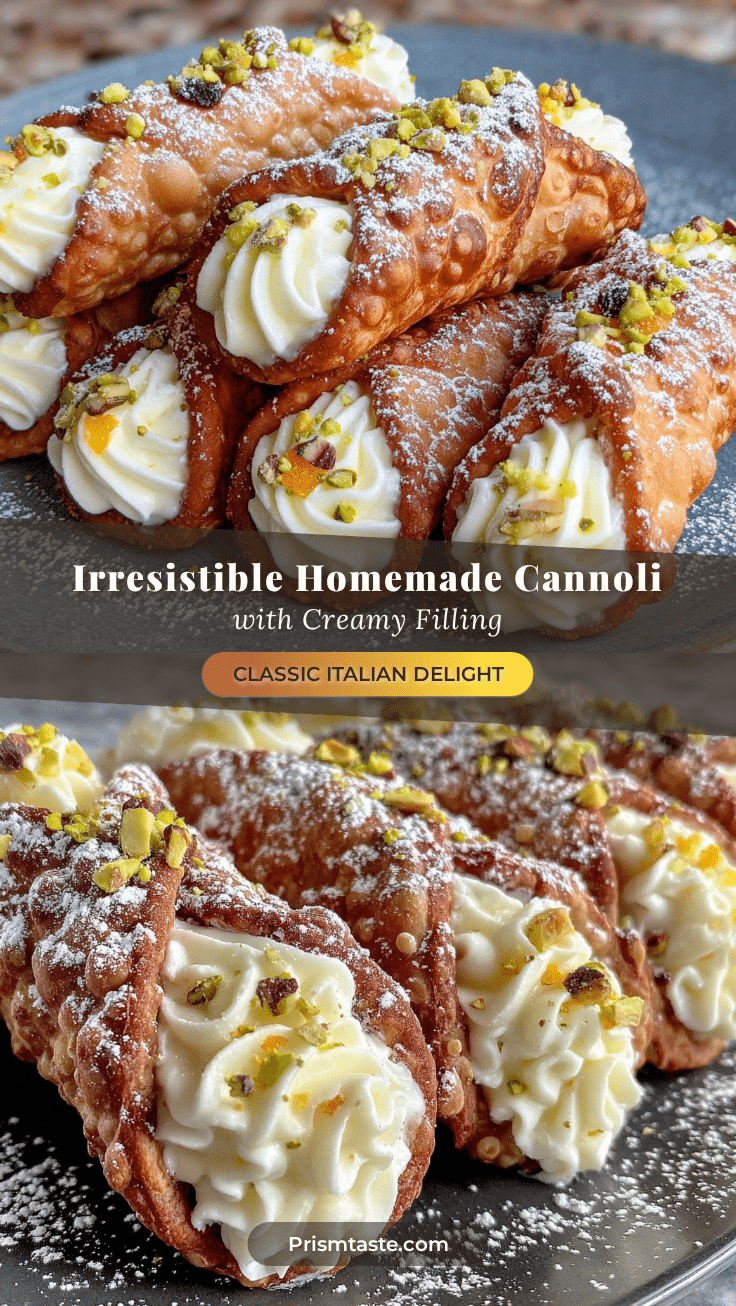
Just before serving (so shells stay crisp), transfer filling to a piping bag. Pipe filling into both ends of each shell. Dip the ends in extra chocolate chips or pistachios, and dust with powdered sugar.
Troubleshooting: If your dough is cracking, add a teaspoon more wine. Shells not crisp? Roll thinner and fry a little longer. Filling seems grainy? Blend ricotta briefly before mixing. I always keep a few extra shells, just in case of breakage (or for snacking).
Personal tip: Make the shells and filling ahead, but fill just before serving—otherwise, you’ll lose that shattering crunch!
Cooking Tips & Techniques
Let’s be real—making cannoli at home isn’t hard, but it’s easy to make a mess. Over the years, I’ve learned a few tricks to get them just right (after my fair share of duds).
- Drain Your Ricotta Well: This is non-negotiable. If it’s too wet, your filling will be soupy and leak from the shells. I’ve tried skipping this step and paid the price—trust me, patience pays off here.
- Roll It Thin: Thinner dough means crispier shells. If you can almost see your hand through it, you’re good. My first batch was more like cannoli cookies (still tasty, but not the same).
- Oil Temperature Matters: Too hot and they burn, too cool and they’re greasy. Use a thermometer, or test with a small scrap of dough—it should sizzle and float right away.
- Don’t Overfill: As tempting as it is, too much filling will split the shell. Pipe from both ends so you get that perfect cream-to-shell ratio.
- Batch Your Work: I like to make all my shells first, then fill. It keeps the workflow smooth and lets you focus on each step (plus, more time for coffee breaks).
- Let the Shells Cool Completely: Warm shells will make the filling melt. Wait until they’re room temp before piping.
- For Consistency: Use a cookie cutter for even shell size, and measure filling ingredients carefully. A kitchen scale is your friend for the best results!
My biggest lesson? Don’t stress the imperfections. A few cracks or odd shapes just add character, and you get to eat the “ugly” ones first!
Variations & Adaptations
The beauty of this perfect homemade cannoli recipe with authentic ricotta filling is that it’s super flexible. Here are a few ways to mix it up for different tastes, diets, or just for fun:
- Gluten-Free: Swap the all-purpose flour for a 1:1 gluten-free blend. The texture is slightly different, but still crisp and delicious.
- Vegan: Use a dairy-free ricotta (like Kite Hill) and replace the egg with a flaxseed egg (1 tablespoon ground flaxseed + 2.5 tablespoons water). Frying in vegetable oil keeps it plant-based.
- Chocolate Cannoli: Add 2 tablespoons (15g) cocoa powder to the shell dough and dip the finished shells in melted dark chocolate before filling. A favorite with kids (and chocolate lovers like me).
- Pistachio or Lemon Twist: Fold chopped pistachios or lemon zest into the filling for a Sicilian flair. I sometimes swap orange zest for lemon when I want a fresher, zingier bite.
- Mini Cannoli: Make smaller shells for bite-sized treats—perfect for parties or dessert platters.
- Allergen Swaps: Nut allergies? Skip the pistachios and use mini chocolate chips or candied fruit. Dairy-free? See above for vegan options.
One of my favorite riffs is adding a spoonful of mascarpone to the ricotta filling—it’s not traditional, but it adds a dreamy, velvety texture. Don’t be afraid to get creative and make these cannoli your own!
Serving & Storage Suggestions
The perfect homemade cannoli with authentic ricotta filling is best enjoyed the day you make them, but here’s how to keep them fresh and serve them in style:
- Serving Temperature: Serve filled cannoli chilled for a refreshing treat, or at room temperature if you prefer the filling extra creamy. Always fill just before serving for maximum crunch.
- Presentation: Arrange cannoli on a platter dusted with powdered sugar. For a Pinterest-worthy look, line them up with ends facing out so the filling and toppings show off—so pretty!
- Pairings: These go beautifully with espresso, cappuccino, or a sweet dessert wine. For a party, serve alongside fresh berries or a scoop of gelato for a real Italian spread.
- Storage: Store unfilled shells in an airtight container at room temp for up to 1 week. The filling keeps in the fridge for 3 days—just give it a quick stir before using.
- Freezing: Shells freeze well! Layer between parchment in a zip-top bag for up to 2 months. Thaw and re-crisp in a warm oven if needed. Don’t freeze filled cannoli—the filling will get grainy.
- Reheating: If shells lose their crunch, pop them in a 350°F (175°C) oven for 5 minutes. Cool before filling.
- Flavor Development: The filling actually tastes better after a few hours in the fridge—the flavors mingle and the texture is perfect. Just don’t fill the shells too early, or you’ll lose that signature snap!
Nutritional Information & Benefits
Each cannoli (about 1 shell with filling) contains roughly: 220 calories, 10g fat, 28g carbs, 5g protein, and 12g sugar. Not exactly diet food, but hey, life’s too short to skip dessert every time!
The ricotta filling packs a nice protein punch and is lower in sugar than most frostings or custards. Using whole milk ricotta keeps the filling rich without being overly fatty, and you can adjust sugar to taste. If you’re gluten-free or dairy-free, just follow the swaps above.
Allergens: Contains dairy, eggs, wheat, and (optionally) nuts. Always check your ingredients and brands if you’re serving to folks with allergies.
My personal take? Cannoli are a treat, but with wholesome cheese and real ingredients, you can feel good about every bite—especially when shared with loved ones.
Conclusion
There’s something truly magical about making this perfect homemade cannoli recipe with authentic ricotta filling in your own kitchen—the aroma, the crisp snap of the shell, and that creamy ricotta center just feels like a celebration. It’s a recipe worth trying not just for the taste, but for the joy of creating something special from scratch.
Don’t hesitate to make this your own—switch up the filling, try different toppings, or go mini for a party. I hope you love this recipe as much as my family does; it’s become a tradition for us, and I bet it’ll become one for you, too.
If you give this a try, I’d love to hear how it turns out—share your tweaks in the comments, or snap a pic for Pinterest (I can’t wait to see your creations). Happy cooking, and may every bite bring you a little taste of Italy!
FAQs
Can I make cannoli shells ahead of time?
Absolutely! Unfilled shells keep well in an airtight container at room temperature for up to a week. Fill just before serving for that perfect crunch.
Can I bake the shells instead of frying?
You can bake at 400°F (205°C) for 10-12 minutes, but they won’t be quite as crisp. Frying gives the best texture, but baking works for a lighter version.
How do I keep cannoli shells from getting soggy?
Only fill shells right before serving. If you need to prep ahead, store shells and filling separately. You can also line shells with melted chocolate to create a moisture barrier.
Can I use store-bought ricotta?
Yes, but always drain it overnight for a smooth, creamy filling. Fresh or whole milk ricotta gives the best result—avoid low-fat or pre-whipped versions if you can.
What can I use if I don’t have cannoli tubes?
Roll up pieces of heavy-duty foil into thick tubes, or use clean metal pastry cream horns. Just be sure to oil them well before wrapping with dough.
Pin This Recipe!
Perfect Homemade Cannoli Recipe with Authentic Ricotta Filling

This classic Italian dessert features crisp, golden cannoli shells filled with a creamy, lightly sweetened ricotta mixture, accented with orange zest and chocolate chips. Perfect for holidays, parties, or whenever you crave a taste of Italy at home.
- Prep Time: 30 minutes (plus 8 hours draining ricotta)
- Cook Time: 20 minutes
- Total Time: 8 hours 50 minutes
- Yield: 12 cannoli 1x
- Category: Dessert
- Cuisine: Italian
Ingredients
- 2 cups (250g) all-purpose flour, plus extra for dusting
- 2 tablespoons (25g) granulated sugar
- 1/2 teaspoon kosher salt
- 1 teaspoon unsweetened cocoa powder
- 1 tablespoon (15g) unsalted butter, cold and diced
- 1 large egg, room temperature
- 1/3 cup (80ml) Marsala wine (or dry white wine/apple cider vinegar)
- 1 tablespoon (15ml) white wine vinegar
- Vegetable oil, for frying (canola or sunflower)
- 2 cups (500g) whole milk ricotta cheese, drained overnight
- 3/4 cup (90g) powdered sugar, more or less to taste
- 1 teaspoon pure vanilla extract
- 1/2 teaspoon ground cinnamon
- Zest of 1 small orange (or lemon)
- 2 tablespoons (25g) mini chocolate chips
- Optional: 2 tablespoons (20g) chopped candied citrus peel or pistachios
- Extra mini chocolate chips, pistachios, or candied orange peel for garnish
- Powdered sugar, for dusting
Instructions
- Place ricotta in a fine mesh sieve or cheesecloth-lined strainer set over a bowl. Cover and refrigerate for at least 8 hours or overnight to drain.
- In a large bowl, whisk together flour, sugar, salt, and cocoa powder. Add cold butter and rub in with fingers until sandy.
- In a small bowl, whisk egg, Marsala, and vinegar. Pour wet ingredients into dry, mixing with a fork until a shaggy dough forms.
- Turn dough onto a floured surface and knead gently for 3-4 minutes until smooth but not sticky. Wrap in plastic and let rest at room temperature for 30 minutes.
- Divide dough in half. Roll each piece as thin as possible (about 1/16 inch). Use a 4-inch round cutter or glass to cut circles. Reroll scraps for extra shells.
- Lightly oil cannoli tubes. Wrap each dough circle around a tube, sealing the edge with water or egg white. Press gently.
- Heat 2 inches of oil in a deep pot to 350°F. Fry a few shells at a time, turning with tongs until golden brown (about 1-2 minutes per batch). Remove with a slotted spoon and drain on paper towels. Cool slightly, then gently slide shells off tubes.
- In a bowl, combine drained ricotta, powdered sugar, vanilla, cinnamon, and orange zest. Mix until smooth. Fold in mini chocolate chips and candied peel or pistachios if using. Adjust sweetness to taste.
- Just before serving, transfer filling to a piping bag. Pipe filling into both ends of each shell. Dip ends in extra chocolate chips or pistachios, and dust with powdered sugar.
Notes
Drain ricotta overnight for best texture. Roll dough very thin for crisp shells. Fill shells just before serving to prevent sogginess. For gluten-free or vegan adaptations, use 1:1 gluten-free flour and dairy-free ricotta, and replace egg with flaxseed egg. Shells can be baked at 400°F for 10-12 minutes for a lighter version, but frying yields the best texture.
Nutrition
- Serving Size: 1 cannoli
- Calories: 220
- Sugar: 12
- Sodium: 120
- Fat: 10
- Saturated Fat: 6
- Carbohydrates: 28
- Fiber: 1
- Protein: 5
Keywords: cannoli, Italian dessert, ricotta filling, homemade cannoli, Sicilian pastry, crispy shell, chocolate chip cannoli, authentic cannoli, holiday dessert, party dessert