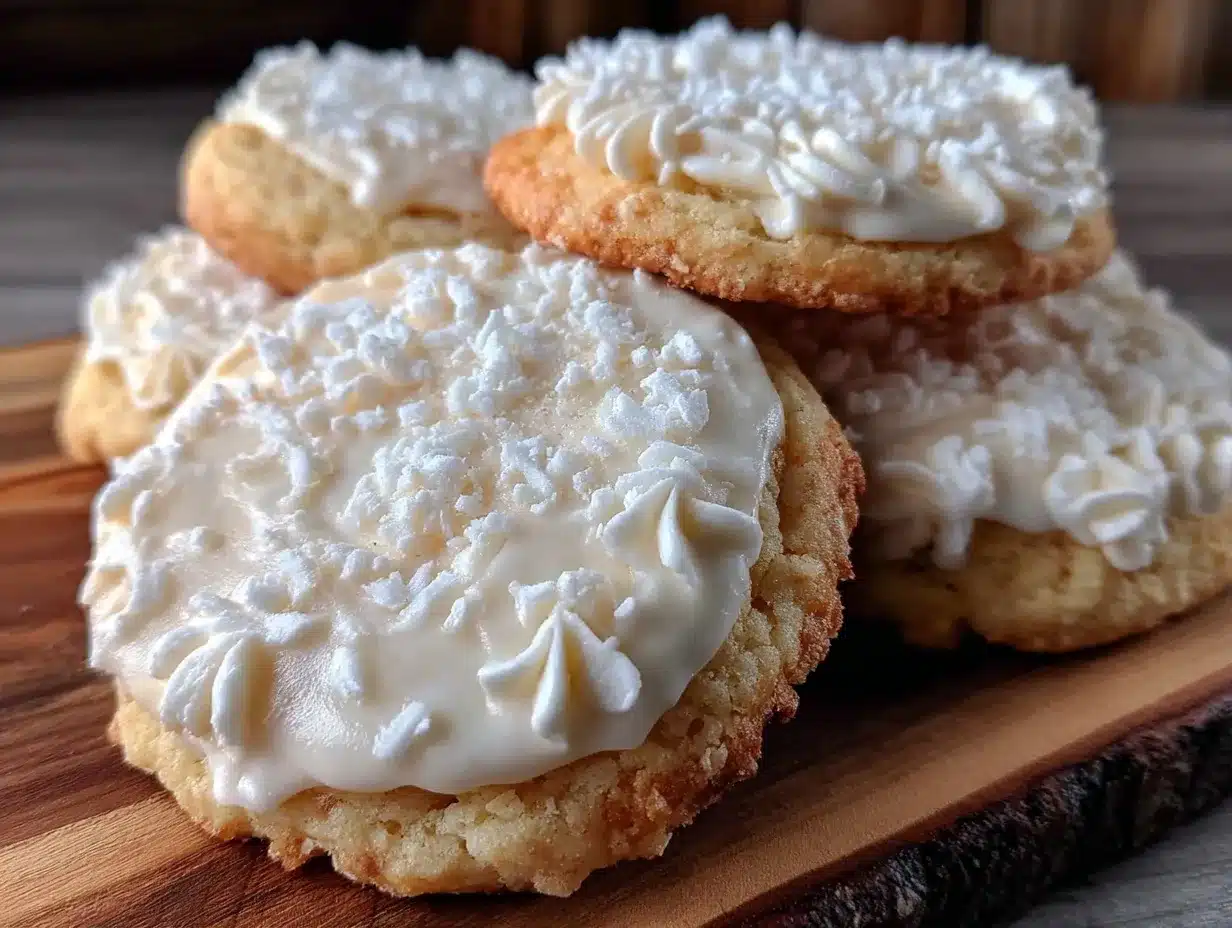
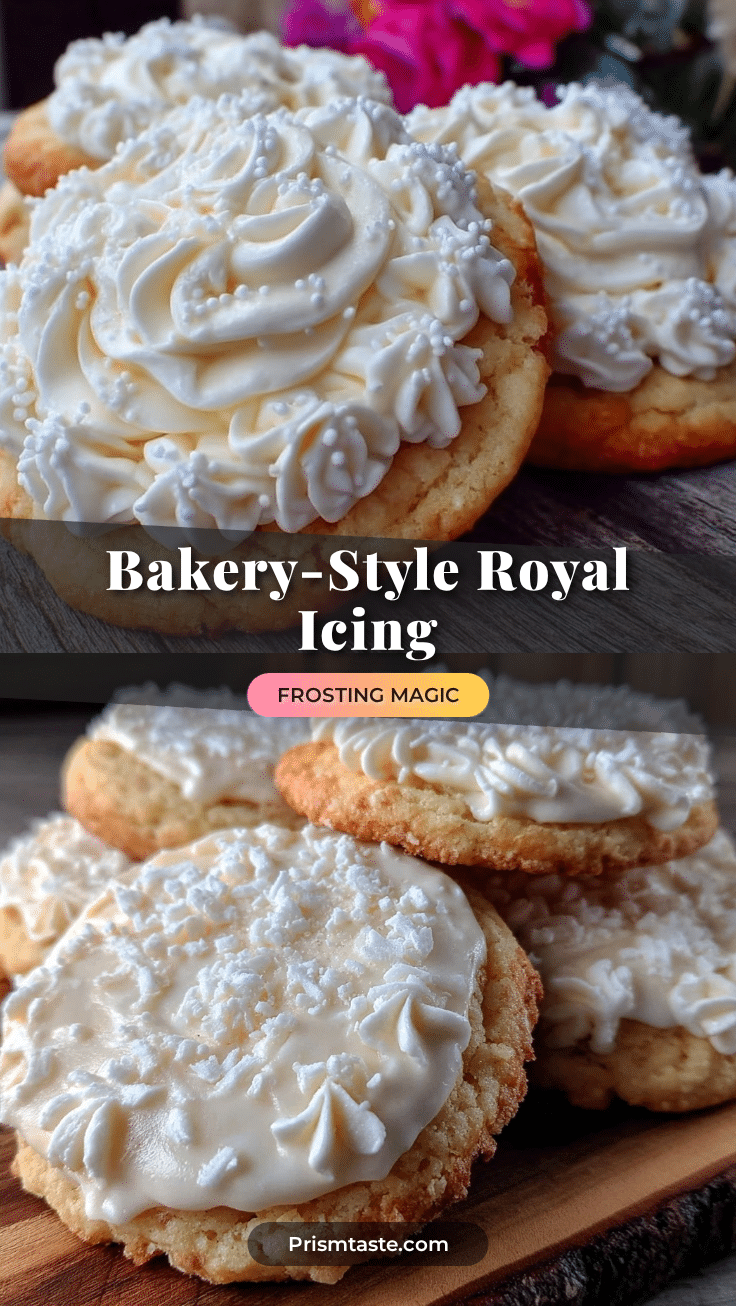
“You don’t need a fancy bakery to get that perfect, glossy royal icing that snaps just right,” my friend had said over text, and honestly, I was skeptical. I’d tried a handful of royal icing recipes before, but they all ended up either too runny or too hard, leaving my sugar cookies looking more like abstract art than the neat, bakery-style treats I was aiming for. That night, while prepping for a last-minute cookie swap, I decided to give this “perfect bakery-style royal icing sugar cookie frosting” a shot. The first batch was a revelation. It wasn’t just about the taste — the way it dried to a smooth, sturdy finish without cracking or getting dull was something I hadn’t quite nailed before.
The kitchen smelled faintly of vanilla and sugar, and with each stroke of the piping bag, I felt more confident. It’s funny how frosting can feel like a small thing, but when it’s just right, it changes everything. This recipe stuck with me because it’s reliable, quick, and gives you that professional touch without the fuss. Plus, it holds up well if you’re decorating ahead of time (a lifesaver when you’re juggling a hundred holiday things). This frosting isn’t just icing; it’s a little bit of magic that makes your sugar cookies look like they belong on a bakery shelf. And that quiet satisfaction has kept me coming back, frosting bag in hand, ready to decorate again.
Why You’ll Love This Recipe
Getting that perfect bakery-style royal icing sugar cookie frosting took a few tries, but now it’s a go-to in my kitchen. Here’s why this frosting stands out and why you’ll appreciate it, too:
- Quick & Easy: Whips up in under 10 minutes, perfect when you need to decorate fast — no waiting around.
- Simple Ingredients: You won’t need anything exotic. Just a few pantry staples like powdered sugar, egg whites, and a splash of vanilla.
- Perfect for Decorating: Dries smooth and hard, ideal for intricate piping or flooding your sugar cookies with ease.
- Crowd-Pleaser: Kids and adults alike love the subtle sweetness and silky texture — it’s not overly sweet or heavy.
- Unbelievably Versatile: Whether you’re making holiday cookies, birthday treats, or just frosting for fun, this icing handles color and flavor additions like a champ.
What sets this apart from other royal icings? Well, the balance of the egg whites and powdered sugar here creates that signature smoothness and snap. The recipe calls for meringue powder or pasteurized egg whites, which gives you the best texture without the worry. Plus, I’ve found that a bit of cream of tartar stabilizes the mix, making the icing less prone to cracking and perfect for detailed designs.
It’s not just a recipe; it’s the kind of frosting that makes you want to close your eyes after the first bite and savor the moment. It’s reliable, beautiful, and honestly, a little bit addictive. If you’ve enjoyed decorating with simpler frostings before, try this one to see how it transforms your sugar cookie game — or pair it with a batch of loaded cookie skillet treats for a full dessert spread that impresses effortlessly.
What Ingredients You Will Need
This perfect bakery-style royal icing uses straightforward ingredients that come together to create a smooth, pipeable frosting that dries hard and shiny. Most of these are pantry staples or easy to find, and you can swap a few based on your preferences or dietary needs.
- Powdered Sugar (also called confectioners’ sugar) – about 4 cups (480g). Use a trusted brand like Domino for a fine, consistent texture.
- Meringue Powder – 3 tablespoons (about 30g). This is key for stable, glossy icing. You can find it in baking aisles or online.
- Water – 6 tablespoons (90ml), room temperature. Adjust slightly to get the perfect flooding consistency.
- Vanilla Extract – 1 teaspoon (5ml). Adds subtle warmth and depth without overpowering.
- Cream of Tartar – 1/4 teaspoon (1g). Stabilizes the egg whites and helps prevent cracking when the icing dries.
Optional:
- Food coloring gel – use sparingly to keep the icing smooth and bright.
- Almond extract – swap for vanilla for a different flavor twist.
If you prefer to avoid raw egg whites, meringue powder is the way to go. It’s a lifesaver for safety and consistency — I’ve had some experiments with fresh egg whites that didn’t quite hold up as well. For a dairy-free or vegan alternative, you can try aquafaba in place of egg white, but be warned, the texture and drying time vary.
In summer, I like to add a little lemon zest or swap vanilla for lemon extract to brighten things up. When I’m pressed for time, I’ve even used this frosting on a batch of keto browned butter chocolate chip cookies, and it works beautifully despite the different cookie base.
Equipment Needed
Making perfect royal icing doesn’t need a ton of fancy gear, but a few tools really make a difference:
- Electric Mixer: A stand mixer with a paddle or whisk attachment is ideal, but a hand mixer works fine, too. It helps achieve that fluffy, smooth texture quickly.
- Mixing Bowl: Use a medium-sized, clean bowl — glass or metal works best. Avoid plastic if possible because it can retain oils that interfere with the icing.
- Measuring Cups and Spoons: Precision matters here, especially for powdered sugar and meringue powder.
- Piping Bags and Tips: Disposable or reusable piping bags with fine round tips (sizes #1 to #3) are perfect for detailed work and flooding outlines.
- Spatula: For scraping down the bowl and mixing in colors gently.
- Plastic Wrap: To cover the icing and keep it from drying out between uses.
For those on a budget, hand mixers and basic piping bags from the dollar store can do the job well enough. I once used a zip-top bag with the corner snipped off when I was out of piping supplies—not perfect but it worked in a pinch! Keeping your mixing bowl and tools grease-free is a must for royal icing success, so a quick rinse with vinegar before starting can help.
Preparation Method
- Measure your ingredients precisely. Sift the powdered sugar into your mixing bowl to avoid lumps. This step is crucial for smooth icing.
- Add the meringue powder and cream of tartar. These help with stability and drying.
- Pour in 6 tablespoons (90 ml) of room temperature water and 1 teaspoon (5 ml) vanilla extract. Start mixing on low speed to prevent powdered sugar from puffing everywhere, then increase to medium-high.
- Beat the mixture for about 7-10 minutes. You want stiff, glossy peaks like meringue. The icing should hold its shape when you pull the whisk out.
- Adjust consistency if needed. For flooding (filling cookie surfaces), add a teaspoon of water at a time to thin the icing until it flows smoothly but isn’t runny. For piping details, keep it thicker so lines hold.
- Transfer the icing to piping bags. Cover the remaining icing in the bowl with plastic wrap to prevent drying. Work quickly but carefully.
- Pipe outlines first. Let outlines crust for 15-20 minutes before flooding inside. This prevents colors from bleeding.
- Flood the cookie with thinner icing. Use a toothpick or small spatula to gently spread icing evenly.
- Allow decorated cookies to dry for at least 4-6 hours at room temperature. Avoid refrigerating as moisture can cause the icing to soften or sweat.
One time, I rushed the drying time and ended up with smudged designs — lesson learned! Patience is key here. If air bubbles appear while piping, lightly tap the bag or use a toothpick to pop them before they set.
Cooking Tips & Techniques
Royal icing can be a little finicky, but getting to know its quirks makes decorating so much more fun. Here are some tips I’ve picked up:
- Mix long enough: Undermixing leads to grainy, dull icing. It should be shiny and hold stiff peaks.
- Keep tools clean and grease-free: Even a tiny bit of oil can cause the icing not to set.
- Work in small batches: If you plan to color your icing, divide it early. I like to keep a base white batch for outlines and a few smaller batches tinted with gel colors.
- Control your icing’s thickness: More water thins for flooding; less water thickens for piping details. Trust your eye and feel over exact measurements here.
- Cover unused icing tightly: It dries out fast when exposed to air.
- Practice steady pressure when piping: It helps keep lines consistent and clean.
Once, I accidentally added too much water and ended up with icing that just wouldn’t set properly—don’t be like me! If that happens, add more powdered sugar in small increments until the right texture returns. Also, drying time varies with humidity, so plan accordingly. When things get busy, multitasking by setting a timer for drying intervals makes decorating less stressful.
Variations & Adaptations
This royal icing recipe is a fantastic base, but feel free to tweak it to fit your needs or taste preferences:
- Flavor Variations: Swap vanilla extract for almond, lemon, or peppermint extract for seasonal twists.
- Color Customization: Use gel food coloring to make vibrant hues without thinning the icing. For pastel shades, dilute colors with a bit more white icing instead of water.
- Dietary Adaptations: Use pasteurized egg whites or meringue powder for safe consumption. For vegan options, try aquafaba but expect longer drying times and softer finish.
- Texture Tweaks: Add a pinch of cornstarch if you want a slightly less glossy, more matte finish — great for rustic cookies.
- Alternative Uses: This icing also works for decorating gingerbread houses or as a glue for assembling cookie crafts.
Personally, I once made a batch flavored with fresh lemon zest and a splash of lemon extract for a spring cookie party — it was a hit! For a different approach, try pairing this frosting with your favorite browned butter banana bread loaf to add a sweet, decorative touch to slices or mini loaves.
Serving & Storage Suggestions
Once your sugar cookies are decorated with this perfect royal icing, serving and storing them is straightforward:
- Serving Temperature: Royal icing sugar cookies are best served at room temperature. This keeps the icing crisp and the cookie tender.
- Presentation: Arrange cookies on a pretty platter or in a decorative tin for gifting. The glossy, smooth finish always looks impressive.
- Storage: Store cookies in an airtight container at room temperature for up to 5 days. Avoid stacking freshly iced cookies until the icing is fully dry to prevent smudging.
- Freezing: Decorated cookies freeze well if wrapped individually in plastic wrap and placed in a sealed container. Thaw at room temperature before serving.
- Reheating: No reheating needed; letting cookies sit at room temp brings out the best texture and flavor.
Over time, the flavors in the icing meld with the cookie, making them even better the next day. Just watch out for humid environments—they can soften the icing. If you’re planning a cookie swap or party, I recommend making the cookies a day ahead and decorating the day of for that fresh, bakery-style look. This also pairs wonderfully with other desserts, like a rich chocolate chip cookie or even a classic no-bake cheesecake jar for a sweet table spread.
Nutritional Information & Benefits
This royal icing is mostly sugar, so it’s definitely a treat rather than a health food, but it offers some benefits compared to other frostings:
- Contains no butter or cream, so it’s lower in fat than traditional buttercream.
- Uses meringue powder or egg whites for protein and structure without adding heaviness.
- Gluten-free as is, making it accessible for those avoiding gluten.
- Minimal ingredients mean it’s free from artificial preservatives or stabilizers.
Of course, it’s best enjoyed in moderation, but I’ve found that this frosting satisfies sweet cravings without feeling overly rich or cloying. If you’re mindful of allergens, note that meringue powder contains egg whites, so it’s not suitable for those with egg allergies. From a personal perspective, this frosting has been a sweet way to indulge while keeping things simple and wholesome in my kitchen.
Conclusion
This perfect bakery-style royal icing sugar cookie frosting has become my secret weapon for decorating cookies that look like they belong in a shop window. It’s straightforward, forgiving, and delivers that glossy, hard finish that holds up beautifully. Whether you’re a seasoned decorator or just getting started, this recipe gives you the confidence to create stunning cookies that taste as good as they look.
Don’t hesitate to make it your own by playing with flavors or colors, and remember that the key is in the balance — not too thick, not too thin, just right. I love this frosting because it turns a simple sugar cookie into a small masterpiece, and honestly, it’s been a joy to share it with friends and family.
If you try it, I’d love to hear how your cookies turned out or what variations you created. Drop a comment or share your photos — nothing beats seeing your frosting creations come to life! Keep baking, keep frosting, and enjoy every sweet moment.
FAQs about Perfect Bakery-Style Royal Icing Sugar Cookie Frosting
Can I use fresh egg whites instead of meringue powder?
Yes, you can use fresh pasteurized egg whites, but meringue powder is safer and more stable, especially if you’re making the icing ahead of time or want consistent results.
How long does royal icing take to dry completely?
Typically, it takes 4 to 6 hours at room temperature to dry hard. Humidity can affect drying time, so in moist climates, it might take longer.
Can I color royal icing without affecting its consistency?
Yes, use gel or paste food coloring sparingly to keep the icing smooth. Avoid liquid coloring as it can thin the icing too much.
What’s the best way to fix runny royal icing?
Add powdered sugar a tablespoon at a time and mix until you reach the desired thickness. Be careful not to add too much or the icing will become too stiff.
Can I store leftover royal icing?
Yes, keep it in an airtight container with plastic wrap pressed directly on the surface to prevent drying. Refrigerate for up to a week and stir gently before use.
Pin This Recipe!
Perfect Bakery-Style Royal Icing Sugar Cookie Frosting Recipe for Easy Decorating

This royal icing recipe creates a smooth, glossy, and sturdy frosting perfect for decorating sugar cookies with a professional bakery-style finish. It dries hard without cracking and is quick and easy to make.
- Prep Time: 10 minutes
- Cook Time: 0 minutes
- Total Time: 10 minutes plus 4-6 hours drying time
- Yield: Enough icing to decorate approximately 24-36 sugar cookies (depending on size and thickness)
- Category: Dessert
- Cuisine: American
Ingredients
- 4 cups powdered sugar (480g)
- 3 tablespoons meringue powder (about 30g)
- 6 tablespoons water (90ml), room temperature
- 1 teaspoon vanilla extract (5ml)
- 1/4 teaspoon cream of tartar (1g)
- Optional: food coloring gel
- Optional: almond extract (can substitute for vanilla extract)
Instructions
- Measure your ingredients precisely. Sift the powdered sugar into your mixing bowl to avoid lumps.
- Add the meringue powder and cream of tartar to the powdered sugar.
- Pour in 6 tablespoons (90 ml) of room temperature water and 1 teaspoon (5 ml) vanilla extract.
- Start mixing on low speed to prevent powdered sugar from puffing everywhere, then increase to medium-high.
- Beat the mixture for about 7-10 minutes until stiff, glossy peaks form and the icing holds its shape when the whisk is pulled out.
- Adjust consistency if needed: add a teaspoon of water at a time to thin for flooding or keep thicker for piping details.
- Transfer the icing to piping bags. Cover remaining icing in the bowl with plastic wrap to prevent drying.
- Pipe outlines first and let crust for 15-20 minutes before flooding inside to prevent colors from bleeding.
- Flood the cookie with thinner icing using a toothpick or small spatula to spread evenly.
- Allow decorated cookies to dry for at least 4-6 hours at room temperature. Avoid refrigerating.
Notes
Keep tools grease-free to ensure icing sets properly. Adjust water to control icing thickness for piping or flooding. Cover unused icing tightly to prevent drying. Drying time varies with humidity; allow 4-6 hours at room temperature. Avoid refrigerating decorated cookies to prevent sweating. Use meringue powder for safety and stability over fresh egg whites. Gel food coloring is preferred to maintain consistency.
Nutrition
- Serving Size: Per serving: 1 table
- Calories: 60
- Sugar: 15
- Sodium: 5
- Carbohydrates: 15
- Protein: 0.5
Keywords: royal icing, sugar cookie frosting, bakery-style frosting, cookie decorating, easy royal icing, meringue powder icing, sugar cookie frosting recipe