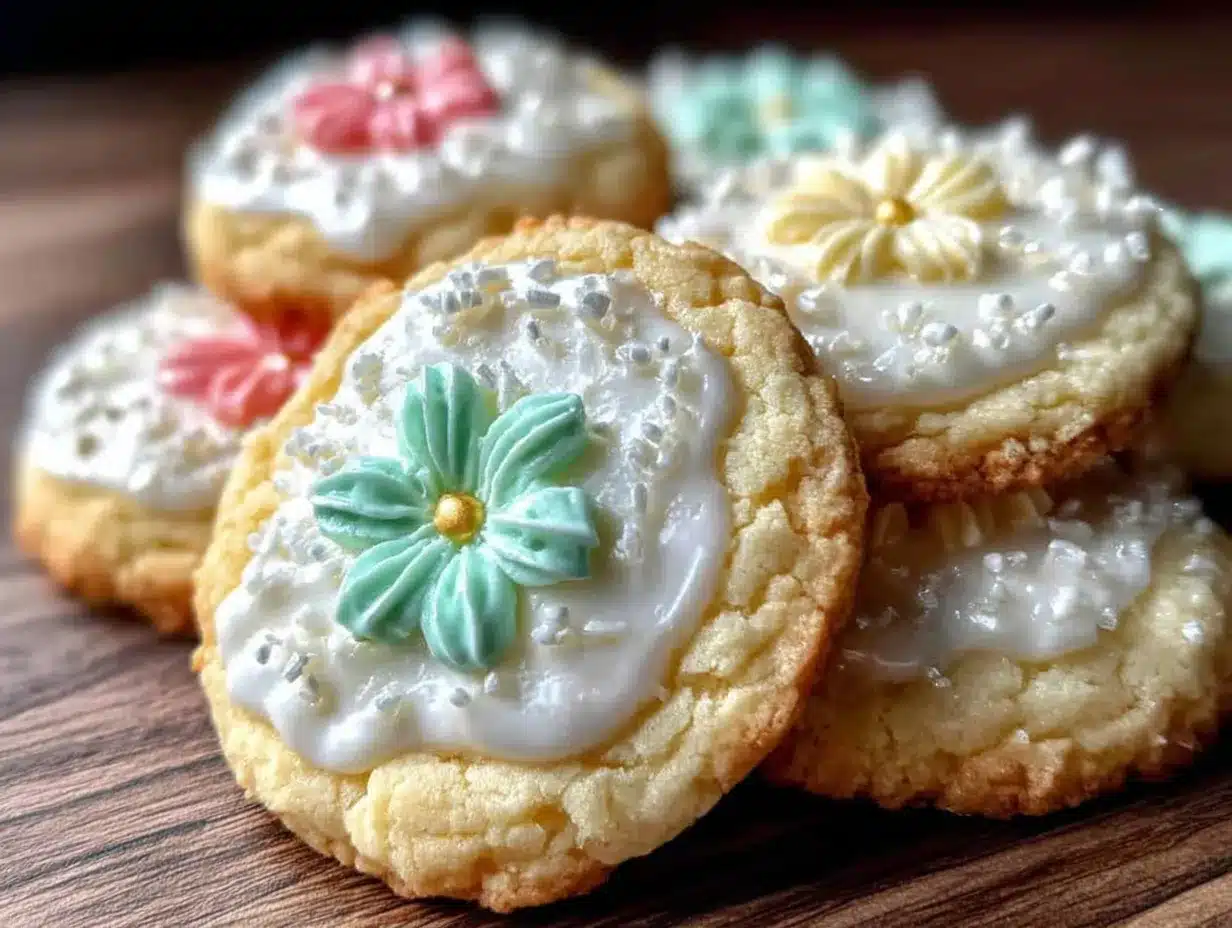
“You’re kidding, right? Pastel sugar cookies with shiny royal icing? That sounds like serious work.” That’s exactly what my friend said when I first mentioned making these perfect pastel sugar cookies. Honestly, I wasn’t sure myself if I could pull it off. But one quiet Sunday afternoon, armed with a stubborn craving for something pretty and sweet, I gave it a shot. The kitchen smelled like vanilla and sugar, the pastel colors slowly took shape, and the royal icing gleamed just right under the soft light. It wasn’t flawless—some cookies cracked, and my piping wasn’t exactly magazine-ready—but the outcome was better than I expected. They were soft, tender, and the icing had that lovely shiny finish that makes you pause before you take a bite.
What really stuck with me was how these cookies became the highlight of a casual coffee meet-up with a neighbor who raved about the delicate sweetness and charming designs. That quiet moment, just sharing these little pastel gems, felt like a small celebration of simple pleasures. So, while this recipe might look fancy, it’s actually a comforting, approachable way to make something special without the stress. And that’s why I keep coming back to these perfect pastel sugar cookies with shiny royal icing designs—they’re sweet, satisfying, and somehow make even the quietest moments feel a bit brighter.
Why You’ll Love This Recipe
Making these pastel sugar cookies isn’t just about baking; it’s about creating little moments of joy you can actually taste. After testing and tweaking this recipe over several weeks (yeah, I might’ve baked a batch almost every weekend), here’s why it’s become my go-to:
- Quick & Easy: The dough mixes up fast, and with a little patience on the icing, you’ve got gorgeous cookies ready in under 2 hours—perfect for last-minute celebrations or sweet cravings.
- Simple Ingredients: Nothing fancy here—just pantry basics like butter, sugar, and eggs. I use King Arthur flour for the best texture, but any all-purpose flour works.
- Perfect for Any Occasion: Whether it’s a baby shower, Easter brunch, or just a cozy afternoon treat, these pastel colors and shiny royal icing add a subtle charm that fits right in.
- Crowd-Pleaser: I’ve had kids and adults alike ask for seconds (and sometimes thirds), which says a lot about the balance of sweetness and texture.
- Unbelievably Delicious: The cookies have a tender crumb, and the royal icing dries to a smooth, shiny finish that’s not too sweet but beautifully decorative.
This isn’t just another sugar cookie recipe—you get the delicate pastel hues from natural food colorings, and the royal icing technique is straightforward, making the designs look professionally done without the fuss. Honestly, it’s the kind of recipe that makes you close your eyes after the first bite, savoring that perfect blend of buttery cookie and glossy icing. Plus, if you want a break from savory dishes like my easy sheet pan loaded fajita bowl, this is a sweet switch-up that’s totally worth it.
What Ingredients You Will Need
This recipe uses simple, wholesome ingredients to deliver bold flavor and that satisfying soft texture without any fuss. Most are pantry staples, and where there’s room for substitutions, I’ll point them out.
- For the Sugar Cookies:
- 1 cup (227g) unsalted butter, softened (I like using Land O Lakes for consistency)
- 1 cup (200g) granulated sugar
- 1 large egg, room temperature
- 1 teaspoon pure vanilla extract
- 2 ½ cups (312g) all-purpose flour (King Arthur is my pick for best results)
- ½ teaspoon baking powder
- ¼ teaspoon salt
- For the Royal Icing:
- 3 cups (360g) powdered sugar, sifted
- 2 large egg whites or 4 tablespoons meringue powder with 6 tablespoons water (for safety, I prefer meringue powder)
- ¼ teaspoon cream of tartar
- Pastel gel food coloring (I use AmeriColor gels for vibrant, smooth colors)
- 1 teaspoon vanilla or almond extract (optional for flavor)
Feel free to swap all-purpose flour for a gluten-free blend if needed, though the texture might be a touch different. For the royal icing, meringue powder is a safer bet if you’re wary of raw egg whites. Also, you can customize the pastel shades depending on the season—soft pinks, blues, greens, and yellows work beautifully for spring, but you might want to try lavender or peach for a subtle twist.
Equipment Needed
Here’s what you’ll want on hand to make these pastel sugar cookies with shiny royal icing designs:
- Mixing bowls (preferably glass or stainless steel)
- Electric hand mixer or stand mixer (a hand mixer works just fine for this recipe)
- Measuring cups and spoons (accuracy matters here!)
- Rolling pin (I have a silicone one that prevents sticking)
- Cookie cutters in your favorite shapes (circles, hearts, or flowers suit the pastel vibe)
- Baking sheets lined with parchment paper or silicone mats
- Piping bags or squeeze bottles for icing (I prefer disposable piping bags for easy cleanup)
- Small round piping tips (#1 or #2) for fine royal icing details
- Toothpicks or scribe tools (for smoothing and fixing icing lines)
If you don’t have a rolling pin, a smooth wine bottle can work in a pinch. For piping, if you’re new to royal icing, using squeeze bottles can make controlling the flow easier. Keeping your tools clean and dry is key, especially since royal icing is sensitive to moisture. I’ve found that silicone mats help cookies bake evenly without sticking, and cleanup is a breeze.
Preparation Method
- Make the Cookie Dough (15 minutes active + chilling): In a large bowl, cream together the softened butter and granulated sugar using your mixer on medium speed until pale and fluffy—about 3-4 minutes. This step is crucial because the air whipped in here gives the cookies their tender texture.
- Add the egg and vanilla extract, mixing until combined but don’t overbeat. Scrape down the sides to keep everything evenly mixed.
- In a separate bowl, whisk together the flour, baking powder, and salt. Slowly add this dry mix to the wet ingredients on low speed, mixing just until the dough comes together. It’ll look a bit crumbly but should hold if pressed.
- Form the dough into a flat disk, wrap it tightly in plastic wrap, and refrigerate for at least 1 hour (or up to overnight). Chilling firms up the dough, which helps with clean cookie shapes and prevents spreading during baking.
- Roll and Cut the Cookies (20 minutes): Preheat your oven to 350°F (175°C). Line baking sheets with parchment or silicone mats.
- On a lightly floured surface, roll out the dough to about ¼ inch (6 mm) thickness. If the dough feels too soft, pop it back in the fridge for 10 minutes—it’s easier to work with when chilled but not frozen solid.
- Use your cookie cutters to cut out shapes, then transfer them carefully to the baking sheets, spacing about 1 inch (2.5 cm) apart.
- Bake (10-12 minutes): Bake until the edges just start to turn golden. The centers will look pale and slightly soft, which is perfect. Overbaking leads to hard cookies, so keep a close eye.
- Let the cookies cool on the sheet for 5 minutes before transferring to wire racks to cool completely. This resting time helps them firm up without breaking.
- Prepare Royal Icing (10 minutes): In a clean bowl, beat the egg whites or meringue powder with water and cream of tartar until frothy.
- Gradually add powdered sugar, mixing on low until smooth. Then increase speed to medium-high and beat until stiff peaks form—about 5-7 minutes. The icing should hold its shape but still be pipeable.
- Divide the icing into small bowls and tint with pastel gel food coloring. Add just a tiny bit of color at a time—you can always darken but can’t undo it!
- Decorate the Cookies (30-45 minutes): Using piping bags fitted with small round tips, outline each cookie first, then flood the center with thinner icing (thin it with a few drops of water). Use a toothpick to spread the icing evenly and pop any air bubbles.
- Let the base coat dry for at least 30 minutes before adding shiny royal icing designs—like delicate lines, dots, or swirls. This layering creates that glossy, polished look.
- Allow the decorated cookies to dry fully at room temperature (2-4 hours) before stacking or packaging to avoid smudging.
One thing I learned is to avoid rushing the drying times—patience here makes all the difference. Also, I recommend decorating in a cool, dry room since humidity can make royal icing sticky or runny. If your icing gets too thick, a tiny splash of water helps; too thin, add powdered sugar a pinch at a time.
Cooking Tips & Techniques
Royal icing can seem intimidating if you’re new to it, but breaking it down into simple steps makes it manageable. Here are some tips from my attempts (and occasional fails!):
- Beat Your Icing Right: The stiff peak stage is key—too loose, and your designs won’t hold; too stiff, and piping gets tough. Test by lifting the beaters: the peaks should stand straight but not crack.
- Control Your Consistency: For outlining, keep icing thicker; for flooding, thin it down just enough to spread smoothly. I usually add 1 teaspoon of water at a time and test on parchment paper.
- Use Gel Colors: Liquid colors thin the icing and can dull the shine. Gel colors keep that pastel pop without messing with texture.
- Mind Your Weather: Humidity is the enemy of royal icing—high moisture can cause cracking or sticky surfaces. Try to work in a dry, cool space.
- Practice Piping: Steady hands come with practice. If shaky, try resting your elbow on the table and piping slowly.
- Don’t Skip Chilling: The dough needs to be cold to cut cleanly and hold shape. Warm dough sticks and spreads too much.
- Test Bake One Cookie: Before baking the whole batch, bake one to check oven temperature and cookie spread—it saves disappointment.
One personal lesson was realizing that rushing the icing drying process only leads to smudges and frustration. Letting the base coat set properly before adding designs is worth the wait. Also, I sometimes swap vanilla for almond extract in the icing for a subtle nutty flavor that pairs beautifully with the pastel theme.
Variations & Adaptations
These pastel sugar cookies are a great canvas for creativity. Here are some ways to tweak the recipe to suit your needs or moods:
- Dietary: Swap all-purpose flour for a gluten-free blend like Bob’s Red Mill 1-to-1 for a tasty gluten-free version. Use aquafaba (chickpea water) instead of egg whites in royal icing for a vegan option.
- Seasonal Flavors: Add a teaspoon of lemon zest or orange extract to the dough for fresh citrus notes, perfect for spring or summer gatherings.
- Color & Design: Try ombré icing effects by blending different pastel shades on each cookie, or add edible glitter for a little sparkle.
- Cooking Method: If you prefer chewy cookies, bake for less time (around 8-9 minutes). For crispier edges, extend bake time by a minute or two.
- Personal Variation: I once added finely chopped crystallized ginger to the dough for a subtle spicy twist that paired surprisingly well with the sweet icing.
Serving & Storage Suggestions
These pastel sugar cookies are best enjoyed at room temperature, allowing the butter to soften slightly and the royal icing to maintain its glossy finish. Serve them on a pretty platter alongside a cup of tea or coffee for an inviting treat. They also fit right in at brunch tables or holiday dessert spreads.
To store, place cookies in an airtight container with parchment paper layers between to prevent sticking. They keep well at room temperature for up to 5 days. For longer storage, freeze undecorated cookies in a sealed bag for up to 3 months and decorate after thawing.
When reheating, avoid microwaves as the royal icing can melt. Instead, let frozen cookies thaw slowly at room temperature. The flavors actually deepen over a day or two, so if you can wait, that’s even better.
For a sweet pairing idea, these cookies complement cozy recipes like browned butter banana bread or a creamy hot chocolate, turning any snack time into a mini celebration.
Nutritional Information & Benefits
Each cookie (depending on size) contains approximately 150-180 calories, with about 7 grams of fat and 20 grams of carbohydrates. The butter provides richness and some fat-soluble vitamins, while the sugar is mostly for sweetness.
Using real butter and pure vanilla extract means you’re avoiding artificial additives common in store-bought cookies. The royal icing is mainly sugar and egg whites (or meringue powder), so it’s a treat best enjoyed in moderation.
This recipe is naturally gluten-free adaptable, dairy-free if you swap butter with plant-based alternatives, and egg-free in the icing if using aquafaba. Just be mindful of food allergies, especially to eggs and nuts if using almond extract.
From a wellness perspective, these cookies satisfy sweet cravings with quality ingredients, helping avoid overly processed snacks. The joy of baking and decorating also contributes to mental well-being — a little therapy in pastel colors!
Conclusion
Perfect pastel sugar cookies with shiny royal icing designs aren’t just a dessert—they’re a little project that brings beauty and sweetness to any day. Whether you’re baking for family, friends, or just because, this recipe is flexible enough to suit your style and skill level. I love how it turns simple ingredients into something that looks special without stress.
Feel free to experiment with the colors, flavors, and shapes to make these cookies your own. Baking is all about making memories and having fun, even if your icing lines aren’t perfect on the first try. And hey, if you enjoy hands-on recipes like this, you might also appreciate my easy creamy one-pot beef stroganoff for a savory dinner that comes together just as effortlessly.
Give this recipe a go, share your decorating adventures, and let those pastel cookies brighten your kitchen — one shiny bite at a time.
FAQs
Can I make the cookie dough ahead of time?
Yes! The dough can be wrapped tightly and refrigerated for up to 3 days or frozen for up to 3 months. Just thaw in the fridge before rolling out.
Is royal icing safe to eat raw?
If using raw egg whites, it carries a small risk. To avoid this, use meringue powder, which is safe and widely available for royal icing recipes.
How do I fix royal icing that’s too runny or too thick?
Add powdered sugar little by little to thicken or a few drops of water to thin it. Adjust gradually and test the consistency on parchment.
Can I use powdered food coloring instead of gel?
Powdered colors are fine but can be harder to mix smoothly. Gel colors are preferred for vibrant, even pastel shades and don’t affect icing consistency.
How long do decorated sugar cookies last?
If stored properly in an airtight container at room temperature, they last 4-5 days. Avoid refrigeration, which can cause icing to sweat or soften.
Pin This Recipe!

Perfect Pastel Sugar Cookies Recipe Easy Royal Icing Decorating Tips

Soft, tender pastel sugar cookies decorated with shiny royal icing that are quick and easy to make, perfect for any occasion and crowd-pleasing.
- Prep Time: 35 minutes (including chilling and rolling)
- Cook Time: 10-12 minutes per batch
- Total Time: Approximately 2 hours (including decorating and drying)
- Yield: About 24 cookies 1x
- Category: Dessert
- Cuisine: American
Ingredients
- 1 cup (227g) unsalted butter, softened
- 1 cup (200g) granulated sugar
- 1 large egg, room temperature
- 1 teaspoon pure vanilla extract
- 2 ½ cups (312g) all-purpose flour
- ½ teaspoon baking powder
- ¼ teaspoon salt
- 3 cups (360g) powdered sugar, sifted
- 2 large egg whites or 4 tablespoons meringue powder with 6 tablespoons water
- ¼ teaspoon cream of tartar
- Pastel gel food coloring
- 1 teaspoon vanilla or almond extract (optional)
Instructions
- Make the Cookie Dough (15 minutes active + chilling): In a large bowl, cream together the softened butter and granulated sugar using your mixer on medium speed until pale and fluffy—about 3-4 minutes.
- Add the egg and vanilla extract, mixing until combined but don’t overbeat. Scrape down the sides to keep everything evenly mixed.
- In a separate bowl, whisk together the flour, baking powder, and salt. Slowly add this dry mix to the wet ingredients on low speed, mixing just until the dough comes together.
- Form the dough into a flat disk, wrap it tightly in plastic wrap, and refrigerate for at least 1 hour (or up to overnight).
- Roll and Cut the Cookies (20 minutes): Preheat oven to 350°F (175°C). Line baking sheets with parchment or silicone mats.
- On a lightly floured surface, roll out the dough to about ¼ inch (6 mm) thickness. If dough is too soft, chill for 10 minutes.
- Use cookie cutters to cut shapes, transfer to baking sheets spaced about 1 inch apart.
- Bake (10-12 minutes): Bake until edges start to turn golden and centers look pale and slightly soft.
- Cool cookies on sheet for 5 minutes, then transfer to wire racks to cool completely.
- Prepare Royal Icing (10 minutes): Beat egg whites or meringue powder with water and cream of tartar until frothy.
- Gradually add powdered sugar, mixing on low until smooth, then beat on medium-high until stiff peaks form (5-7 minutes).
- Divide icing into bowls and tint with pastel gel food coloring.
- Decorate the Cookies (30-45 minutes): Outline each cookie with thicker icing, then flood center with thinner icing. Use toothpick to spread evenly and pop air bubbles.
- Let base coat dry at least 30 minutes before adding shiny royal icing designs.
- Allow decorated cookies to dry fully at room temperature for 2-4 hours before stacking or packaging.
Notes
Use meringue powder instead of raw egg whites for safer royal icing. Chill dough to prevent spreading. Let icing dry fully between layers to avoid smudging. Work in a cool, dry room to prevent sticky icing. Adjust icing consistency with water or powdered sugar as needed. Test bake one cookie to check oven temperature and spread.
Nutrition
- Serving Size: 1 cookie
- Calories: 165
- Sugar: 14
- Sodium: 60
- Fat: 7
- Saturated Fat: 4
- Carbohydrates: 20
- Protein: 1
Keywords: pastel sugar cookies, royal icing, easy sugar cookies, decorated cookies, pastel cookies, baking, cookie decorating, holiday cookies