Let me tell you, the warm, nutty aroma of browned butter mingling with sweet, crispy marshmallows is enough to make anyone’s mouth water. The first time I made these cozy browned butter Rice Krispie treats with a crispy twist, I was instantly hooked—the kind of moment where you pause, take a deep breath, and just smile because you know you’re onto something truly special. I still remember when I was knee-high to a grasshopper, my grandma’s classic Rice Krispie treats were the ultimate sweet fix after school. But adding that browned butter magic? Oh, it’s a whole new level of comfort food that I wish I’d discovered years ago.
Honestly, my family couldn’t stop sneaking them off the cooling rack (and I can’t really blame them). These treats have become a staple for family gatherings and last-minute dessert cravings. You know what makes them so dangerously easy? The crispy twist that adds a little extra crunch and a deeper, richer flavor thanks to the browned butter. Perfect for potlucks, sweet treats for your kids, or just brightening up your Pinterest cookie board, these treats bring that nostalgic comfort with a little modern flair. After testing this recipe multiple times (in the name of research, of course), it’s safe to say you’re going to want to bookmark this one.
Why You’ll Love This Recipe
If you’re wondering why these browned butter Rice Krispie treats are stealing the spotlight, let me share a few reasons based on my kitchen trials and family feedback:
- Quick & Easy: Comes together in under 20 minutes, perfect for busy weeknights or last-minute sweet cravings.
- Simple Ingredients: No fancy grocery trips needed; you likely already have everything in your pantry and fridge.
- Perfect for Any Occasion: Great for potlucks, holiday gatherings, or just a cozy night in with a warm beverage.
- Crowd-Pleaser: Kids and adults alike give rave reviews—those crispy edges and buttery richness are pure magic.
- Unbelievably Delicious: The browned butter adds a toasty, nutty flavor that sets this apart from the usual marshmallow treats.
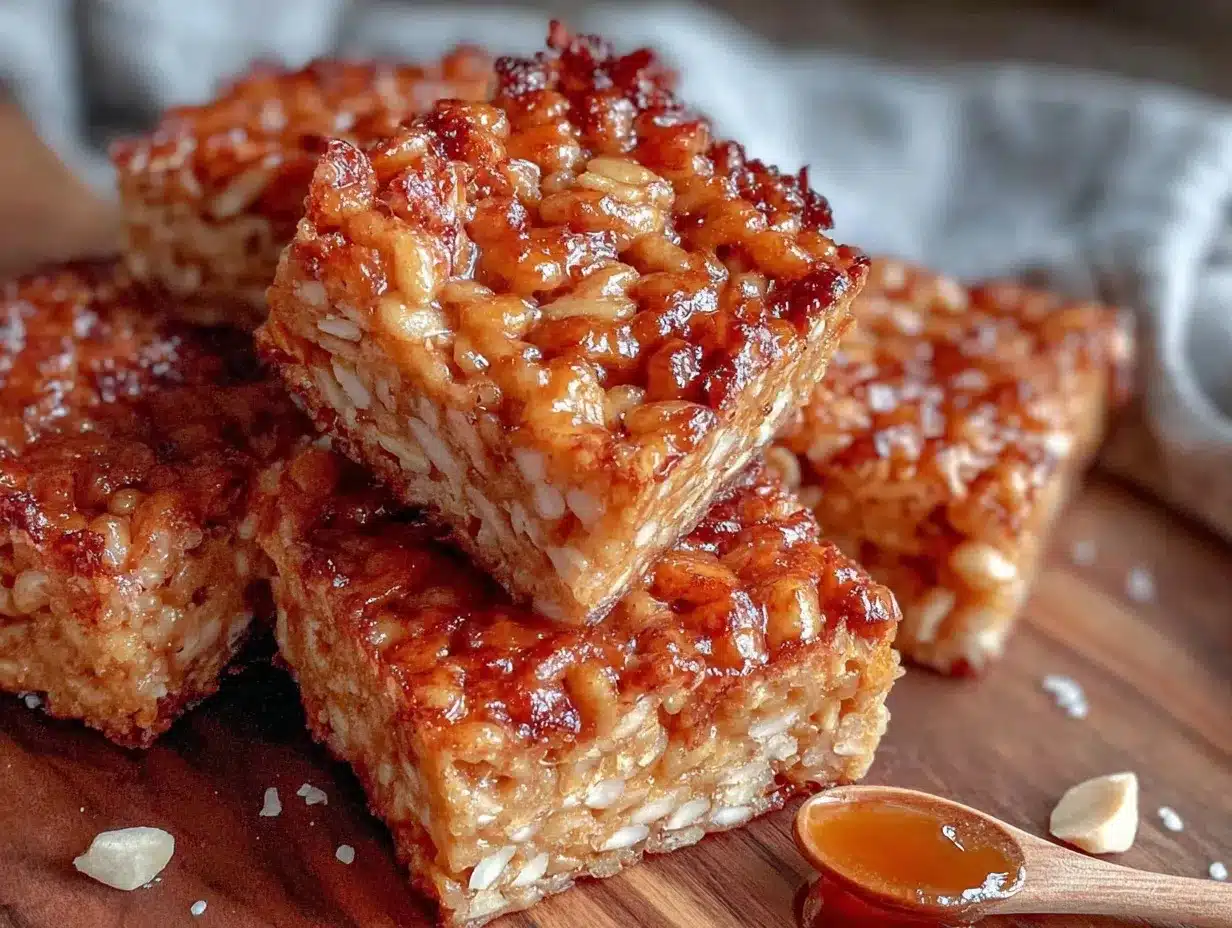
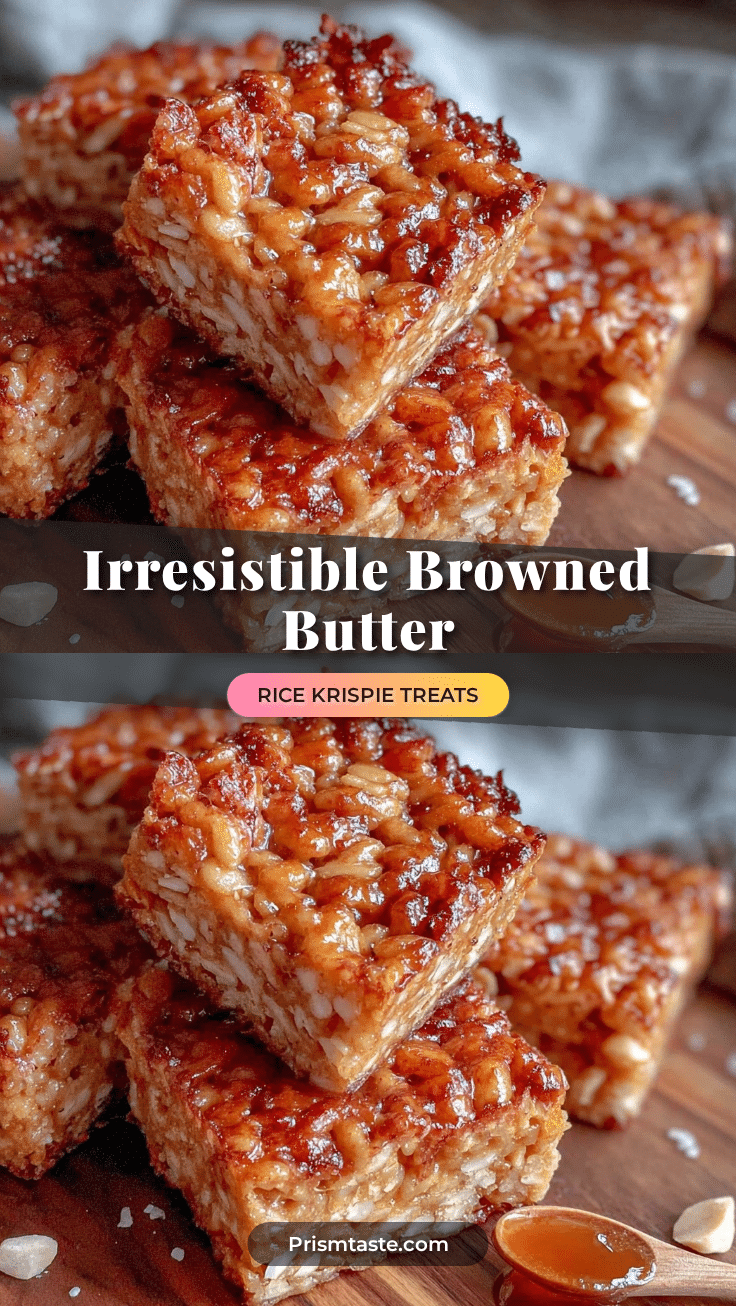
This recipe isn’t just another Rice Krispie treat. Browning the butter before mixing it in creates a perfectly balanced flavor profile that’s buttery without being greasy and sweet without being overpowering. Plus, the crispy twist comes from toasting some of the cereal beforehand, giving each bite a delightful crunch you didn’t know you were missing. Honestly, it’s comfort food reimagined—faster, richer, and just as soul-soothing.
What Ingredients You Will Need
This recipe uses simple, wholesome ingredients to deliver bold flavor and satisfying texture without the fuss. Most of these are pantry staples, but if you want to get fancy, I’ve included a few tips for ingredient selection and substitution.
- Unsalted Butter, 6 tablespoons (about 85 grams), browned to bring out a nutty, rich flavor (I recommend Kerrygold for the best texture).
- Mini Marshmallows, 10 ounces (about 280 grams), for that classic melty sweetness (Campfire brand melts beautifully).
- Rice Krispies Cereal, 6 cups (about 180 grams), the crispy base of this treat (I like the original Kellogg’s for its crunch).
- Vanilla Extract, 1 teaspoon, adds warmth and depth to the flavor.
- Salt, a pinch, to balance the sweetness and enhance the browned butter notes.
Substitution tips: Use almond flour or gluten-free Rice Krispies for a gluten-free version. Swap regular butter for a dairy-free margarine if you need a dairy-free option, but browning might take a bit longer. If mini marshmallows aren’t handy, regular marshmallows chopped into smaller pieces work just fine.
Equipment Needed
- Large non-stick skillet or saucepan for browning the butter and melting marshmallows (a heavy-bottomed pan works best to prevent burning).
- Large mixing bowl to combine the cereal and marshmallow mixture.
- Rubber spatula or wooden spoon, perfect for scraping the pan and folding ingredients together without scratching.
- 9×13-inch baking pan (glass or metal) for setting the treats.
- Wax paper or parchment paper to press the mixture evenly into the pan.
- Optional: Cooking spray or extra butter for greasing the pan to prevent sticking.
If you don’t have a heavy skillet, a regular saucepan will do, but keep a close eye on the butter while browning. I’ve found a rubber spatula easier than a wooden spoon for getting into those pan corners.
Preparation Method
- Brown the Butter: In your large skillet over medium heat, melt 6 tablespoons (85 grams) of unsalted butter. Stir frequently as it foams and then begins to brown (about 5-7 minutes). Look for a golden-brown color and a nutty aroma. Be careful—not too dark or burnt! Remove from heat immediately and add a pinch of salt.
- Toast the Rice Krispies: In a separate dry pan over medium heat, toast 1 cup (30 grams) of the Rice Krispies cereal, stirring often, until lightly golden and fragrant (about 3-4 minutes). This step adds that crispy twist we love. Combine toasted cereal with the remaining 5 cups (150 grams) in a large bowl.
- Melt the Marshmallows: Quickly add 10 ounces (280 grams) of mini marshmallows to the browned butter while it’s still warm. Stir until completely melted and smooth (around 1-2 minutes). Stir in 1 teaspoon vanilla extract for extra warmth.
- Mix with Cereal: Pour the melted marshmallow and browned butter mixture over the bowl of Rice Krispies. Using a rubber spatula, fold gently but thoroughly to coat all the cereal evenly. Work fast before it sets!
- Press Into the Pan: Lightly grease your 9×13-inch pan and transfer the mixture into it. Use a piece of wax or parchment paper to press the mixture evenly without squishing it too hard—leave some air pockets for that perfect texture.
- Cool and Cut: Let the treats cool completely at room temperature for at least 30 minutes. Once firm, cut into squares or rectangles. Enjoy the crispy, buttery delight!
Pro tip: Browning butter can go from perfect to burnt in seconds, so stay close and stir constantly. Toasting a portion of the cereal separately adds a welcome crunch that makes this recipe stand out. Pressing the treats gently keeps them light and crispy instead of dense and chewy.
Cooking Tips & Techniques
One trick I’ve learned (the hard way) is to never leave browned butter unattended—it can burn quickly, and burnt butter means a bitter aftertaste you don’t want. Stirring constantly and watching for that nutty aroma is your best bet.
Another tip: Toasting a small portion of the cereal separately before mixing it with the rest adds that coveted crispy twist. Honestly, skipping this step is like missing the best part of the treat’s texture.
When melting marshmallows, use medium-low heat if you’re not browning butter, but since our butter is warm, the marshmallows melt quickly. Stir gently to avoid breaking the cereal pieces.
Multitasking helps a lot here—start toasting the cereal while browning the butter to save time. Also, pressing the mixture with wax paper instead of your hands prevents the treats from getting too dense or sticky.
If your treats turn out too sticky or dense, it probably means the marshmallows were overheated or pressed too hard. For consistent results, measure ingredients carefully and work swiftly.
Variations & Adaptations
- Chocolate Drizzle: Once the treats have cooled, drizzle melted dark or white chocolate on top for a decadent finish.
- Peanut Butter Addition: Stir in ½ cup (125 grams) creamy peanut butter with the browned butter before adding marshmallows for a nutty twist.
- Gluten-Free & Vegan: Use gluten-free rice cereal and swap butter for vegan margarine plus vegan marshmallows to make these treats allergy-friendly.
- Seasonal Flair: Add a handful of dried cranberries or chopped nuts in fall or winter for extra texture and festive flavor.
- Healthy Swap: Use coconut oil instead of butter and natural sweeteners like maple syrup with homemade marshmallow alternatives.
I personally tried adding a pinch of cinnamon and a few toasted pecans for a cozy fall version—totally worth it and became a new favorite in my house!
Serving & Storage Suggestions
These browned butter Rice Krispie treats are best served at room temperature, right off the cutting board. The crispy edges stay crunchy, and the center stays chewy, creating a perfect bite every time.
Serve alongside a cold glass of milk or a warm cup of coffee or tea to balance the rich, buttery sweetness. They also make awesome grab-and-go snacks for kids’ lunchboxes or quick post-workout energy bites.
Store leftovers in an airtight container at room temperature for up to 3 days. For longer storage, pop them in the fridge for up to a week, but cold treats might lose some of that crispy charm. You can also freeze them wrapped tightly in plastic wrap and stored in a freezer-safe container for up to 3 months. To reheat, let thaw at room temperature or warm gently in the microwave for 10-15 seconds—it softens them up without losing the crispy texture.
Flavors actually deepen and meld a bit after a day, so if you can resist, letting them sit overnight makes the experience even richer.
Nutritional Information & Benefits
Each serving (about one treat) contains roughly 150-180 calories, with a modest amount of fat from the butter and a good dose of carbs from the cereal and marshmallows. The butter provides some fat-soluble vitamins, and the toasted nuts or added peanut butter variations can boost protein and healthy fats.
While these treats are definitely a sweet indulgence, using browned butter adds a layer of natural flavor that means you don’t need extra sugary toppings. You can also tailor this recipe for gluten-free diets by choosing certified gluten-free cereal. Just note that marshmallows often contain gelatin, so vegan alternatives are necessary for plant-based diets.
From my experience, these treats hit the spot when you want a nostalgic, cozy snack without overcomplicating things—perfect for occasional treats that bring a smile and a little comfort.
Conclusion
So, there you have it—cozy browned butter Rice Krispie treats with that crispy twist you never knew you needed. This recipe is worth trying because it takes a childhood favorite and adds a grown-up, buttery depth while keeping things dangerously easy. Feel free to customize with your favorite mix-ins or drizzle on some chocolate; the possibilities are endless.
I love this recipe because it feels like a warm hug from the inside out—comfort food with a touch of sophistication. If you give it a go, drop a comment below with your own twists or how it turned out. And hey, don’t forget to share it with friends who appreciate a little crispy, buttery magic in their lives. Happy snacking!
FAQs
Can I use regular butter instead of unsalted butter?
Yes, but just reduce added salt slightly since salted butter adds more sodium. Unsalted butter gives you better control over the flavor.
How do I prevent the treats from becoming too sticky?
Make sure to work quickly when mixing and press gently into the pan. Avoid overheating marshmallows and don’t over-press the mixture.
Can I store these treats in the freezer?
Absolutely! Wrap tightly in plastic and store in an airtight container for up to 3 months. Thaw at room temperature before eating.
Is there a way to make these treats vegan?
Swap butter for vegan margarine and use vegan marshmallows. Also, ensure your cereal is vegan-friendly (some brands add vitamin D3 derived from animals).
What’s the best way to get that crispy twist?
Toast a small portion of the Rice Krispies cereal separately before mixing it in. This adds a delightful crunch not found in standard recipes.
Pin This Recipe!
Browned Butter Rice Krispie Treats
These cozy browned butter Rice Krispie treats feature a crispy twist with toasted cereal and a nutty, rich flavor from browned butter, perfect for a nostalgic yet sophisticated sweet treat.
- Prep Time: 10 minutes
- Cook Time: 10 minutes
- Total Time: 30 minutes
- Yield: 12 servings 1x
- Category: Dessert
- Cuisine: American
Ingredients
- 6 tablespoons (85 grams) unsalted butter, browned
- 10 ounces (280 grams) mini marshmallows
- 6 cups (180 grams) Rice Krispies cereal
- 1 teaspoon vanilla extract
- Pinch of salt
Instructions
- Brown the butter: In a large skillet over medium heat, melt 6 tablespoons (85 grams) of unsalted butter. Stir frequently as it foams and then begins to brown (about 5-7 minutes). Look for a golden-brown color and a nutty aroma. Remove from heat immediately and add a pinch of salt.
- Toast the Rice Krispies: In a separate dry pan over medium heat, toast 1 cup (30 grams) of the Rice Krispies cereal, stirring often, until lightly golden and fragrant (about 3-4 minutes). Combine toasted cereal with the remaining 5 cups (150 grams) in a large bowl.
- Melt the marshmallows: Quickly add 10 ounces (280 grams) of mini marshmallows to the browned butter while it’s still warm. Stir until completely melted and smooth (around 1-2 minutes). Stir in 1 teaspoon vanilla extract.
- Mix with cereal: Pour the melted marshmallow and browned butter mixture over the bowl of Rice Krispies. Using a rubber spatula, fold gently but thoroughly to coat all the cereal evenly. Work fast before it sets!
- Press into the pan: Lightly grease a 9×13-inch pan and transfer the mixture into it. Use wax or parchment paper to press the mixture evenly without squishing it too hard—leave some air pockets for perfect texture.
- Cool and cut: Let the treats cool completely at room temperature for at least 30 minutes. Once firm, cut into squares or rectangles and serve.
Notes
Stay close and stir constantly when browning butter to avoid burning. Toasting a portion of the cereal separately adds a crispy twist. Press the mixture gently to keep treats light and crispy. Store in airtight container at room temperature up to 3 days or freeze up to 3 months.
Nutrition
- Serving Size: One treat (approxima
- Calories: 165
- Sugar: 14
- Sodium: 90
- Fat: 7
- Saturated Fat: 4.5
- Carbohydrates: 25
- Fiber: 0.5
- Protein: 1
Keywords: Browned butter, Rice Krispie treats, crispy twist, easy dessert, marshmallow treats, nostalgic snack