Can I just say—the scent of fresh strawberries mingling with warm, melted chocolate is downright irresistible. Picture this: you’re standing in your kitchen with a bowl of glossy chocolate, dipping ruby-red berries one by one, and the aroma floats up, wrapping the whole room in a sweet hug. The first time I created a chocolate-covered strawberry dessert board, it was on a rainy Saturday, with my kids swirling around me, each sneaking strawberries when they thought I wasn’t looking. I was instantly hooked. That first bite—crisp fruit, velvety chocolate—was the kind of moment where you pause, take a deep breath, and just smile because you know you’re onto something truly special.
There’s something downright nostalgic about strawberries and chocolate. When I was knee-high to a grasshopper, my grandma used to make chocolate-dipped fruit for family gatherings (hers were never quite as glossy as mine, but always delicious). Years ago, I tried recreating her platter for a bake sale, and—let’s face it—it was so much easier than fussing with cupcakes or cookies. Honestly, I wish I’d stumbled across the idea of a dessert board sooner. It’s dangerously easy, pure comfort, and gets the kind of reaction that makes you want to do a little happy dance.
My family couldn’t stop sneaking the chocolate-covered strawberries off the board before I’d even snapped a photo. Friends rave every time I bring this to a potluck or party. It’s the sort of treat you’ll want to bookmark—not just for Valentine’s Day, but for birthdays, movie nights, and any time you need a “wow” moment without a ton of effort. I’ve tested this recipe (in the name of research, of course) at least a dozen times, tweaking the chocolate ratios and adding new toppings. Now, it’s become the staple for family gatherings and gifting. It honestly feels like a warm, sweet hug on a plate—and you’re going to want to try it for yourself!
Why You’ll Love This Recipe
If you’re searching for a dessert that’s gorgeous, easy, and a total crowd-pleaser, you’ve landed in the right spot. This chocolate-covered strawberry dessert board is my secret weapon for entertaining—born from years of trial and error, and lots of happy taste-testers. Here’s what makes it stand out:
- Quick & Easy: Comes together in under 30 minutes—no baking, no fuss. Perfect for last-minute gatherings or when you just need something sweet, stat.
- Simple Ingredients: You probably have everything you need in your kitchen. No fancy or hard-to-find items, just real, fresh fruit and good chocolate.
- Perfect for Entertaining: Whether it’s a brunch, birthday, holiday, or cozy movie night, this board is a showstopper. It’s made for sharing, chatting, and snacking.
- Crowd-Pleaser: Kids and adults both adore it. The combo of juicy strawberries and rich chocolate is pretty much unbeatable.
- Unbelievably Delicious: The contrast in textures—snappy chocolate, tender berries, crunchy toppings—gives you next-level comfort food vibes.
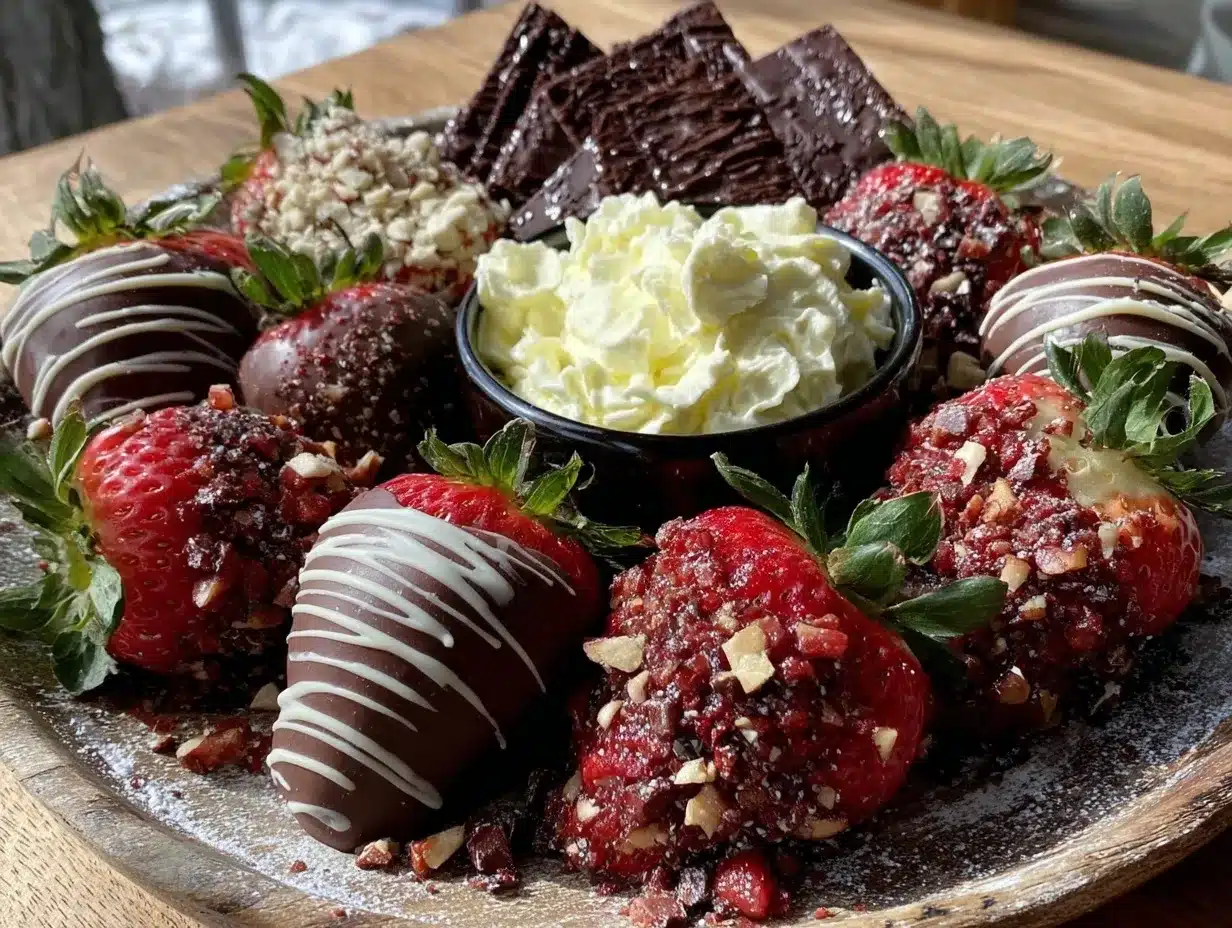
What sets this chocolate-covered strawberry dessert board apart is the clever layering of flavors and textures. I use a mix of dark, milk, and white chocolate (because, frankly, why pick just one?), and sprinkle on fun toppings like crushed nuts, coconut, and even flaky salt. The strawberries get a glossy, bakery-worthy finish thanks to a simple tempering trick I learned from a pastry chef buddy. You know what? It’s comfort food, but dressed up—faster, fresher, and every bit as satisfying as the classic treat.
This isn’t just another dessert—it’s the kind that makes you close your eyes after the first bite and sigh. It’s perfect for impressing guests without a single drop of stress, and it turns any gathering into a celebration. If you’re ready to wow your friends and family (and maybe yourself!), this chocolate-covered strawberry dessert board is the answer.
What Ingredients You Will Need
This chocolate-covered strawberry dessert board uses simple, wholesome ingredients to deliver bold flavor, vibrant color, and satisfying texture. Most are pantry staples, but there’s plenty of room for creative swaps if needed.
For the Chocolate-Covered Strawberries:
- Fresh strawberries (about 2 pounds/900g, rinsed and dried completely—look for firm, ripe berries with bright green tops)
- Dark chocolate chips or bars (8 oz/225g, 60–70% cacao for deep flavor)
- Milk chocolate chips or bars (8 oz/225g—for classic sweetness)
- White chocolate chips or bars (6 oz/170g—for pretty contrast and creamy flavor)
- Coconut oil (2 teaspoons—helps chocolate stay smooth and glossy)
For Toppings:
- Chopped toasted nuts (e.g., almonds, pistachios, hazelnuts—about 1/2 cup/60g, adds crunch)
- Shredded coconut (unsweetened or sweetened, 1/4 cup/25g)
- Sprinkles (rainbow or chocolate, about 2 tablespoons/18g—for festive flair)
- Crushed freeze-dried fruit (optional, about 2 tablespoons/10g—raspberries or strawberries add tang)
- Flaky sea salt (just a pinch—unlocks flavor, especially with dark chocolate)
For the Dessert Board:
- Shortbread or chocolate wafer cookies (about 1 cup/100g)
- Fresh berries (raspberries, blueberries, blackberries—1 cup/150g, for color and variety)
- Mini marshmallows (1/2 cup/25g—kids love these!)
- Pretzel sticks or rods (about 1 cup/70g—for salty crunch)
- Optional: Dried fruit, caramel candies, or other favorites (feel free to add your personal touches!)
I’m partial to Ghirardelli or Guittard chocolate for melting—smooth, easy to work with, and reliable every time. If you want a gluten-free board, swap cookies for gluten-free varieties. Dairy-free chocolate works beautifully for vegan guests. In summer, you can swap in fresh cherries or sliced peaches alongside the strawberries for a seasonal twist. If you’re missing coconut oil, a bit of butter works too, but the finish won’t be quite as shiny.
Equipment Needed
- Large cutting board, platter, or tray: This is your canvas—wooden or marble boards look stunning, but any large plate works.
- Microwave-safe bowls: For melting chocolate quickly and easily. You can also use a double boiler if you’re feeling fancy.
- Small spatula or silicone spoon: For stirring chocolate smoothly.
- Parchment paper: Essential for setting dipped strawberries—keeps things tidy and prevents sticking.
- Toothpicks or forks: Handy for dipping strawberries without making a mess.
- Assorted small bowls or ramekins: For toppings and extra nibbles.
I’ve tried every kind of tray, but honestly, a simple wooden cutting board is my favorite. For melting chocolate, I usually go with the microwave—just watch closely to avoid burning! Double boilers work well but need more cleanup. If you don’t have parchment paper, wax paper or a silicone baking mat is a good backup. For budget-friendly options, dollar-store bowls and trays do the job just fine—don’t let fancy serveware hold you back from enjoying this.
Preparation Method
-
Prep Your Board and Ingredients:
Wash and dry the strawberries carefully (moisture makes chocolate seize!). Arrange your cookies, berries, and other snacks on the serving board for easy assembly later. Time: 5 minutes. -
Melt the Chocolate:
Place dark, milk, and white chocolate chips (separately) in microwave-safe bowls. Add 1 teaspoon coconut oil to each. Microwave each bowl in 20-second bursts, stirring after each, until smooth and glossy (about 1–2 minutes per bowl). Avoid overcooking—chocolate burns fast! Sensory cue: chocolate should look shiny and flow easily off a spoon. -
Dip the Strawberries:
Hold each strawberry by the stem or use a toothpick. Dip into your melted chocolate, swirling until coated 2/3 up the berry. Let excess drip off, then lay on parchment paper. Alternate chocolates for variety. If your chocolate starts to thicken, reheat briefly. Time: 10 minutes. -
Add Toppings:
While chocolate is still soft, sprinkle strawberries with chopped nuts, coconut, sprinkles, freeze-dried fruit, or a pinch of flaky salt. Don’t be shy—mix and match! If you want neat lines or patterns, drizzle with contrasting chocolate using a spoon. Warning: toppings stick best while chocolate is warm. -
Let Strawberries Set:
Allow dipped berries to set at room temperature (about 15–20 minutes). If you’re in a rush, pop them in the fridge for 10 minutes, but don’t leave them too long or condensation may dull the chocolate. -
Assemble Your Dessert Board:
Arrange chocolate-covered strawberries in the center of your board. Fill in gaps with cookies, fresh berries, marshmallows, pretzels, and any extras. Play with colors and shapes. Sensory cue: the board should look vibrant and abundant. -
Serve and Enjoy:
Set out small forks or toothpicks for easy grabbing. Encourage guests to mix and match flavors. Time: 5 minutes. Pro tip: save a few strawberries for yourself—they disappear fast!
If your chocolate seizes (turns gritty), add a tiny splash of coconut oil and stir gently. If berries are too wet, the chocolate will slide off—so dry them thoroughly. For a more polished look, use room-temperature berries and tempered chocolate. If you want the strawberries extra glossy, use a clean, dry brush to lightly “polish” them once set.
Cooking Tips & Techniques
Chocolate-covered strawberries seem simple, but a few pro tips make all the difference. Here’s what I’ve learned—sometimes the hard way!
- Dry Strawberries Thoroughly: Any water on the berries will make the chocolate seize and slide off. Pat them dry with a paper towel, and let them air dry for a few minutes before dipping.
- Use Good Quality Chocolate: Cheap chocolate chips can be waxy or grainy. Go for a trusted brand. I’ve had batches turn out dull with store-brand chips, so I stick to my favorites now.
- Melt Chocolate Slowly: Rushing the melting process causes burnt chocolate. Short microwave bursts with lots of stirring is key. If you’re melting on the stove, keep the heat low and stir constantly.
- Don’t Overcrowd the Board: Give each strawberry some breathing room—they look prettier and are easier to grab.
- Mix Textures: Add crunchy, chewy, and creamy elements to your board for variety. Pretzels and marshmallows are always a hit.
- Room Temperature Serving: Chocolate tastes best at room temp. If you chill the board, let it sit out for 10 minutes before serving so everything’s perfectly snappy and smooth.
- Timing: Start with the strawberries (they need time to set), then arrange the rest of the board. Multitasking saves time!
I’ve had my share of failures—like chocolate that wouldn’t stick because my berries were too damp, or boards that looked messy because I tried to rush assembly. Now, I prep everything ahead and dip at the last minute for best results. Consistency is all about patience and using good ingredients.
Variations & Adaptations
This chocolate-covered strawberry dessert board is endlessly customizable. Here are a few of my favorite ways to switch things up:
- Dietary: For a vegan board, use dairy-free chocolate and swap out cookies for vegan-friendly varieties. Gluten-free cookies work beautifully if you’re avoiding gluten.
- Seasonal: In summer, add sliced peaches, nectarines, or cherries. In winter, dried figs or orange segments are lovely alongside the strawberries.
- Flavor: Stir a pinch of cinnamon or espresso powder into the dark chocolate for a grown-up twist. Or, add orange zest for a citrusy lift.
- Cooking Method: If you don’t have a microwave, melt chocolate in a double boiler—just watch it closely!
- Allergen Substitutions: Swap nuts for seeds (like pumpkin or sunflower) to make the board nut-free. For coconut allergies, skip the coconut oil and use a neutral oil or butter.
Personally, my favorite adaptation is adding crushed salted pretzels to the dipped strawberries—salty-sweet perfection. I’ve also tried a “breakfast board” version with chocolate-dipped strawberries, mini pancakes, and maple syrup. Honestly, the sky’s the limit—let your creativity run wild!
Serving & Storage Suggestions
Chocolate-covered strawberry boards are best served at room temperature for optimal texture and flavor. Arrange everything on a large board or platter, piling the berries in the center and surrounding them with cookies, marshmallows, and extras for a show-stopping presentation. If you’re feeling fancy, garnish with mint sprigs or edible flowers.
This dessert pairs well with sparkling wine, cold brew coffee, or a pitcher of lemonade for summer parties. At brunch, add it alongside a fruit salad or yogurt parfait.
To store leftovers, place chocolate-covered strawberries in a single layer in an airtight container and refrigerate for up to 24 hours. They’re best enjoyed fresh, but you can freeze them for up to 1 month—just note the texture may change slightly. If refrigerating, let them sit out for 10–15 minutes before serving so the chocolate isn’t too hard. For reheating cookies or marshmallows, a quick zap in the microwave (10 seconds) brings back softness, but don’t heat the strawberries themselves.
The flavors meld and deepen over time—the chocolate gets even richer after a few hours. If you’re making ahead, assemble the board right before serving for prettiest results.
Nutritional Information & Benefits
Here’s the estimated nutritional breakdown for a serving (about 4 strawberries with assorted extras):
- Calories: 180
- Fat: 8g
- Carbohydrates: 25g
- Fiber: 3g
- Sugar: 15g
- Protein: 2g
Strawberries are a great source of vitamin C, antioxidants, and fiber. Dark chocolate adds flavonoids, which may support heart health. Nuts provide healthy fats and a little protein. This board can be made gluten-free, nut-free, or dairy-free with simple swaps. Be mindful of chocolate and nut allergies; always check with guests before serving.
I love knowing that this dessert packs in fresh fruit alongside the sweet treats, making it a little more wholesome than your average party platter. For me, it’s a sweet spot between indulgence and real-food goodness.
Conclusion
If you’re looking for a dessert that’s stunning, simple, and guaranteed to make guests swoon, this chocolate-covered strawberry dessert board is it. It’s fuss-free, endlessly customizable, and delivers pure joy with every bite. Honestly, I love this recipe because it feels like a celebration—no matter the occasion.
Don’t be afraid to play around with flavors, toppings, and extras. Make it your own! I hope you love it as much as my family does. If you give it a try, leave a comment below or share your board on Pinterest or Instagram. I’d love to see your creative spins and hear your entertaining stories!
So go ahead—grab those strawberries and chocolate, and treat yourself and your loved ones. Here’s to sweet moments, easy entertaining, and the kind of dessert that brings everyone together.
Frequently Asked Questions
How far in advance can I make chocolate-covered strawberries for a dessert board?
Chocolate-covered strawberries are best made the day you plan to serve them, but you can prepare them up to 24 hours ahead. Store them in a single layer in the fridge to keep the chocolate from melting or getting soggy.
Can I use frozen strawberries for this recipe?
Fresh strawberries work best. Frozen berries tend to release water as they thaw, which makes the chocolate slip off and can cause a mushy texture.
What if my chocolate won’t stick to the strawberries?
This usually happens if the berries are too wet. Make sure they’re completely dry before dipping. If the chocolate is thick, reheat it gently and stir in a teaspoon of coconut oil.
How can I make this dessert board nut-free?
Skip chopped nuts and use seeds like pumpkin or sunflower for crunch. Double-check all packaged ingredients for nut contamination if serving guests with allergies.
What’s the best way to transport a chocolate-covered strawberry dessert board?
Arrange the strawberries on parchment paper in a sturdy container first, then assemble the board at your destination. This keeps everything neat and prevents the chocolate from smudging or melting during travel.
Pin This Recipe!
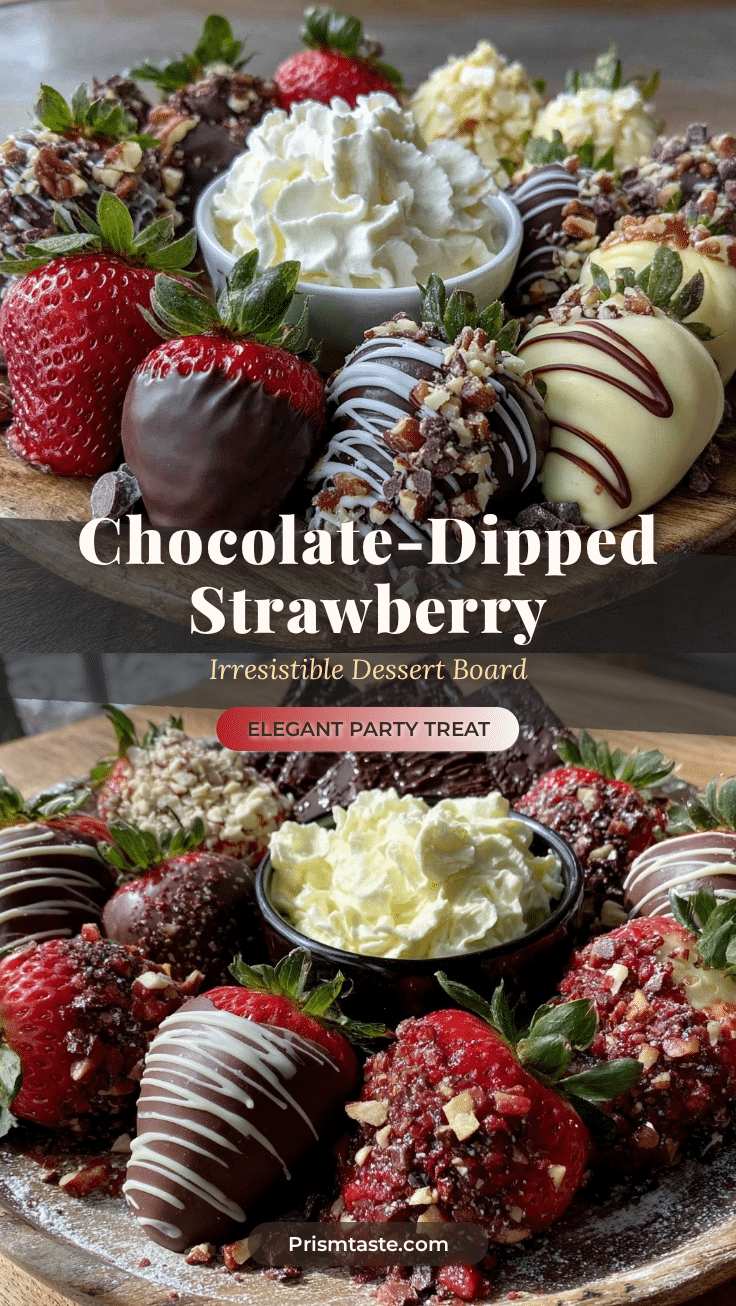
Chocolate-Covered Strawberry Dessert Board

This chocolate-covered strawberry dessert board is a stunning, easy, and crowd-pleasing treat perfect for entertaining. With juicy strawberries dipped in dark, milk, and white chocolate and a variety of fun toppings, it’s a showstopper for any occasion.
- Prep Time: 10 minutes
- Cook Time: 10 minutes
- Total Time: 30 minutes
- Yield: 8 servings 1x
- Category: Dessert
- Cuisine: American
Ingredients
- 2 pounds fresh strawberries, rinsed and dried completely
- 8 oz dark chocolate chips or bars (60–70% cacao)
- 8 oz milk chocolate chips or bars
- 6 oz white chocolate chips or bars
- 2 teaspoons coconut oil (divided)
- 1/2 cup chopped toasted nuts (almonds, pistachios, hazelnuts, etc.)
- 1/4 cup shredded coconut (unsweetened or sweetened)
- 2 tablespoons sprinkles (rainbow or chocolate)
- 2 tablespoons crushed freeze-dried fruit (optional, raspberries or strawberries)
- Pinch of flaky sea salt
- 1 cup shortbread or chocolate wafer cookies
- 1 cup fresh berries (raspberries, blueberries, blackberries)
- 1/2 cup mini marshmallows
- 1 cup pretzel sticks or rods
- Optional: dried fruit, caramel candies, or other favorite snacks
Instructions
- Wash and dry the strawberries thoroughly. Arrange cookies, berries, and other snacks on the serving board for easy assembly later.
- Place dark, milk, and white chocolate chips (separately) in microwave-safe bowls. Add 1 teaspoon coconut oil to each. Microwave each bowl in 20-second bursts, stirring after each, until smooth and glossy (about 1–2 minutes per bowl).
- Hold each strawberry by the stem or use a toothpick. Dip into melted chocolate, swirling until coated 2/3 up the berry. Let excess drip off, then lay on parchment paper. Alternate chocolates for variety. If chocolate thickens, reheat briefly.
- While chocolate is still soft, sprinkle strawberries with chopped nuts, coconut, sprinkles, freeze-dried fruit, or a pinch of flaky salt. For neat lines or patterns, drizzle with contrasting chocolate using a spoon.
- Allow dipped berries to set at room temperature (about 15–20 minutes). If in a rush, refrigerate for 10 minutes, but don’t leave too long to avoid condensation.
- Arrange chocolate-covered strawberries in the center of your board. Fill in gaps with cookies, fresh berries, marshmallows, pretzels, and any extras. Play with colors and shapes.
- Serve at room temperature with small forks or toothpicks for easy grabbing. Enjoy!
Notes
Dry strawberries thoroughly before dipping to prevent chocolate from seizing. Use good quality chocolate for best results. Toppings stick best while chocolate is warm. For a vegan or gluten-free board, use dairy-free chocolate and gluten-free cookies. Serve at room temperature for best flavor and texture.
Nutrition
- Serving Size: About 4 strawberries
- Calories: 180
- Sugar: 15
- Fat: 8
- Carbohydrates: 25
- Fiber: 3
- Protein: 2
Keywords: chocolate covered strawberries, dessert board, entertaining, party platter, easy dessert, fruit dessert, chocolate, strawberries, no bake, crowd pleaser