There used to be a little bakery in my hometown called The Gilded Whisk that made these peanut butter cookies shaped like little turkeys every November. When they closed—just vanished one day with a “For Lease” sign in the window—I felt a weird, specific kind of grief. I mean, it was a bakery, not a relative, but those cookies were our family’s official start to Thanksgiving season. After twelve tries—twelve, people, including one batch that looked more like mutant dinosaurs than turkeys—I finally got it. And honestly? I think my version might actually be better than the original.
The first time I made these for my kids, my youngest looked at the cookie sheet and said, “Mom, did you mean to make those?” That’s the kind of honest feedback you get from a six-year-old, you know? But I kept tweaking, kept adjusting, and somewhere around attempt number eight, something clicked. The peanut butter flavor was spot-on, the cookie held its shape, and the little candy corn feathers looked almost… professional. Almost.
These Easy Turkey-Shaped Peanut Butter Cookies are now a non-negotiable part of our fall baking rotation. They’re the kind of recipe that makes you feel like a kitchen rockstar without actually having to work that hard. And if you’ve ever stared at a Pinterest-perfect cookie and thought, “Yeah, mine won’t look like that,” let me tell you—mine didn’t either at first. But these are forgiving. They’re fun. And they taste like childhood, peanut butter, and a little bit of autumn magic.
Why You’ll Love This Recipe
Let me be real with you for a second. Weeknight baking with kids sounds cute in theory, but in practice it usually involves flour on the ceiling and someone crying over a broken cookie. These Easy Turkey-Shaped Peanut Butter Cookies are different. They’re the rare recipe that actually delivers on its promises without making you want to hide in the pantry.
- Quick & Easy : From start to finish, you’re looking at about 25 minutes. No chilling the dough, no complicated steps—just mix, shape, bake, and decorate. Perfect for those evenings when someone announces they need a treat for the school party tomorrow morning. (Not that I’ve been there. Okay, I’ve been there.)
- Simple Ingredients : You probably have everything in your pantry right now. Peanut butter, sugar, egg, vanilla—that’s it. No weird specialty items that cost ten dollars and then sit in your cupboard for three years.
- Perfect for Fall Gatherings : These little turkeys are the life of the party at Thanksgiving dinners, classroom celebrations, or even just a random Tuesday in November when you need something cute to cheer everyone up.
- Crowd-Pleaser : I have never—and I mean never—seen a plate of these last more than fifteen minutes at any gathering. Kids love them because they’re cute. Adults love them because they taste like those classic peanut butter cookies everyone grew up with.
- Unbelievably Delicious : The texture is that perfect balance of crispy edges and soft, chewy centers. The peanut butter flavor is front and center, and the candy corn adds just enough sweetness without being overwhelming.
What makes these different from every other turkey cookie recipe out there? It’s the dough itself. I tested this recipe six different ways before landing on the perfect ratio of peanut butter to sugar that gives you a cookie that holds its shape during baking but stays soft in the middle. No spreading out into unrecognizable blobs. No dry, crumbly mess. Just a perfect little turkey every single time.
What Ingredients You Will Need
This recipe uses simple, wholesome ingredients to deliver bold peanut butter flavor and satisfying texture without the fuss. Most of these are pantry staples, which means you can whip up a batch of Easy Turkey-Shaped Peanut Butter Cookies whenever the mood strikes.
- 1 cup creamy peanut butter (I recommend Skippy or Jif for the best texture—natural peanut butter that separates will make the cookies too oily and they won’t hold their shape. Trust me on this one, I learned the hard way.)
- 1 cup granulated sugar (plus extra for rolling—this is what gives the cookies that classic crinkly top and prevents them from sticking to your cookie cutters or hands)
- 1 large egg (room temperature if you remember to take it out ahead of time, but honestly? I’ve used cold eggs straight from the fridge and they worked fine. Don’t stress about this.)
- 1 teaspoon vanilla extract (pure vanilla if you have it, imitation works in a pinch—the peanut butter is such a strong flavor that most people won’t notice the difference)
- Candy corn (for the feathers—you’ll need about 5-6 pieces per cookie, so grab a big bag. I like the Brach’s brand because they’re slightly softer and easier to press into the dough.)
- Candy eyes (the little white and black ones you find in the baking aisle—these are optional but they make the turkeys look SO much cuter. My kids get very particular about the eye placement.)
- Orange M&M’s or candy-coated chocolate pieces (for the turkey’s snood—yes, that’s the proper term for that dangly bit on a turkey’s beak. You learn something new every day, right?)
- Red M&M’s or small red candies (for the wattle—the red bit under the beak. Again, totally optional, but it makes them look like actual turkeys instead of weird peanut butter blobs with candy corn sticking out)
For the candy corn, look for fresh bags that aren’t rock-hard. I’ve made the mistake of using a bag that had been sitting in my pantry since last Halloween, and pressing those stale pieces into the dough was like trying to stab a cookie with a tiny rock. Not a good time. Fresh candy corn is soft enough to press in without cracking.
If you’re making these with kids, you might want to buy extra candy corn because some of it will inevitably end up in little mouths before it makes it onto the cookies. I’m not saying that happened at my house, but I’m also not saying it didn’t.
Equipment Needed
You don’t need a lot of fancy equipment for these Easy Turkey-Shaped Peanut Butter Cookies, which is part of what makes them so perfect for busy weeknights.
- Mixing bowl (medium-sized, nothing fancy—I use the same scratched-up Pyrex bowl I’ve had since college)
- Electric mixer or sturdy wooden spoon (the dough comes together pretty easily by hand, but a hand mixer makes it faster. If you’re using a spoon, make sure it’s a strong one—thick peanut butter dough can be stubborn)
- Baking sheet (a standard half-sheet pan works great—line it with parchment paper for easiest cleanup)
- Parchment paper or silicone baking mat (non-negotiable for these cookies—they’re delicate when warm and the parchment makes transferring them a breeze)
- Measuring cups and spoons (for accurate measurements—baking is a science, even when it’s easy)
- Small bowl of water (for wetting your hands to prevent the dough from sticking—this is a game-changer tip I wish I’d known sooner)
- Cooling rack (for letting the cookies cool completely before decorating—patience is hard, I know)
Budget-friendly option: If you don’t have a cooling rack, you can let the cookies cool right on the baking sheet. They’ll take a little longer, but they’ll still be delicious. And if you don’t have an electric mixer, your arm will get a workout, but the cookies will turn out just fine.
Preparation Method
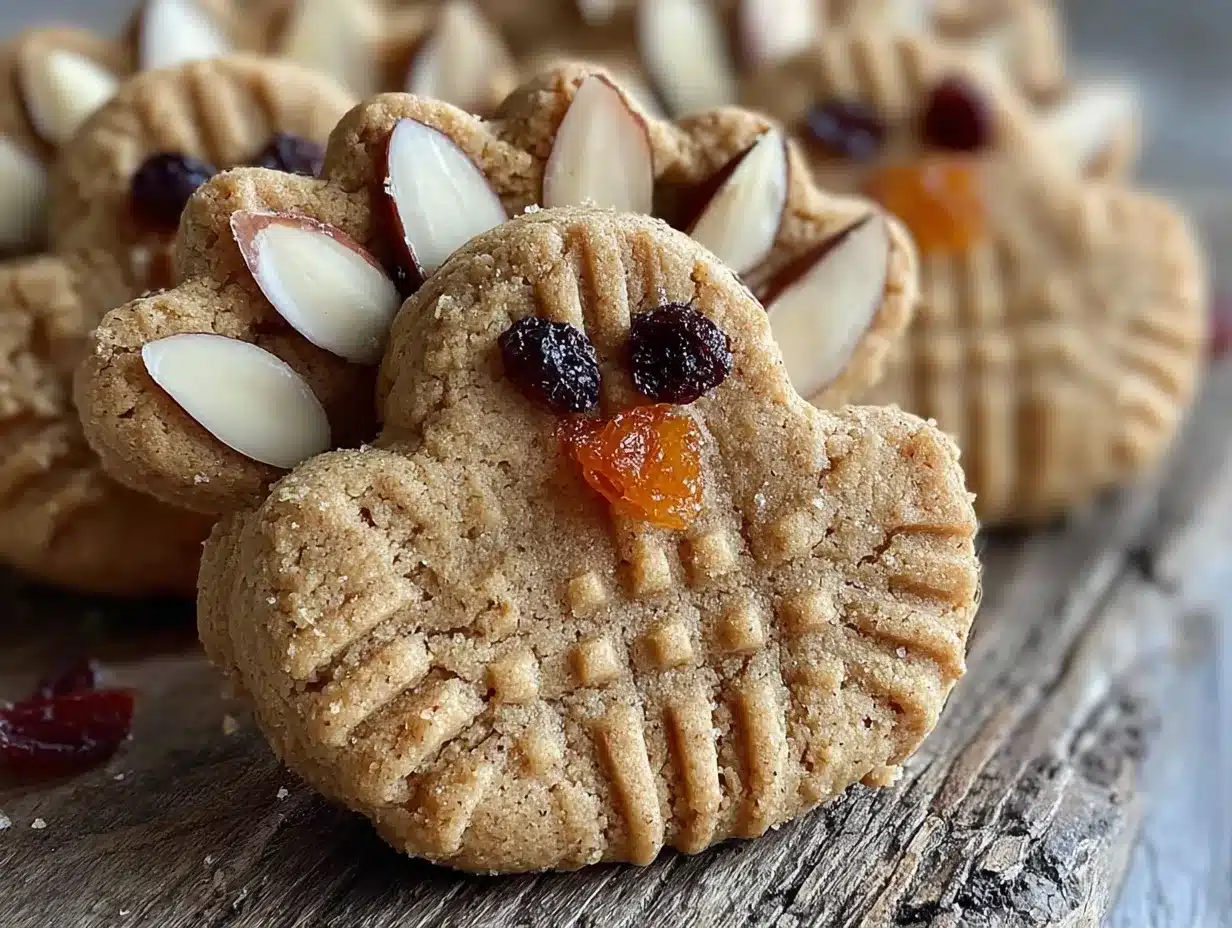
Alright, let’s make some Easy Turkey-Shaped Peanut Butter Cookies! The whole process takes about 25 minutes from start to finish, so preheat your oven to 350°F (175°C) right now and let’s get going.
- Mix the wet ingredients. In your medium mixing bowl, combine 1 cup creamy peanut butter, 1 cup granulated sugar, 1 large egg, and 1 teaspoon vanilla extract. Mix until everything comes together into a smooth, cohesive dough. It should be thick and slightly sticky but not wet. If it feels too dry, add a teaspoon of water. If it feels too wet, add a tablespoon of flour. (I’ve only had to do this once when I accidentally used extra-sugary peanut butter.)
- Shape the cookie balls. Scoop out about 1 ½ tablespoons of dough and roll it into a ball. Then, to make the turkey shape, gently flatten the ball into an oval that’s slightly wider at the bottom. This is the base of your turkey body. Don’t worry about making it perfect—the cookies will spread just a tiny bit in the oven, and the imperfections make them look handmade and charming.
- Roll in sugar. Pour some extra granulated sugar into a small bowl. Roll each shaped cookie dough piece in the sugar, making sure all sides are coated. This gives the cookies that classic crinkly, sparkly look and adds a tiny bit of sweetness to the outside. Place the sugared dough pieces on your parchment-lined baking sheet, spacing them about 2 inches apart.
- Bake the cookies. Pop the baking sheet into your preheated oven and bake for 8-10 minutes. The cookies should look puffed and lightly golden around the edges, but still soft in the center. They will continue to cook slightly on the hot baking sheet after you take them out, so don’t overbake them. I pull mine out at exactly 9 minutes—the edges are set but the centers still look slightly underdone. That’s exactly what you want.
- Cool completely. Let the cookies cool on the baking sheet for 5 minutes, then carefully transfer them to a cooling rack. This is the hardest part of the recipe—waiting. But trust me, warm cookies are too soft to decorate, and the candy corn will just slide right off if you try to rush it. I’ve tried. It’s not pretty.
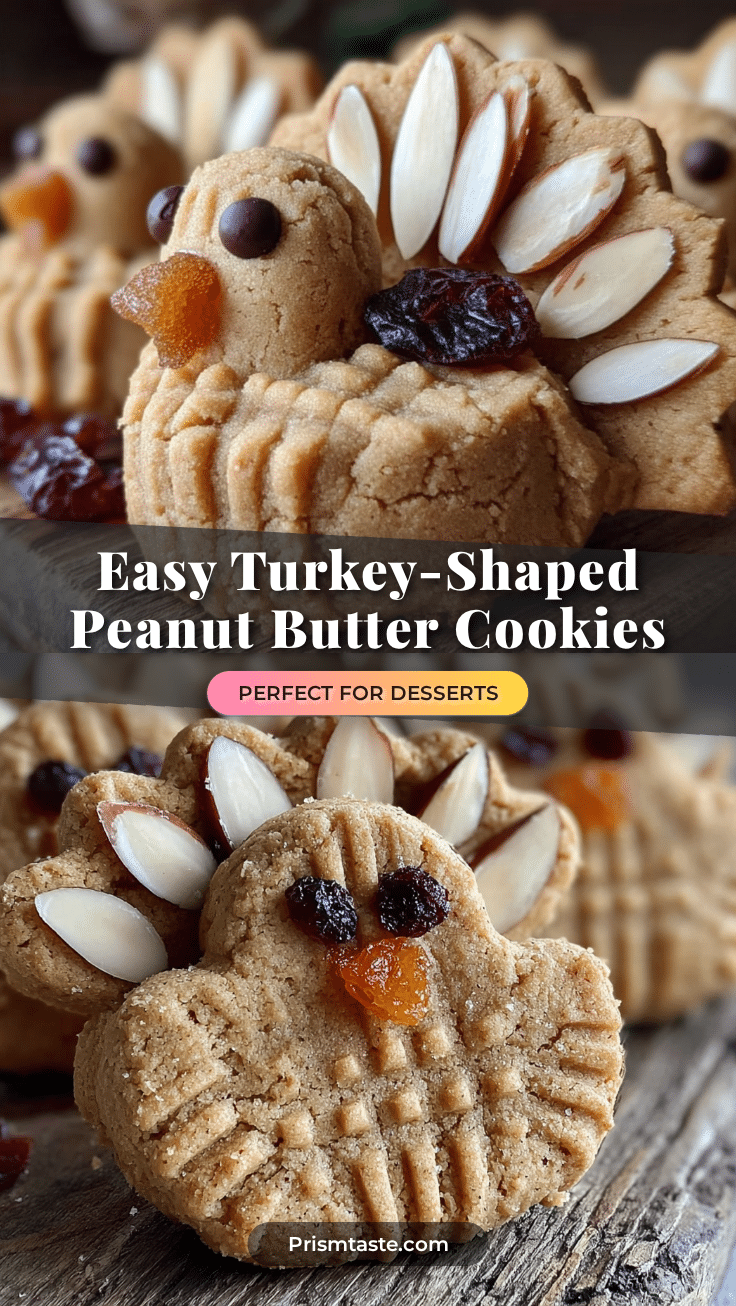
- Add the turkey feathers. Once the cookies are completely cool, it’s time for the fun part. Arrange 5-6 pieces of candy corn in a fan pattern at the top back of each cookie, with the white tips pointing toward the center. Press them gently into the cookie—they should stick without any extra glue. If your cookies are too hard, the candy corn might not stick well. A tiny dab of frosting or melted chocolate works as “glue” if needed.
- Add the turkey face. Place two candy eyes in the center of the cookie, slightly toward the front. Add one orange M&M for the snood (that dangly bit on the beak) and one red candy for the wattle (the red bit under the beak). Press everything gently but firmly into the cookie so it stays put.
- Let the decorations set. Give the decorated cookies about 10-15 minutes to let everything settle. If you’re using frosting as glue for any stubborn pieces, let it set completely before moving the cookies. Then serve them up and watch them disappear!
A quick note about timing: If you’re making these with little helpers, expect the decorating step to take twice as long and involve some creative interpretations of “turkey face.” My nephew once made a turkey that looked like it was wearing sunglasses. We called him “Cool Turkey” and he was everyone’s favorite.
Cooking Tips & Techniques
After making about a million batches of these Easy Turkey-Shaped Peanut Butter Cookies (okay, maybe not a million, but it feels like it), I’ve picked up some tricks that make the process smoother and the results better.
Don’t overmix the dough. I know it’s tempting to keep mixing until everything is perfectly smooth, but overmixing can make the cookies tough. Mix just until the ingredients come together—a few small lumps are totally fine. They’ll disappear during baking.
Wet your hands. This is my number one tip for working with peanut butter cookie dough. Keep a small bowl of water nearby and dip your fingers in it before shaping each cookie. The water prevents the dough from sticking to your hands without adding extra flour that would dry out the cookies. Game changer, I’m telling you.
Watch the bake time. Every oven is different, so start checking your cookies at 8 minutes. They should look puffed and set around the edges but still soft in the middle. Remember that they’ll continue cooking on the hot baking sheet for a few minutes after you pull them out. Underbaked is better than overbaked—crispy peanut butter cookies are sad peanut butter cookies.
Let them cool completely. I know you’re excited. I know they smell amazing. But decorating warm cookies is a recipe for disaster. The candy corn will slide off, the eyes will melt, and you’ll end up with a sad, naked cookie. Trust the process. Give them at least 30 minutes to cool completely before you start decorating.
Make extra dough. If you’re making these for a party or school event, double the recipe. These cookies disappear fast, and you’ll be glad you have extras. The dough freezes beautifully too—just shape it into balls, freeze them on a baking sheet, then transfer to a freezer bag. Bake straight from frozen, adding 2-3 minutes to the bake time.
Variations & Adaptations
One of the best things about these Easy Turkey-Shaped Peanut Butter Cookies is how adaptable they are. Here are some variations I’ve tried and loved:
Nut-Free Version: Swap the peanut butter for sunflower seed butter or WowButter (a soy-based peanut butter alternative). The texture will be slightly different, but the cookies will still hold their shape and taste delicious. Just make sure to check the labels if you’re serving people with allergies.
Gluten-Free Option: These cookies are naturally gluten-free since they don’t contain any flour! Just double-check that your peanut butter and candy corn are certified gluten-free if that’s a concern. Most major brands are, but it’s always worth checking.
Chocolate Twist: Add 2 tablespoons of cocoa powder to the dough for chocolate peanut butter turkeys. You might need to add an extra tablespoon of sugar to balance the bitterness of the cocoa. These are dangerously good—like a Reese’s cup in cookie form.
Different Decorations: Not a fan of candy corn? No problem! Use pretzel sticks for the feathers, chocolate chips for the eyes, and a tiny orange jelly bean for the beak. You can get super creative with the decorations—my neighbor once made turkeys with Fruit Loops for feathers and they were surprisingly cute.
Mini Version: Use a teaspoon of dough per cookie instead of a tablespoon to make mini turkey cookies. These are perfect for classroom parties or cookie exchanges. Reduce the baking time to 6-7 minutes and watch them carefully.
Spiced Up: Add ½ teaspoon of cinnamon and ¼ teaspoon of nutmeg to the dough for a warm fall flavor. The spices complement the peanut butter beautifully and make the cookies taste even more like Thanksgiving.
Serving & Storage Suggestions
These Easy Turkey-Shaped Peanut Butter Cookies are best served at room temperature, which makes them perfect for parties and gatherings. Arrange them on a platter with the turkey faces facing outward so everyone can admire your handiwork before they devour them.
They pair beautifully with a cold glass of milk (obviously), hot apple cider, or a warm cup of coffee. For a fun Thanksgiving dessert table, serve them alongside pumpkin pie, apple crisp, and maybe some chocolate-dipped pretzels for variety.
Storage: Store the decorated cookies in an airtight container at room temperature for up to 5 days. Layer them between sheets of wax paper to prevent the decorations from getting smushed. Don’t refrigerate them—the fridge will make the cookies dry and the candy corn will get weirdly hard.
Freezing: You can freeze the undecorated cookies for up to 3 months. Let them cool completely, then place them in a single layer in a freezer-safe container with wax paper between layers. When you’re ready to serve, thaw them at room temperature, then decorate. The candy corn doesn’t freeze well, so always add decorations after thawing.
Make-Ahead Tip: The dough can be made up to 2 days in advance and stored in the refrigerator. Let it sit at room temperature for about 10 minutes before shaping—cold dough is harder to work with and won’t roll as smoothly.
One thing I’ve noticed is that these cookies actually taste even better the next day. The flavors meld together, the peanut butter gets deeper, and the texture softens just a bit. So if you can resist eating them all immediately, your future self will thank you.
Nutritional Information & Benefits
Let’s be honest—these are cookies, not health food. But they do have some redeeming qualities! Here’s the approximate nutritional breakdown per cookie (based on a recipe making 18 cookies):
- Calories: 145
- Total Fat: 8g
- Saturated Fat: 1.5g
- Carbohydrates: 17g
- Sugar: 14g
- Protein: 4g
- Fiber: 1g
The peanut butter provides a good amount of protein and healthy fats, which helps keep you feeling satisfied. Peanut butter is also a good source of vitamin E, magnesium, and potassium. The small amount of sugar means these aren’t a complete sugar bomb—they’re sweet enough to feel like a treat without being overwhelming.
For those with dietary restrictions, these cookies are naturally gluten-free and can easily be made nut-free with the substitutions mentioned above. They’re also vegetarian-friendly. Just be aware that they contain peanuts and eggs, so they’re not suitable for those with those specific allergies.
From a wellness perspective, I love that these cookies use real, recognizable ingredients. No weird preservatives, no artificial flavors—just peanut butter, sugar, egg, and vanilla. It’s the kind of treat you can feel good about giving to your kids because you know exactly what’s in it.
Conclusion
These Easy Turkey-Shaped Peanut Butter Cookies are more than just a cute Thanksgiving treat—they’re a memory in the making. Every time I make them, I think about that little bakery that started it all, and about the twelve failed attempts that led me to this perfect recipe. And honestly? The process of figuring them out was half the fun.
Whether you’re making these for a classroom party, a Friendsgiving gathering, or just because it’s Tuesday and you want something fun to do with the kids, I promise they’ll deliver. They’re easy enough for beginners, forgiving enough for messy kitchens, and delicious enough to become a new family tradition.
So grab your peanut butter, your candy corn, and maybe a little patience for the decorating step. Give these a try and let me know how they turn out! Leave a comment below with your best turkey face creations, or tag me in your photos on social media. I love seeing your versions—even the ones that look like mutant dinosaurs. Especially those ones, actually.
Happy baking, and happy almost-Thanksgiving!
Frequently Asked Questions
Can I use natural peanut butter for these cookies?
I don’t recommend it. Natural peanut butter that separates tends to make the cookies too oily and they won’t hold their shape as well. Stick with processed peanut butter like Skippy or Jif for the best results. If you only have natural peanut butter, stir it really well and add an extra tablespoon of flour to help stabilize the dough.
How do I keep the candy corn from falling off?
Make sure your cookies are completely cool before decorating—warm cookies won’t hold the candy corn. Press the pieces gently but firmly into the cookie. If they still won’t stick, use a tiny dab of frosting or melted chocolate as “glue.” A little bit goes a long way!
Can I make these cookies ahead of time?
Absolutely! You can make the dough up to 2 days ahead and keep it in the fridge. Or bake the cookies, freeze them undecorated, and add the candy corn and eyes after thawing. The decorations don’t freeze well, so always add them fresh.
My cookies spread out too much in the oven. What went wrong?
This usually happens if the dough is too warm or if you used natural peanut butter. Try chilling the shaped dough for 10-15 minutes before baking. Also, make sure your baking sheet isn’t too hot—if you’re reusing the same sheet for multiple batches, let it cool completely between batches.
Can I use crunchy peanut butter instead of creamy?
You can, but the texture will be different and the cookies might not hold their shape as well. The peanut pieces can create weak spots in the dough that cause the cookies to crack or spread unevenly. If you love crunchy peanut butter, go for it—just know the turkeys might look a little more rustic!
Pin This Recipe!
Easy Turkey-Shaped Peanut Butter Cookies: Fun Fall Treat
These Easy Turkey-Shaped Peanut Butter Cookies are a fun and forgiving fall treat that combines classic peanut butter cookie flavor with adorable turkey decorations. Perfect for Thanksgiving gatherings, classroom parties, or a cozy baking session with kids.
- Prep Time: 15 minutes
- Cook Time: 10 minutes
- Total Time: 25 minutes
- Yield: 18 cookies 1x
- Category: Dessert
- Cuisine: American
Ingredients
- 1 cup creamy peanut butter (Skippy or Jif recommended)
- 1 cup granulated sugar (plus extra for rolling)
- 1 large egg (room temperature preferred, but cold works)
- 1 teaspoon vanilla extract (pure or imitation)
- Candy corn (5-6 pieces per cookie, Brach’s recommended)
- Candy eyes (optional, for decoration)
- Orange M&M’s or candy-coated chocolate pieces (for snood)
- Red M&M’s or small red candies (for wattle)
Instructions
- Preheat oven to 350°F (175°C). Line a baking sheet with parchment paper or a silicone baking mat.
- In a medium mixing bowl, combine 1 cup creamy peanut butter, 1 cup granulated sugar, 1 large egg, and 1 teaspoon vanilla extract. Mix until smooth and cohesive. If dough is too dry, add a teaspoon of water; if too wet, add a tablespoon of flour.
- Scoop about 1½ tablespoons of dough and roll into a ball. Gently flatten into an oval that is slightly wider at the bottom to form the turkey body.
- Roll each shaped dough piece in extra granulated sugar to coat all sides. Place on prepared baking sheet, spacing about 2 inches apart.
- Bake for 8-10 minutes, until edges are lightly golden and centers are still soft. Do not overbake. Let cool on baking sheet for 5 minutes, then transfer to a cooling rack to cool completely (at least 30 minutes).
- Once cookies are completely cool, arrange 5-6 pieces of candy corn in a fan pattern at the top back of each cookie for feathers, pressing gently.
- Place two candy eyes in the center front of the cookie. Add one orange M&M for the snood and one red candy for the wattle. Press all decorations gently but firmly into the cookie.
- Let decorated cookies sit for 10-15 minutes to set. Serve at room temperature.
Notes
For best results, use processed peanut butter (like Skippy or Jif) rather than natural peanut butter, which can cause spreading. Keep a small bowl of water nearby to wet your hands when shaping dough to prevent sticking. Cookies are best served at room temperature and can be stored in an airtight container for up to 5 days. Undecorated cookies can be frozen for up to 3 months; add decorations after thawing.
Nutrition
- Serving Size: 1 cookie
- Calories: 145
- Sugar: 14
- Fat: 8
- Saturated Fat: 1.5
- Carbohydrates: 17
- Fiber: 1
- Protein: 4
Keywords: turkey cookies, peanut butter cookies, Thanksgiving cookies, fall baking, easy cookies, kid-friendly, no-chill cookies