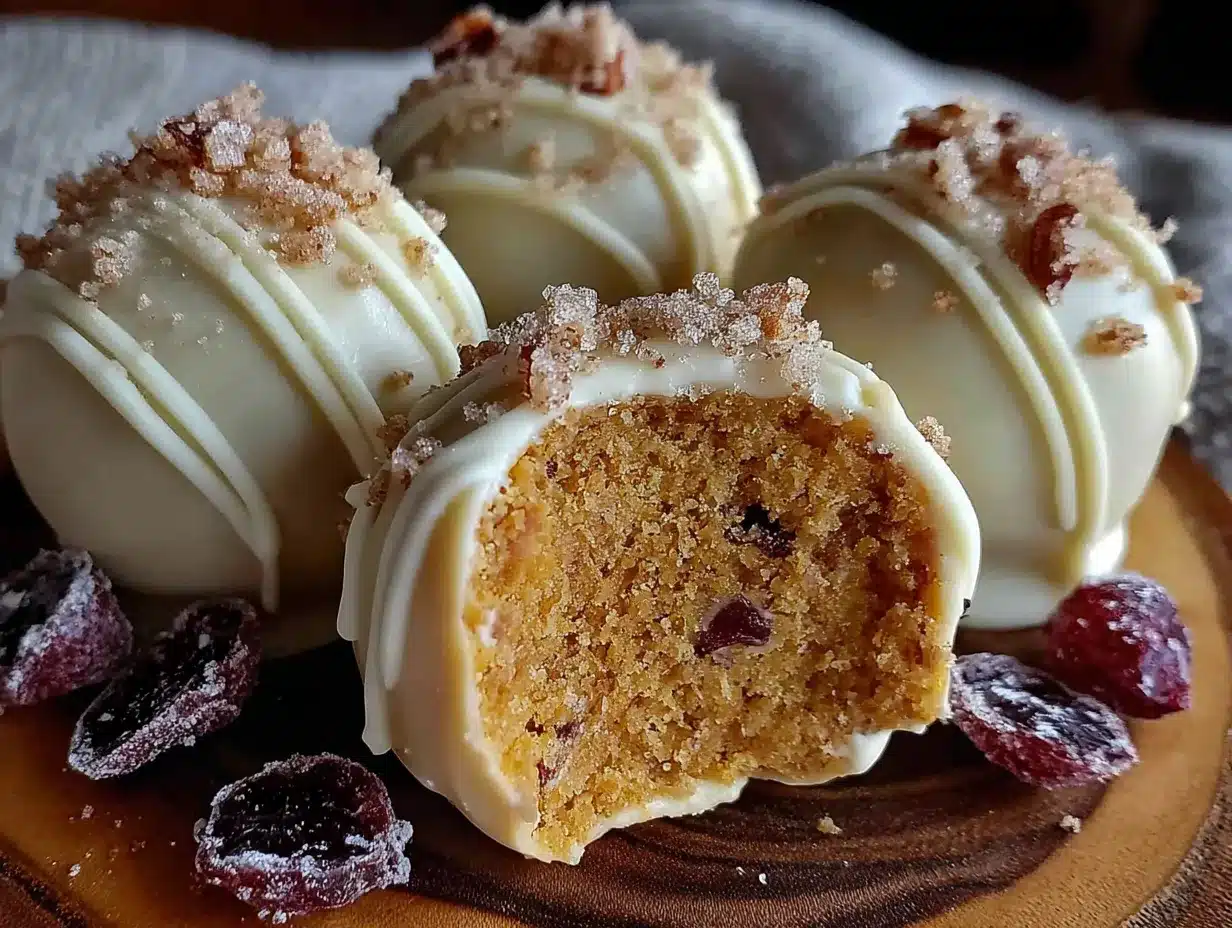
My neighbor Carol wasn’t trying to impress anyone. I’d stopped by to pick up a casserole dish she’d borrowed, and the smell of warm pumpkin and brown sugar hit me before I even got through her screen door. She was standing at her kitchen counter, completely nonchalant, rolling these little golden spheres between her palms. “Oh, these?” she said when I asked, not even looking up. “Just something I threw together for the church potluck.” She said it like it was nothing. But let me tell you, I stood there watching her for a good ten minutes, completely mesmerized. The way she dipped them in that white coating, the little tap-tap-tap to shake off the excess, the casual flick of her wrist to add those sprinkles. I mean, honestly, I was supposed to leave. I had things to do. But I couldn’t move. She finally looked up, caught me staring, and just laughed. “Here,” she said, handing me one that had cooled on the counter. “Taste it.” And that was it. That single bite changed my whole approach to fall desserts. You know that feeling when something is so unexpectedly perfect that you have to close your eyes for a second? That’s what these pumpkin pie cake pops do. And the best part? Carol would never, ever call herself a baker. She just makes things that taste this good without making a big deal about it. That’s exactly the energy I wanted to bring to this recipe.
Why You’ll Love This Recipe
Let’s be real for a second. Hosting a dinner party or a festive fall gathering comes with enough stress without worrying about a complicated dessert that might flop. These pumpkin pie cake pops solve that problem in the best way possible. I’ve tested this recipe at four different gatherings now, and I can tell you with complete confidence that they disappear faster than almost anything else on the table.
- Perfect for Hosting: You can make these entirely ahead of time. Like, two days ahead. That means you’re not scrambling on the day of your party. Just pull them out of the fridge, arrange them on a pretty platter, and watch your guests light up.
- Crowd-Pleasing Flavor: Pumpkin pie spice, creamy cheesecake-like filling, and that satisfying crunch from the coating. It’s everything people love about fall in one bite-sized package.
- No Special Skills Needed: I promise you don’t need to be a pastry chef. If you can crumble a cake and roll it into a ball, you’ve got this. The dipping part takes a little practice, but I’ll walk you through exactly how to get that smooth finish.
- Scales Beautifully: Need 20 cake pops for a small dinner party? Easy. Need 80 for a big family gathering? Also easy. The recipe multiplies perfectly.
- Conversation Starter: There’s something about cake pops that makes people smile. They’re nostalgic, they’re cute, and they always get people asking, “Wait, you made these?”
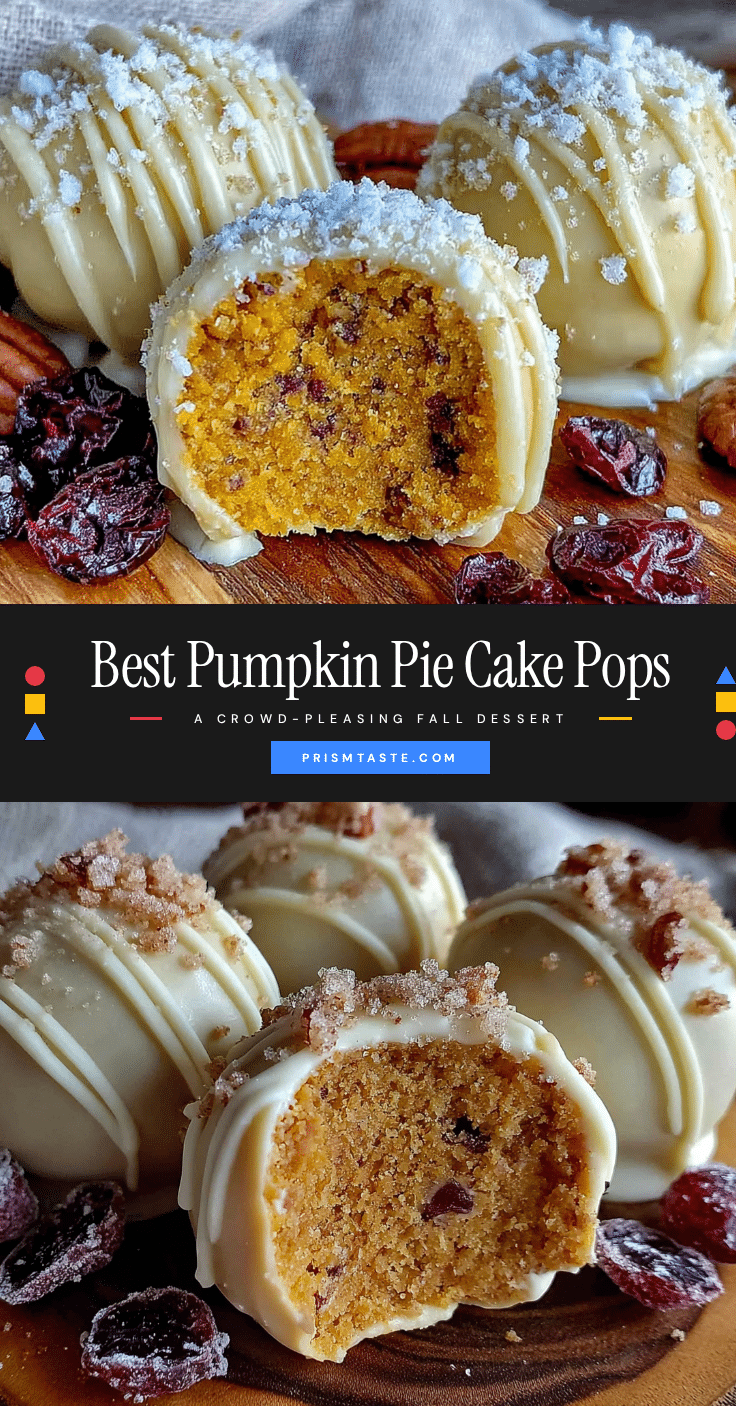
What makes this version different from other pumpkin cake pop recipes? It’s the texture. Most cake pops end up dense and heavy, like eating a brick of frosting. Not these. I use a specific ratio of cake to frosting that keeps them light and almost mousse-like inside. Plus, the pumpkin pie filling adds this incredible moisture that makes every bite feel decadent without being overwhelming. This isn’t just another fall dessert. It’s the one your guests will text you about the next morning asking for the recipe.
What Ingredients You Will Need
This recipe uses simple, pantry-friendly ingredients that come together to create something that tastes far more complicated than it actually is. Most of these are things you probably already have if you do any fall baking at all.
For the Pumpkin Cake Base
- 1 box yellow cake mix (15.25 oz) – I prefer Duncan Hines for its moist texture, but any brand works fine
- 1 can pumpkin puree (15 oz) – Not pumpkin pie filling! Make sure you grab 100% pure pumpkin. Libby’s is my go-to
- 2 large eggs, room temperature – Cold eggs can make the batter seize up slightly
- 1 teaspoon pumpkin pie spice – Adds that warm, aromatic fall flavor
- 1/2 teaspoon cinnamon – Because you can never have too much cinnamon in a pumpkin recipe
- 1/4 cup vegetable oil – Keeps the cake moist without making it greasy
For the Filling & Binding
- 1/2 cup cream cheese frosting – Store-bought is totally fine here. I use Pillsbury. The cream cheese flavor complements the pumpkin beautifully
- 1/4 cup pumpkin pie filling – Yes, the canned stuff. This adds an extra layer of pumpkin flavor and helps bind the crumbs together
- 1/4 cup graham cracker crumbs – Optional, but highly recommended. It adds a subtle crunch and that pie-crust vibe
For the Coating & Decoration
- 12 oz white candy melts – I like Wilton brand for their smooth melting consistency
- 1 tablespoon coconut oil or shortening – This thins the coating and helps it set with a beautiful shine
- Fall sprinkles – Orange, brown, gold, or leaf-shaped sprinkles work perfectly
- Lollipop sticks – 20-24 sticks, depending on how large you make your cake pops
- Styrofoam block or cake pop stand – For drying the dipped cake pops upright
Ingredient Selection Tips: When choosing your pumpkin puree, look for cans that feel heavy for their size. That usually means they’re packed full with less water separation. If you open your can and see liquid on top, just stir it back in before measuring. For the candy melts, white chocolate chips can work in a pinch, but candy melts are specifically designed to set hard at room temperature, which is what you want for cake pops that don’t get sticky.
Substitution Guidance: If you need a gluten-free option, use a gluten-free yellow cake mix. The texture will be slightly different, but still delicious. For a dairy-free version, use dairy-free cream cheese frosting and dairy-free white chocolate. The coconut oil in the coating is already dairy-free, so that part works perfectly. And if you can’t find pumpkin pie spice, just mix 1/2 teaspoon cinnamon, 1/4 teaspoon nutmeg, 1/4 teaspoon ginger, and a pinch of cloves.
Equipment Needed
You don’t need a lot of fancy equipment for these cake pops, which is part of why I love this recipe. Here’s what you’ll actually use:
- 9×13 baking pan – For baking the cake. A metal pan works better than glass for even browning
- Large mixing bowl – Big enough to crumble the cake without making a mess
- Fork or pastry cutter – For breaking the cake into fine crumbs
- Cookie scoop (1.5 tablespoon size) – This is my secret weapon for uniform cake balls. If you don’t have one, just use a tablespoon measure
- Baking sheet lined with parchment paper – For holding the rolled cake balls before dipping
- Microwave-safe bowl – For melting the candy coating
- Lollipop sticks – I get mine at Michael’s or on Amazon. The 6-inch size is perfect
- Styrofoam block – For drying the finished cake pops. You can also use a cardboard box with holes poked in it
Budget-Friendly Options: Don’t want to buy a cake pop stand? I’ve used a cardboard box with pencil holes poked through the top more times than I can count. It’s not pretty, but it works perfectly. And if you don’t have lollipop sticks, you can actually just shape the mixture into small balls and serve them as cake truffles instead. They taste exactly the same.
Preparation Method
Let me walk you through this step by step. I’ve made these so many times now that I’ve figured out all the little tricks that make the process smoother.
- Bake the cake. Preheat your oven to 350°F (175°C). In a large bowl, combine the yellow cake mix, pumpkin puree, eggs, pumpkin pie spice, cinnamon, and vegetable oil. Mix until just combined – don’t overmix or the cake will be tough. Pour into a greased 9×13 pan and bake for 22-26 minutes. The cake is done when a toothpick inserted in the center comes out clean. Let it cool completely. I mean completely. If it’s even slightly warm, the crumbs won’t hold together properly. I usually bake it the night before and let it cool overnight.
- Crumble the cake. Once the cake is completely cool, break it into large chunks and place them in a large mixing bowl. Use your hands or a fork to break the cake into fine, even crumbs. You want it to look like wet sand. No large pieces. This takes about 3-4 minutes of patient crumbling. I usually put on a podcast for this part.
- Add the binding ingredients. Add the cream cheese frosting, pumpkin pie filling, and graham cracker crumbs (if using) to the cake crumbs. Mix everything together with your hands. Yes, your hands. A spoon won’t incorporate it evenly enough. Squeeze the mixture together – it should hold its shape when pressed. If it feels too dry, add another tablespoon of frosting. If it feels too wet, add a tablespoon of graham cracker crumbs or powdered sugar.
- Shape the cake balls. Using your cookie scoop or a tablespoon, portion out the mixture. Roll each portion between your palms into a smooth ball. Place them on the parchment-lined baking sheet. You should get 20-24 cake balls, depending on size. Pop the baking sheet into the refrigerator for at least 30 minutes. This is crucial. Cold cake balls are much easier to dip.
- Prepare the coating. About 10 minutes before you’re ready to dip, place the white candy melts and coconut oil in a microwave-safe bowl. Microwave in 30-second intervals, stirring after each, until completely smooth. Don’t rush this. If the coating gets too hot, it will seize up and become lumpy. If that happens, add another teaspoon of coconut oil and stir vigorously.
- Insert the sticks. Remove the cake balls from the fridge. Dip the tip of each lollipop stick into the melted coating, then insert it about halfway into a cake ball. This acts like glue and keeps the stick from sliding out later. Return the cake balls to the fridge for another 10 minutes to set the glue.
- Dip the cake pops. Hold a cake pop by the stick and dip it completely into the melted coating. Gently tap the stick on the edge of the bowl to let excess coating drip off. Don’t shake it – just tap. Rotate the cake pop slowly to help the coating settle evenly. Before the coating sets, add your sprinkles. I like to hold the sprinkle container over the cake pop and sprinkle them on from above.
- Let them set. Insert the dipped cake pop into your styrofoam block or stand. Let them dry completely at room temperature. This takes about 20-30 minutes. Don’t put them in the fridge to speed this up – condensation can make the coating look streaky.
- Add finishing touches. If you want to get fancy, you can drizzle extra melted coating on top or add a light dusting of cinnamon. I sometimes add a tiny dot of orange gel food coloring to the remaining white coating to make a contrasting drizzle.
Cooking Tips & Techniques
I’ve made every mistake in the book with cake pops, so let me save you the trouble. Here are the things I wish someone had told me the first time.
The Temperature Game: Cake pops are all about temperature control. If your cake balls are too warm, they’ll fall apart in the coating. If your coating is too hot, it will crack when it sets. I keep my cake balls in the fridge until the very last minute, and I let my melted coating cool for a full 2 minutes before I start dipping. This Goldilocks zone makes everything so much easier.
Thin Your Coating: Candy melts straight out of the bag are usually too thick for smooth dipping. That tablespoon of coconut oil or shortening makes a huge difference. Your coating should be about the consistency of warm honey. If it’s thicker than that, add more oil. If it’s thinner, it’s too runny and will pool at the bottom of your cake pop.
The Tap Technique: When you’re tapping off excess coating, do it gently and patiently. I see people shaking their cake pops aggressively, and that just creates bubbles in the coating. Instead, hold the stick between your thumb and forefinger and tap your wrist against the edge of the bowl. It’s a subtle motion that gives you a much smoother finish.
Fix Cracks Immediately: If your coating cracks after it sets (usually because the cake ball was too cold), don’t panic. Just dip the whole cake pop again. The second layer will cover the cracks. I’ve had to double-dip plenty of times, and honestly, the double-coated ones look even more professional.
Batch Size Matters: Don’t try to dip all 24 cake pops at once. Work in batches of 6-8. The coating will start to thicken as it sits, and you’ll get inconsistent results. If your coating does get too thick, just microwave it for 10 seconds and stir.
Variations & Adaptations
One of the best things about this recipe is how easily it adapts to different tastes and dietary needs. Here are some variations I’ve tried and loved.
Spiced Chai Variation
Add 1 teaspoon of chai spice blend to the cake batter and use vanilla frosting instead of cream cheese. The chai spices (cardamom, ginger, cloves, black pepper) pair beautifully with the pumpkin. I made these for a book club meeting and they were gone in 15 minutes.
Gluten-Free Version
Use a gluten-free yellow cake mix. I’ve tested this with King Arthur’s gluten-free mix and it works perfectly. Just make sure your cream cheese frosting is also gluten-free. Most store-bought brands are, but always check the label. The texture is slightly more delicate, so handle the cake balls gently.
Vegan Adaptation
Use a vegan yellow cake mix, replace the eggs with flax eggs (1 tablespoon ground flaxseed + 3 tablespoons water per egg), use vegan cream cheese frosting, and use vegan white chocolate for the coating. The coconut oil in the coating is already vegan. I’ve made these for a vegan friend’s birthday and she couldn’t believe they were plant-based.
Pumpkin Cheesecake Version
Add 4 ounces of softened cream cheese to the cake crumb mixture instead of the cream cheese frosting. This gives the cake pops a tangier, more authentic cheesecake flavor. You’ll need to add a little extra powdered sugar to help bind everything together. This version is richer, so I make smaller cake balls.
Maple Pecan Twist
Add 1/4 cup finely chopped pecans to the cake crumb mixture and replace the pumpkin pie filling with 2 tablespoons of maple syrup. Top the finished cake pops with a tiny pecan half instead of sprinkles. The maple and pecan combination screams “fall” in the best way possible.
Serving & Storage Suggestions
These cake pops are incredibly versatile when it comes to serving. Here’s how I handle them for different occasions.
For Dinner Parties: Arrange the cake pops in a tall vase or a decorative mason jar. They look like a bouquet of edible flowers. I like to place them in the center of the table so guests can grab them throughout the evening. They’re perfect for mingling – no plates or forks required.
For Potlucks: I lay them flat in a single layer in a disposable aluminum pan lined with parchment paper. Cover loosely with foil for transport. When I arrive, I transfer them to a serving platter. They travel surprisingly well because the coating sets hard and protects the cake inside.
What to Serve Alongside: These cake pops pair beautifully with hot apple cider, spiced chai lattes, or a warm pumpkin spice latte. If you’re serving them as part of a dessert table, they look gorgeous next to pumpkin bars, snickerdoodles, or a caramel apple dip. The contrast of the white coating with the warm fall colors of other desserts is really striking.
Storage Instructions: Store cake pops in an airtight container in the refrigerator for up to 5 days. Place them in a single layer with wax paper between layers if you need to stack them. Let them sit at room temperature for 15 minutes before serving – the coating gets too hard when cold and the texture is much better at room temperature.
Freezing Instructions: You can freeze undipped cake balls for up to 3 months. Just roll them, place them on a baking sheet, freeze until solid, then transfer to a freezer bag. When you’re ready to use them, thaw in the refrigerator overnight, then dip as directed. Dipped cake pops can also be frozen for up to 2 months. Wrap each one individually in plastic wrap, then place in a freezer bag. Thaw in the refrigerator overnight.
Flavor Development: Honestly, these cake pops taste even better the day after you make them. The flavors meld together overnight and the texture evens out. So don’t stress about making them fresh on the day of your party. Making them a day ahead is actually the smart move.
Nutritional Information & Benefits
Let’s be honest – these are a treat. But they’re not as bad as you might think, especially compared to a full slice of pumpkin pie.
| Per Cake Pop (based on 24 servings) | Amount |
|---|---|
| Calories | 185 |
| Total Fat | 8g |
| Saturated Fat | 4g |
| Carbohydrates | 27g |
| Sugar | 18g |
| Protein | 2g |
| Fiber | 1g |
| Vitamin A | 45% DV |
Health Highlights: Pumpkin is packed with vitamin A, which supports eye health and immune function. It’s also a good source of fiber, which helps with digestion. The cream cheese frosting adds calcium, and even the white coating contains some calcium from the milk solids. Are these a health food? No. But they’re a more nutrient-dense treat than a lot of other desserts out there.
Dietary Considerations: This recipe contains gluten, dairy, and eggs. For gluten-free and vegan adaptations, see the variations section above. The cake pops are nut-free as written, but if you add the pecan variation, obviously they’re not nut-free anymore.
I personally love that these cake pops satisfy my pumpkin pie craving without the commitment of a whole slice. Sometimes you just want two or three bites of something sweet, and these deliver exactly that.
Frequently Asked Questions
Why did my cake pops crack?
Cracking usually happens when the cake ball is too cold when you dip it into warm coating. The sudden temperature change makes the coating expand and crack. Let your cake balls sit at room temperature for 5-10 minutes before dipping, or use slightly cooler coating.
Can I use homemade cream cheese frosting?
Absolutely! I use store-bought for convenience, but homemade works beautifully. Just make sure it’s thick enough to bind the crumbs. If your homemade frosting is too thin, add powdered sugar until it reaches a spreadable consistency.
Why are my cake pops falling off the sticks?
This happens when the cake ball is too heavy or the stick isn’t inserted far enough. Make sure you’re inserting the stick at least halfway into the cake ball. Also, that little dip of coating on the tip of the stick before insertion acts like glue – don’t skip that step.
Can I make these without a cake mix?
Yes, you can use your favorite from-scratch yellow cake recipe. Just make sure it’s a moist recipe. Pumpkin cake recipes work particularly well. Bake it, cool it completely, and proceed with the recipe as written. The crumb texture might be slightly different, but the result will still be delicious.
How far in advance can I make these?
You can make the cake balls up to 3 days ahead and store them in the refrigerator. Dip them the day before your event for the freshest look. Fully assembled cake pops stay perfect for up to 5 days in the fridge. Just remember to let them come to room temperature before serving.
Conclusion
These pumpkin pie cake pops have become my go-to fall dessert for hosting, and I honestly don’t see that changing anytime soon. They’re the kind of recipe that makes you look like you put in way more effort than you actually did. And honestly, isn’t that the dream when you’re hosting a party? You want something that impresses your guests but doesn’t leave you exhausted in the kitchen while everyone else is having fun.
What I love most about this recipe is how forgiving it is. If your first few cake pops aren’t perfect, that’s okay. The imperfections are what make them look homemade in the best possible way. And trust me, nobody has ever complained about a slightly lopsided cake pop when it tastes this good.
I’d love to hear how these turn out for you. Did you try any of the variations? Did your guests fight over the last one? Drop a comment below and let me know. And if you’re looking for another crowd-pleasing fall dessert, you might want to check out these pumpkin bars with cream cheese frosting that have saved me more times than I can count. Happy hosting, and happy fall baking!
Pin This Recipe!
Best Pumpkin Pie Cake Pops: Easy Fall Dessert
These pumpkin pie cake pops are a perfect fall dessert, combining moist pumpkin cake with a creamy cheesecake-like filling, all dipped in a smooth white coating. They’re easy to make ahead and guaranteed to impress at any gathering.
- Prep Time: 30 minutes
- Cook Time: 25 minutes
- Total Time: 55 minutes
- Yield: 24 servings 1x
- Category: Dessert
- Cuisine: American
Ingredients
- 1 box yellow cake mix (15.25 oz)
- 1 can pumpkin puree (15 oz)
- 2 large eggs, room temperature
- 1 teaspoon pumpkin pie spice
- 1/2 teaspoon cinnamon
- 1/4 cup vegetable oil
- 1/2 cup cream cheese frosting
- 1/4 cup pumpkin pie filling
- 1/4 cup graham cracker crumbs (optional)
- 12 oz white candy melts
- 1 tablespoon coconut oil or shortening
- Fall sprinkles
- Lollipop sticks (20-24)
- Styrofoam block or cake pop stand
Instructions
- Preheat oven to 350°F (175°C). In a large bowl, combine yellow cake mix, pumpkin puree, eggs, pumpkin pie spice, cinnamon, and vegetable oil. Mix until just combined. Pour into a greased 9×13 pan and bake for 22-26 minutes, until a toothpick inserted in the center comes out clean. Let cool completely.
- Once the cake is completely cool, break it into large chunks and place in a large mixing bowl. Use your hands or a fork to break the cake into fine, even crumbs (like wet sand).
- Add cream cheese frosting, pumpkin pie filling, and graham cracker crumbs (if using) to the cake crumbs. Mix with your hands until the mixture holds its shape when pressed. If too dry, add more frosting; if too wet, add graham cracker crumbs or powdered sugar.
- Using a cookie scoop or tablespoon, portion out the mixture and roll into smooth balls. Place on a parchment-lined baking sheet. Refrigerate for at least 30 minutes.
- About 10 minutes before dipping, place white candy melts and coconut oil in a microwave-safe bowl. Microwave in 30-second intervals, stirring after each, until completely smooth.
- Remove cake balls from fridge. Dip the tip of each lollipop stick into the melted coating, then insert it about halfway into a cake ball. Return to fridge for 10 minutes to set.
- Hold a cake pop by the stick and dip it completely into the melted coating. Gently tap the stick on the edge of the bowl to let excess drip off. Add sprinkles before the coating sets.
- Insert the dipped cake pop into a styrofoam block or stand. Let dry completely at room temperature for 20-30 minutes.
- Optional: Drizzle extra melted coating or add a dusting of cinnamon for finishing touches.
Notes
Cake pops are all about temperature control. Keep cake balls cold until dipping, and let melted coating cool for 2 minutes before starting. If coating cracks, double-dip. Store in an airtight container in the fridge for up to 5 days; let sit at room temperature for 15 minutes before serving. Undipped cake balls can be frozen for up to 3 months.
Nutrition
- Serving Size: 1 cake pop
- Calories: 185
- Sugar: 18
- Fat: 8
- Saturated Fat: 4
- Carbohydrates: 27
- Fiber: 1
- Protein: 2
Keywords: pumpkin pie cake pops, fall dessert, easy cake pops, pumpkin dessert, cake pops recipe