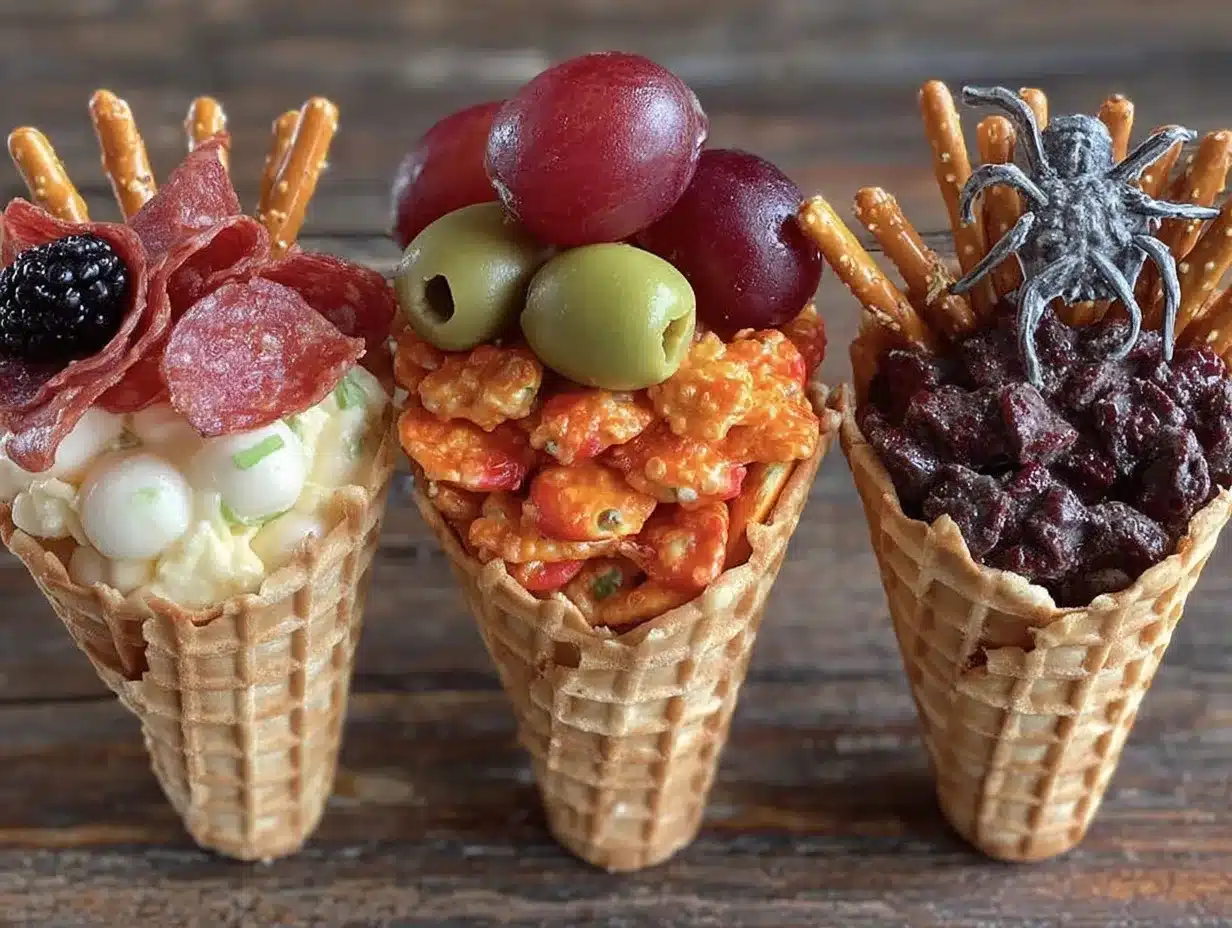
There used to be a little party supply shop on the corner of Elm and 3rd that made the most incredible Halloween snack cones for their annual costume parade. When they closed three years ago—just up and vanished, replaced by a vape shop—I honestly felt a little lost. My kids asked about “the cone lady” for months. After seven tries—one of which involved a catastrophic cheese-and-pretzel avalanche all over my kitchen floor—I finally cracked the code. Let me tell you, these Easy Spooky Charcuterie Cone Cups for a Kids’ Halloween Party are the exact recreation of that magic, minus the shop’s weirdly specific rule about no touching the display cones.
I remember the first time I saw them. My oldest was three, dressed as a very grumpy pumpkin, and the cone lady handed him this cone filled with salami fingers and cheese cubes that looked like little tombstones. He didn’t even say thank you—he just stared at it like it was the Holy Grail of snacks. That’s the thing about these cones. They’re not just food; they’re an experience. They’re portable, they’re cute, and they make every kid feel like they’ve won the Halloween lottery.
I’ve made these for birthday parties, classroom celebrations, and even a backyard movie night where the kids were more interested in the cones than the actual movie. Honestly, they’re the kind of recipe that makes you look like a Pinterest wizard without actually having to do much work. You just assemble, fill, and watch the kids go wild. If you’ve been looking for a Halloween snack that doesn’t involve a ton of sugar or a meltdown over spilled candy, you’re in the right place. Maybe you’ve been there—staring at a table full of cupcakes and wondering why everything is so messy. These cone cups are the answer, and I’m pretty sure you’re going to love them as much as my grumpy pumpkin did.
Why You’ll Love This Recipe
I’ve tested these Easy Spooky Charcuterie Cone Cups for a Kids’ Halloween Party at least a dozen times, tweaking the fillings and the cone-to-cheese ratio until they were just right. Here’s why they’ve become my go-to for every Halloween gathering:
- Quick & Easy: These come together in under 15 minutes. Seriously. Once you’ve prepped your ingredients, assembly is a breeze. Perfect for those last-minute Halloween party panics.
- Simple Ingredients: No fancy grocery trips needed. You probably already have most of these items in your fridge and pantry. It’s all about using what you’ve got.
- Perfect for Halloween Parties: These are the ultimate crowd-pleaser for kids’ parties. They’re portable, mess-free (mostly), and each cone is its own little serving. No plates required!
- Crowd-Pleaser: I’ve yet to meet a kid who doesn’t light up when they see these. Even the picky eaters can’t resist the fun shapes and the hands-on eating experience.
- Unbelievably Delicious: The combination of salty meats, creamy cheese, and crunchy veggies is just so satisfying. It’s comfort food in a cone—perfect for little hands.
What makes these different from every other Halloween snack out there? It’s the presentation. Instead of a boring plate of cheese and crackers, you get individual cones that look like spooky little creations. Plus, you can customize them for any dietary need—gluten-free, dairy-free, you name it. This isn’t just another snack idea; it’s the snack idea that will make you the hero of the Halloween party. Honestly, it’s the kind of recipe that makes you close your eyes after the first bite—if you can get one before the kids snatch them all up.
What Ingredients You Will Need
This recipe uses simple, wholesome ingredients to deliver bold flavor and satisfying texture without the fuss. Most of these are pantry staples or easy to find at your local grocery store. Here’s what you’ll need to make these spooky cone cups come to life:
For the Cones
- 6-8 waffle cones (or sugar cones for a smaller option)
- 1 cup of mixed cheese cubes (I prefer cheddar and Monterey Jack for color and meltiness)
- 1 cup of salami or pepperoni slices (cut into small rounds or fun shapes using cookie cutters)
- 1 cup of turkey or ham slices (rolled up and sliced into pinwheels)
- 1/2 cup of baby carrots (cut into thin sticks or use mini carrots for ease)
- 1/2 cup of cucumber slices (cut into small rounds or use a ghost-shaped cutter for fun)
- 1/4 cup of black olives (sliced for “spider eyes” or left whole for a creepy look)
- 1/4 cup of cherry tomatoes (halved for “monster noses”)
- 1/4 cup of pretzel sticks (for “witch fingers” or “spider legs”)
- 1/4 cup of cream cheese or hummus (for dipping the cone tips or spreading on crackers)
For the Spooky Decorations
- Edible googly eyes (you can find these at craft stores or make your own with cream cheese and black olive slices)
- Small cookie cutters in Halloween shapes (ghost, bat, pumpkin, etc.)
- Food-safe markers (for drawing faces on cheese or cucumber slices)
- Optional: Red bell pepper strips (for “bloody” fingers or monster tongues)
I recommend using Boar’s Head meats for the best flavor and texture—they hold up well in the cones and don’t get soggy. For the cheese, Tillamook is my go-to because it’s creamy and cuts cleanly. If you’re looking for a dairy-free option, swap the cheese for vegan cheese cubes and use a plant-based cream cheese. For a gluten-free version, use gluten-free pretzels or omit them entirely. The beauty of this recipe is how flexible it is—you can swap in whatever your family loves.
Equipment Needed
You don’t need a lot of fancy equipment to make these Easy Spooky Charcuterie Cone Cups for a Kids’ Halloween Party. Here’s what I use:
- Waffle cones or sugar cones: These form the base of your snack. Waffle cones are sturdier and hold more, but sugar cones work fine too.
- Small cookie cutters: Halloween shapes are ideal, but you can use any small cutter you have. I’ve used a star cutter in a pinch, and it still looked cute.
- Cutting board and sharp knife: For slicing meats, cheese, and veggies. A sharp knife makes clean cuts and prevents squished edges.
- Small bowls: For organizing your ingredients before assembly. This makes the process faster and less chaotic.
- Parchment paper or a baking sheet: To hold the cones upright while you fill them. A muffin tin works great for this too!
- Toothpicks: For attaching googly eyes or securing small pieces. Just be careful with kids—use food-safe markers instead if you’re worried.
- Optional: A piping bag or zip-top bag: For filling the cones with cream cheese or hummus if you want a cleaner look.
I’ve made these with just a knife and a cutting board before, and they turned out fine. The cookie cutters are fun but not essential. If you’re on a budget, just use a knife to cut shapes freehand—it adds to the homemade charm. For storing the cones, a simple cardboard box or a cupcake carrier works wonders to keep them upright and safe.
Preparation Method
- Prep your ingredients (5 minutes): Start by washing and cutting your veggies. Slice the cucumbers into rounds, halve the cherry tomatoes, and cut the baby carrots into thin sticks. If you’re using cookie cutters, press them into the cheese slices and meat slices to create fun shapes. I like to make ghosts out of the cheese and bats out of the salami—it’s a hit with the kids.
- Assemble the cones (5 minutes): Take a waffle cone and place it upright in a muffin tin or a small glass. This keeps it steady while you fill it. Start by adding a layer of cheese cubes at the bottom—this acts as a base and prevents everything from falling out. Then, add a layer of meat shapes, followed by a layer of veggies. Repeat until the cone is filled to the top. I usually do about 3-4 layers depending on the cone size.
- Add the spooky details (3 minutes): Once the cone is filled, it’s time to make it spooky! Use edible googly eyes on the cheese cubes or meat shapes to create little monsters. You can also draw faces on cucumber slices using a food-safe marker—think jack-o’-lantern faces or simple smiley ghosts. For a creepy touch, thread a few black olive slices onto a pretzel stick to make a spider and place it on top.
- Secure the toppings (2 minutes): If you’re using cream cheese or hummus, you can pipe a small dollop on top of the cone to act as “glue” for any loose pieces. This also adds a creamy element that kids love. For the pretzel spider legs, gently press them into the cream cheese to hold them in place.
- Serve immediately or store (0 minutes): These are best served fresh, but you can make them up to 2 hours ahead. Just cover them loosely with plastic wrap and keep them in the fridge. If you’re storing them, wait to add the googly eyes until right before serving—they can get soggy otherwise.
Pro tip: If you’re making these for a party, set up a “cone bar” where kids can fill their own cones. It’s interactive and saves you time. Just lay out all the ingredients in small bowls and let them go wild. I’ve done this for my son’s birthday party, and it was a huge hit—plus, it kept the kids busy for a good 20 minutes!
Sensory cues: You’ll know the cone is filled correctly when you can see the layers through the waffle cone—it should look like a colorful, edible rainbow. The cheese should be firm, the meat should be slightly curled from the cookie cutter shapes, and the veggies should be crisp. When you bite into it, you should get a satisfying crunch from the cone, followed by the creamy cheese and salty meat.
Cooking Tips & Techniques
I’ve learned a few things the hard way while perfecting these Easy Spooky Charcuterie Cone Cups for a Kids’ Halloween Party. Here are my top tips to save you from my mistakes:
- Don’t overfill the cones: I know it’s tempting to cram as much as possible in there, but overfilled cones are prone to tipping over. Leave about half an inch of space at the top to avoid a snack avalanche. Trust me, I’ve cleaned up enough salami from my floor to know.
- Use a sturdy cone: Waffle cones are your best bet—they’re thicker and can hold more weight. Sugar cones are thinner and can break easily, especially if you’re using heavy ingredients like cheese cubes. If you only have sugar cones, double up by placing one inside another for extra strength.
- Cut ingredients into uniform sizes: This isn’t just for aesthetics—it ensures that every bite has a little bit of everything. If some pieces are too big, they’ll poke out of the cone and make it unstable. Aim for bite-sized pieces that fit snugly inside.
- Keep ingredients cold: Cheese and meats are easier to cut and shape when they’re cold. If your cheese starts to get soft, pop it in the fridge for 10 minutes before cutting. This also helps the shapes hold their form better.
- Make it a team effort: This is a great recipe to make with kids—they can help with the cookie cutter shapes and arranging the ingredients. Just supervise the knife work. I let my kids press the cookie cutters into the cheese, and they feel so proud of their “spooky creations.”
One time, I forgot to cut the cheese into small enough cubes, and the whole cone just fell apart when my son tried to eat it. He was not happy. Now, I always do a test cone first to make sure everything fits properly. It’s a small step that saves a lot of heartache.
Variations & Adaptations
These Easy Spooky Charcuterie Cone Cups for a Kids’ Halloween Party are incredibly versatile. Here are some variations I’ve tried and loved:
- Vegetarian Version: Skip the meat and load up on cheese, veggies, and hummus. Use roasted red pepper strips, cucumber ghosts, and carrot sticks for a colorful, plant-based option. I’ve made this for my vegetarian niece, and she devoured it.
- Gluten-Free Option: Use gluten-free pretzels or omit them entirely. You can also use rice cakes or corn chips as a crunchy alternative. Just make sure your meats and cheeses are gluten-free as well.
- Dairy-Free Variation: Swap the cheese for vegan cheese cubes or marinated tofu. Use a dairy-free cream cheese or hummus for the base. I’ve tried this with Kite Hill’s vegan cream cheese, and it worked beautifully.
- Sweet Version: For a dessert twist, fill the cones with yogurt, fresh fruit, and a drizzle of honey. Use Halloween-themed sprinkles or candy eyes for decoration. This is perfect for a Halloween brunch or a healthier treat option.
- Spicy Kick: Add a few slices of jalapeño or a sprinkle of red pepper flakes to the meat layer for a little heat. This is more for the adults, but some kids love it too—my oldest calls them “dragon cones.”
I once made a “breakfast” version with scrambled eggs, cheese, and bacon bits for a Halloween morning surprise. It was a hit, though a little messy. The key is to experiment and see what your family enjoys most. There are no wrong answers here!
Serving & Storage Suggestions
These cones are best served immediately, but they can be prepped ahead of time with a few adjustments. Here’s what I’ve found works best:
- Serving Temperature: Serve them cold or at room temperature. If you’re using cream cheese or hummus, let it sit out for 10 minutes before serving to soften slightly—it makes the cones easier to eat.
- Presentation: Arrange the cones upright in a cupcake stand or a shallow bowl filled with popcorn or candy corn to keep them stable. You can also place them in a muffin tin for easy transport. For a spooky touch, add a few plastic spiders or fake cobwebs around the display.
- Complementary Dishes: These cones pair well with other Halloween snacks like pumpkin-shaped fruit platters, mummy hot dogs, or witch’s brew punch. They’re also great alongside a bowl of Halloween-themed popcorn or roasted pumpkin seeds.
- Storage: If you need to make them ahead, assemble the cones without the googly eyes and store them in an airtight container in the fridge for up to 4 hours. Add the eyes right before serving to keep them from getting soggy. For longer storage, keep the components separate and assemble just before serving.
- Reheating: These are meant to be eaten cold, so no reheating needed. If you’ve used hummus or cream cheese, let them sit at room temperature for 5 minutes before serving to take the chill off.
The flavors actually meld together nicely after about an hour in the fridge—the cheese softens slightly, and the meat absorbs a bit of the veggie moisture. It’s a different experience, but still delicious. Just don’t leave them out for more than 2 hours if you’re using perishable ingredients.
Nutritional Information & Benefits
While these Easy Spooky Charcuterie Cone Cups for a Kids’ Halloween Party are definitely a treat, they also offer some surprising nutritional benefits. Here’s a rough estimate per cone (based on one cone with a mix of cheese, meat, and veggies):
- Calories: Approximately 250-300 calories per cone
- Protein: 15-20 grams (thanks to the meat and cheese)
- Carbohydrates: 15-20 grams (mostly from the cone and veggies)
- Fat: 12-15 grams (from the cheese and meat)
- Fiber: 2-3 grams (from the veggies)
Key health benefits include:
- Protein Power: The meat and cheese provide a good source of protein, which helps keep kids full and energized during a long Halloween party.
- Veggie Boost: The cucumbers, carrots, and tomatoes add vitamins A and C, plus a nice crunch. It’s a sneaky way to get some veggies in!
- Portion Control: Each cone is a single serving, which helps prevent overeating. It’s a great way to offer a balanced snack without the free-for-all of a buffet.
For dietary considerations, this recipe can be easily adapted for gluten-free, dairy-free, or vegetarian diets. Potential allergens include dairy (cheese, cream cheese) and gluten (waffle cones, pretzels). I always check labels to ensure safety, especially when serving a crowd. From a wellness perspective, I love that these cones offer a balance of protein, fat, and carbs—it’s a snack that actually satisfies without the sugar crash.
Conclusion
These Easy Spooky Charcuterie Cone Cups for a Kids’ Halloween Party are more than just a snack—they’re a memory in the making. I’ve made them for every Halloween since that party supply shop closed, and they never fail to bring smiles. The best part? They’re so simple to put together that you can actually enjoy the party instead of stressing in the kitchen.
I encourage you to make these your own—swap in your family’s favorite ingredients, try different shapes, or let the kids take the lead. That’s the beauty of this recipe: it’s a template for creativity. Whether you’re hosting a big bash or just want a fun after-school snack, these cones are sure to be a hit.
I’d love to hear how yours turn out! Drop a comment below with your favorite spooky creation, or share a photo on Pinterest with the hashtag #SpookyConeCups. And if you’re looking for more Halloween inspiration, don’t forget to check out our other kid-friendly recipes. Happy haunting, and happy snacking!
Frequently Asked Questions
Can I make these cones ahead of time?
Yes, you can assemble them up to 4 hours in advance. Just wait to add the googly eyes until right before serving to keep them from getting soggy. Store them in an airtight container in the fridge.
What if I don’t have waffle cones?
No problem! You can use sugar cones, ice cream cones, or even small paper cups as a substitute. Just adjust the filling amount accordingly. I’ve even used hollowed-out bell peppers as edible cones in a pinch.
Are these suitable for toddlers?
Absolutely! Just cut the ingredients into very small, safe pieces and avoid hard items like pretzels or large cheese cubes. You can also use soft cheese and finely chopped veggies. Always supervise young children while eating.
Can I make these nut-free?
Yes, this recipe is naturally nut-free if you avoid nut-based cheeses or spreads. Check labels on your meats and crackers to ensure they’re processed in a nut-free facility if allergies are a concern.
How do I keep the cones from tipping over?
Place them in a muffin tin, a cupcake stand, or a shallow bowl filled with popcorn or candy corn. This keeps them upright and adds a festive touch to your presentation. You can also use a small glass or a shot glass for individual cones.
Pin This Recipe!

Easy Spooky Charcuterie Cone Cups for a Kids’ Halloween Party

These Easy Spooky Charcuterie Cone Cups are a fun, portable, and mess-free Halloween snack for kids. Filled with cheese, meats, and veggies, they’re perfect for parties and can be customized for any dietary need.
- Prep Time: 15 minutes
- Cook Time: 0 minutes
- Total Time: 15 minutes
- Yield: 6-8 servings 1x
- Category: Appetizer
- Cuisine: American
Ingredients
- 6–8 waffle cones (or sugar cones for a smaller option)
- 1 cup mixed cheese cubes (cheddar and Monterey Jack recommended)
- 1 cup salami or pepperoni slices (cut into small rounds or fun shapes)
- 1 cup turkey or ham slices (rolled and sliced into pinwheels)
- 1/2 cup baby carrots (cut into thin sticks or use mini carrots)
- 1/2 cup cucumber slices (cut into small rounds or use a ghost-shaped cutter)
- 1/4 cup black olives (sliced for ‘spider eyes’ or left whole)
- 1/4 cup cherry tomatoes (halved for ‘monster noses’)
- 1/4 cup pretzel sticks (for ‘witch fingers’ or ‘spider legs’)
- 1/4 cup cream cheese or hummus (for dipping or spreading)
- Edible googly eyes (optional)
- Small Halloween-shaped cookie cutters (optional)
- Food-safe markers (optional)
- Red bell pepper strips (optional, for ‘bloody’ fingers or monster tongues)
Instructions
- Prep your ingredients (5 minutes): Wash and cut veggies. Slice cucumbers into rounds, halve cherry tomatoes, and cut baby carrots into thin sticks. Use cookie cutters to press shapes into cheese and meat slices if desired.
- Assemble the cones (5 minutes): Place a waffle cone upright in a muffin tin or small glass. Add a layer of cheese cubes at the bottom, then a layer of meat shapes, followed by a layer of veggies. Repeat until the cone is filled to the top (about 3-4 layers).
- Add the spooky details (3 minutes): Use edible googly eyes on cheese cubes or meat shapes to create monsters. Draw faces on cucumber slices with a food-safe marker. Thread black olive slices onto a pretzel stick to make a spider and place on top.
- Secure the toppings (2 minutes): Pipe a small dollop of cream cheese or hummus on top of the cone to act as ‘glue’ for loose pieces. Gently press pretzel spider legs into the cream cheese to hold them in place.
- Serve immediately or store (0 minutes): Best served fresh, but can be made up to 2 hours ahead. Cover loosely with plastic wrap and refrigerate. Add googly eyes just before serving to prevent sogginess.
Notes
Don’t overfill cones; leave about half an inch of space at the top. Use sturdy waffle cones for best results. Cut ingredients into uniform bite-sized pieces. Keep cheese and meats cold for easier cutting. For a party, set up a ‘cone bar’ for kids to fill their own. Cones can be stored in the fridge for up to 4 hours without googly eyes.
Nutrition
- Serving Size: 1 cone
- Calories: 250300
- Sugar: 35
- Sodium: 400600
- Fat: 1215
- Saturated Fat: 68
- Carbohydrates: 1520
- Fiber: 23
- Protein: 1520
Keywords: Halloween charcuterie cones, kids Halloween snack, spooky cone cups, easy Halloween appetizer, portable snack, party food


