My neighbor had refused to carve a pumpkin for Halloween for fifteen years. “It’s messy, it’s a waste of a good squash, and I don’t need rotting gourds on my porch,” she’d announce every October, arms crossed like she was defending a sacred principle. Then last Tuesday, I saw her through my kitchen window, standing at my back door with a plate in her hands. On it sat four bell peppers, each one carved into a tiny, grinning jack-o-lantern face, stuffed with something that smelled like garlic and herbs and pure coziness. She caught me staring and shrugged. “Don’t say a word. I just wanted to see if you’d taste-test them for me.” I didn’t say a word. I just grabbed a fork.
Honestly, I’ve been thinking about those peppers ever since. Not because they were fancy—they weren’t. She’d used basic ground turkey, leftover rice, a can of diced tomatoes, and a handful of shredded cheese. But the faces. The faces turned a simple stuffed pepper into an event. Dinner became a conversation starter, a little bit of Halloween magic without the sticky pumpkin guts. I mean, you’ve probably had that moment where you’re staring at a weeknight dinner and thinking, “This needs something.” These Cozy Jack-O-Lantern Stuffed Bell Peppers are that something.
I tweaked her recipe a bit—added more spice, swapped in beef because I had it, used orange bell peppers for that perfect pumpkin color—and now I make them every fall. The best part? You don’t even need to be good at carving. A simple triangle for the eyes, a zigzag for the mouth, and suddenly you’re serving dinner that makes people smile before they even take a bite. That’s the kind of meal that stays with you, you know? The kind you keep making because it turns a regular Tuesday into something worth remembering.
Why You’ll Love This Recipe
These Cozy Jack-O-Lantern Stuffed Bell Peppers aren’t just another stuffed pepper recipe. I’ve tested this version through three different batches—burned my fingers on hot peppers, over-stuffed one until it exploded in the oven, and finally nailed the perfect balance. Here’s why this one works:
- Quick & Easy: Comes together in about 45 minutes, and most of that is hands-off oven time. Perfect for those chaotic weeknights when you still want something special.
- Simple Ingredients: Ground beef, rice, tomato sauce, cheese, and bell peppers. You probably have most of this in your kitchen right now.
- Perfect for Halloween Fun: Great for a family dinner before trick-or-treating, a Halloween party appetizer, or just a cozy fall meal that brings the season to your table.
- Crowd-Pleaser: Kids love the jack-o-lantern faces, and adults appreciate the hearty, satisfying filling. I’ve seen picky eaters clear their plates.
- Unbelievably Delicious: The smoky paprika, the melty cheese, the slightly charred edges of the pepper—it’s next-level comfort food that hits every note.
What makes this recipe different from the rest? It’s the carving technique. Instead of just cutting the top off, you carve a face into the side of each pepper. This isn’t just a gimmick—the cutouts allow steam to escape and the filling to caramelize a bit at the edges, creating a concentrated flavor you don’t get with traditional stuffed peppers. Plus, you get to eat the little face pieces as a chef’s snack. Trust me, it’s the best part.
This recipe is the kind that makes you close your eyes after the first bite. It’s comfort food reimagined—heartier, more festive, but with the same soul-soothing satisfaction. Perfect for impressing guests without stress, or turning a simple fall meal into something memorable.
What Ingredients You Will Need
This recipe uses simple, wholesome ingredients to deliver bold flavor and satisfying texture without the fuss. Most of these are pantry staples, and I’ve included notes on substitutions so you can adapt based on what you have.
For the Peppers
- 4 large orange bell peppers (look for squat, round ones—they look more like pumpkins and stand up better)
- 1 tablespoon olive oil (for rubbing the peppers before baking)
For the Filling
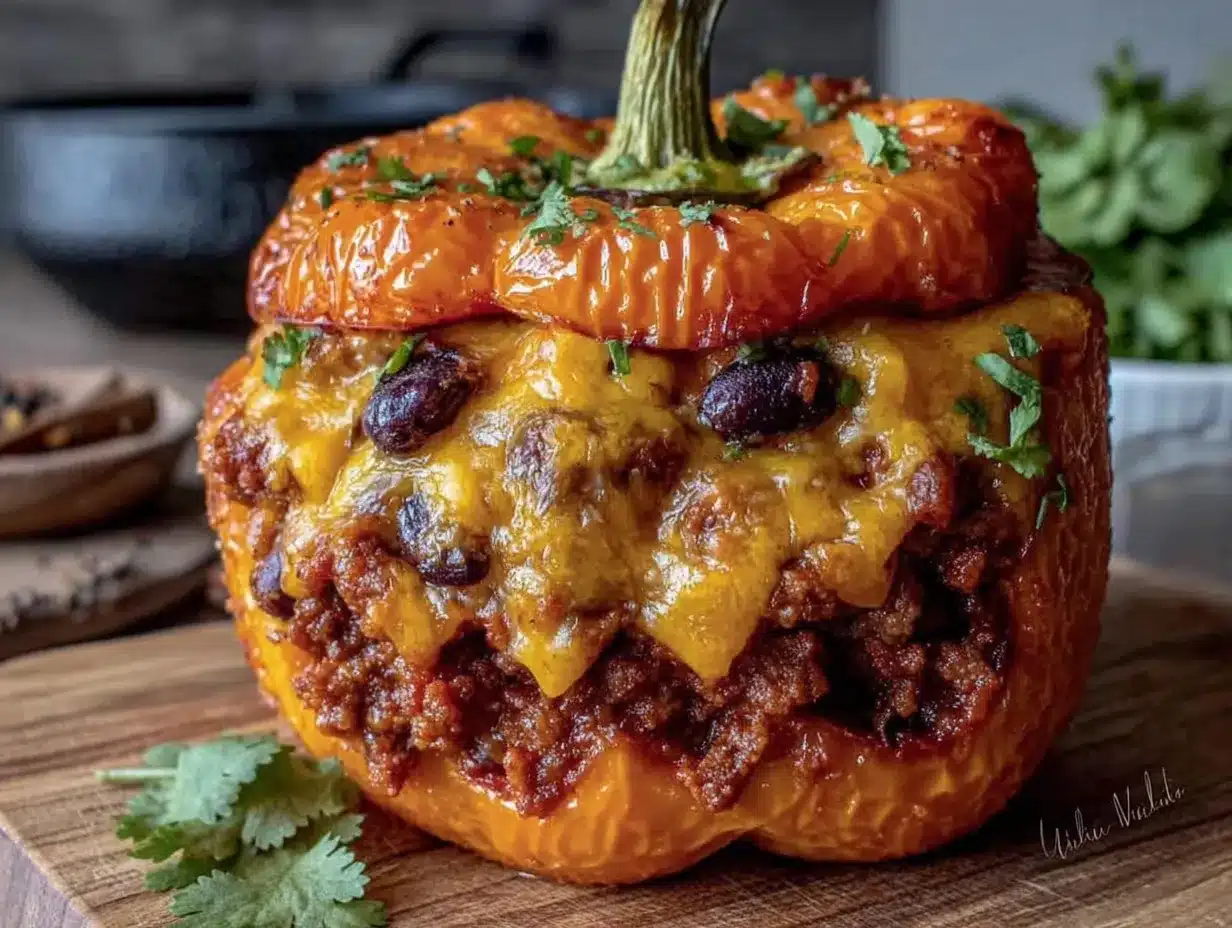
- 1 pound ground beef (80/20 works best; you can use ground turkey or chicken for a lighter option)
- 1 cup cooked rice (white, brown, or cauliflower rice for low-carb—I prefer jasmine rice for its fluffy texture)
- 1 small yellow onion, diced (about ¾ cup)
- 3 cloves garlic, minced (I use a garlic press because I’m lazy, and it works fine)
- 1 can (15 ounces) tomato sauce (I like Hunt’s for its smooth consistency, but any brand works)
- 1 tablespoon tomato paste (adds richness and depth)
- 1 teaspoon smoked paprika (this is non-negotiable—it gives that cozy, smoky flavor)
- 1 teaspoon dried oregano
- ½ teaspoon ground cumin
- ½ teaspoon salt (plus more to taste)
- ¼ teaspoon black pepper
- Pinch of cayenne pepper (optional, for a little heat—I add it because I like my stuffed peppers with a kick)
For the Topping
- 1 cup shredded sharp cheddar cheese (or Monterey Jack, or a mix—I’ve used both and they’re equally delicious)
- 2 tablespoons chopped fresh parsley (for garnish; optional, but it makes the peppers look pretty)
Ingredient Selection Tips: Look for orange bell peppers that are as round as possible. They mimic pumpkins better than the elongated ones. If you can’t find orange, yellow or red work too—they just won’t look as pumpkin-like. For the cheese, I recommend shredding it yourself from a block. Pre-shredded cheese has anti-caking agents that prevent it from melting as smoothly. Trust me on this one—I learned the hard way when my cheese topping came out grainy.
Substitution Guidance: Use ground turkey or chicken for a leaner option. For a vegetarian version, swap the meat with cooked lentils or a plant-based crumble. Use dairy-free cheese if needed, though it won’t melt the same way. For a gluten-free option, ensure your rice is certified gluten-free and skip any questionable seasoning blends.
Equipment Needed
You don’t need fancy gadgets for this recipe, which is part of why I love it. Here’s what you’ll need:
- Large skillet: For browning the meat and sautéing the onions. A 12-inch skillet works best. I use my trusty cast iron—it holds heat beautifully and gives the meat a nice sear.
- Sharp paring knife: This is crucial for carving the jack-o-lantern faces. A small, sharp knife gives you more control. I once tried using a steak knife, and let me tell you, it was a disaster—jagged edges everywhere.
- Small spoon or melon baller: For scooping out the seeds and membranes from inside the peppers. A melon baller makes this surprisingly quick.
- Baking dish: A 9×13-inch dish works perfectly. You want something that holds the peppers upright without them tipping over. If your dish is too big, you can crumple some foil to prop them up.
- Aluminum foil: For covering the dish during the first part of baking. This steams the peppers and ensures they’re tender, not crunchy.
- Cutting board: Preferably one with a groove to catch juices. Bell peppers can be juicy, and you don’t want that running all over your counter.
Budget-Friendly Options: If you don’t have a melon baller, a regular teaspoon works fine. No cast iron skillet? Any non-stick skillet will do. The key is just having a pan that can hold all the filling comfortably.
Preparation Method
Here’s how to make these Cozy Jack-O-Lantern Stuffed Bell Peppers. I’ve broken it down into clear steps with time estimates and sensory cues so you know exactly what to look for.
- Preheat your oven to 375°F (190°C). While it’s heating, start prepping your peppers. Wash them well and pat them dry. Place each pepper on your cutting board, stem side up. Using your sharp paring knife, cut a small circle around the stem and remove the top, just like you would a pumpkin. Set the tops aside—you can chop them up and add them to the filling if you want, or just snack on them.
- Carve the faces. This is the fun part. Using your paring knife, carefully cut jack-o-lantern faces into the sides of each pepper. Keep it simple—two triangles for eyes, a zigzag or crescent for a mouth. Don’t overthink it. I’ve made peppers that look like they’re laughing and peppers that look slightly terrified, and both were delicious. The cutouts should be about ½ inch wide. Use a small spoon to pop out the cut pieces and save them for snacking. Be careful not to cut too close to the top or bottom, or the pepper might collapse during baking.
- Scoop out the seeds and membranes. Use your small spoon or melon baller to remove the seeds and white membranes from inside each pepper. Rinse them briefly under cold water to remove any stray seeds, then pat them dry again. Place the peppers upright in your baking dish. If they wobble, trim a tiny slice off the bottom to make them flat—but don’t cut into the face area.
- Cook the filling. Heat your large skillet over medium-high heat. Add the ground beef and cook, breaking it up with a wooden spoon, until browned—about 5-7 minutes. You’re looking for deep brown bits on the bottom of the pan; that’s flavor. Drain off any excess fat, leaving about 1 tablespoon in the pan. (I usually tilt the pan and spoon out the fat, but if you’re using lean meat, you might not need to drain anything.)
- Sauté the aromatics. Add the diced onion to the skillet with the beef and cook for 3-4 minutes, until it softens and turns translucent. Add the minced garlic and cook for another 30 seconds, until fragrant. Your kitchen should smell amazing at this point—like a cozy fall evening.
- Add the liquids and seasonings. Stir in the tomato sauce, tomato paste, smoked paprika, oregano, cumin, salt, pepper, and cayenne if using. Bring the mixture to a simmer and let it cook for 2-3 minutes, stirring occasionally. The sauce should thicken slightly. Stir in the cooked rice and mix until everything is well combined. Taste the filling and adjust seasoning if needed. I often add another pinch of salt here.
- Stuff the peppers. Spoon the filling into each carved pepper, packing it gently but firmly. Don’t overstuff—you want the filling to be level with the top of the pepper. Any extra filling can go into a small ramekin and bake alongside the peppers. Place the filled peppers in your baking dish. If they’re touching, that’s fine—it helps them stay upright.
- Bake covered. Cover the baking dish tightly with aluminum foil. Bake for 25 minutes. The foil traps steam, which softens the peppers without drying them out. You’ll know they’re getting there when your kitchen smells like roasted peppers and savory meat.
- Add cheese and bake uncovered. After 25 minutes, remove the foil carefully—hot steam will escape. Sprinkle the shredded cheddar cheese evenly over the tops of the peppers. Return the dish to the oven, uncovered, and bake for another 10-15 minutes, until the cheese is melted and bubbly and the peppers are tender. The edges of the pepper cutouts should be slightly charred and caramelized.
- Rest and garnish. Remove the dish from the oven and let the peppers rest for 5 minutes. This allows the filling to set and makes them easier to handle. Sprinkle with fresh parsley if you’re using it. Serve warm, with the jack-o-lantern faces grinning up at you.
Cooking Tips & Techniques
I’ve made these peppers maybe a dozen times now, and I’ve learned a few things the hard way. Here are my best tips for perfect results every time.
Don’t overcook the peppers before stuffing. I know some recipes call for parboiling the peppers first, but I prefer not to. Boiling them makes them too soft and they can fall apart during baking. Baking them covered in the oven is gentler and gives you that perfect tender-but-not-mushy texture. Plus, you skip a whole extra step.
Carve the faces after you cut the tops off. I tried carving before cutting the tops once, and it was a nightmare. The pepper kept rolling around, and I nearly stabbed myself. Cut the top off first, then the pepper sits flat and stable while you carve.
Use a toothpick to test doneness. After the covered baking time, poke a toothpick into the side of a pepper. If it slides in easily, the pepper is tender. If there’s resistance, give it a few more minutes covered before adding the cheese. This is especially important if your peppers are on the larger side.
Watch the cheese. Broiling the cheese for the last minute or two can give you that beautiful golden-brown crust, but keep an eye on it. I once got distracted and ended up with blackened, bitter cheese. It wasn’t pretty. If you want bubbly cheese without the risk, just stick to the regular baking time.
Multitask like a pro. While the peppers are baking covered, you can clean up your workspace, set the table, or whip up a quick side salad. The 25-minute covered bake is your golden window for getting everything else ready.
Variations & Adaptations
One of the best things about this recipe is how flexible it is. I’ve tried several variations, and they’ve all been winners. Here are some to get you started:
- Vegetarian Jack-O-Lanterns: Swap the ground beef with cooked lentils or a plant-based crumble. I used green lentils once, and they held up beautifully. Add an extra ¼ cup of tomato sauce to keep the filling moist, since lentils absorb more liquid than meat.
- Spicy Southwest Version: Add ½ cup of corn kernels and ½ cup of black beans to the filling. Use pepper jack cheese instead of cheddar, and add a teaspoon of chili powder. The result is a stuffed pepper with serious personality—perfect for those who like a little heat.
- Italian-Inspired Peppers: Replace the cumin and paprika with 1 teaspoon of dried basil and ½ teaspoon of fennel seeds. Use mozzarella cheese on top and serve with a side of marinara for dipping. This version feels like a deconstructed lasagna in pepper form.
- Low-Carb Option: Swap the rice for cauliflower rice. Sauté the cauliflower rice in the skillet for 2-3 minutes before adding it to the filling to remove excess moisture. I’ve done this for a friend on keto, and she said it was the best stuffed pepper she’d ever had.
- Breakfast Stuffed Peppers: This is a fun twist I tried one lazy Sunday. Use breakfast sausage instead of beef, add scrambled eggs to the filling, and top with a sprinkle of cheddar. The jack-o-lantern faces make it feel like a Halloween morning celebration, even in October.
Serving & Storage Suggestions
These Cozy Jack-O-Lantern Stuffed Bell Peppers are best served warm, straight from the oven. The cheese should be melted and stretchy, and the peppers should be tender enough to cut with a fork. I like to serve them on a bed of simple greens tossed with a lemon vinaigrette—the acidity cuts through the richness of the filling. A side of crusty bread is also a great idea for sopping up any extra tomato sauce that pools in the dish.
For a complete fall meal, pair these peppers with a warm bowl of cozy butternut squash soup or a simple roasted vegetable medley. If you’re hosting a Halloween party, they work beautifully as a main course alongside a spooky roasted vegetable tray for a fully themed spread.
Storage Instructions: Leftover stuffed peppers keep well in the refrigerator for up to 4 days. Store them in an airtight container. The flavors actually meld together overnight, so they might taste even better the next day. To reheat, place them in a 350°F oven for 10-15 minutes, or microwave them for 2-3 minutes until heated through. The microwave is faster, but the oven gives you a better texture—the peppers stay firmer.
Freezer Instructions: These peppers freeze beautifully. Let them cool completely, then wrap each pepper individually in plastic wrap and place them in a freezer-safe bag. They’ll keep for up to 3 months. To reheat from frozen, thaw overnight in the refrigerator, then bake at 350°F for 20 minutes, covered, until heated through.
Flavor Development Note: If you’re making these ahead for a party, I recommend assembling them the day before but not baking them. Keep the stuffed peppers in the fridge, covered, and bake them just before serving. The filling has time to absorb all the seasonings, and you get that fresh-from-the-oven experience.
Nutritional Information & Benefits
Here’s an estimated nutritional breakdown per serving (one stuffed pepper, based on the recipe as written with ground beef and cheddar cheese):
| Nutrient | Amount |
|---|---|
| Calories | 385 |
| Protein | 28g |
| Fat | 18g |
| Carbohydrates | 24g |
| Fiber | 4g |
| Sugar | 8g |
| Sodium | 680mg |
These peppers are a good source of protein and fiber, which means they’ll keep you full and satisfied. Bell peppers are packed with vitamin C—in fact, one orange bell pepper contains more vitamin C than an orange. They also provide vitamin A, potassium, and antioxidants. The ground beef offers iron and B vitamins, while the rice adds complex carbohydrates for sustained energy.
If you’re watching your sodium, you can use low-sodium tomato sauce and reduce the added salt. For a lower-fat version, use ground turkey and reduced-fat cheese. This recipe is naturally gluten-free as long as you use certified gluten-free ingredients. It’s not suitable for a dairy-free diet unless you use dairy-free cheese, though the texture will be slightly different.
I’m not a nutritionist, but I do believe in balanced eating. This recipe gives you a hearty portion of vegetables, protein, and carbs in one dish. It’s the kind of meal that feels indulgent but is actually pretty wholesome. That’s my favorite kind of cooking—food that tastes like a treat but treats your body well too.
Conclusion
These Cozy Jack-O-Lantern Stuffed Bell Peppers are more than just a Halloween gimmick. They’re a genuinely delicious, satisfying dinner that happens to look adorable on the plate. The combination of smoky, savory filling, tender roasted pepper, and bubbly melted cheese is hard to beat. And honestly, there’s something about eating a meal that smiles back at you that makes the whole evening feel a little bit brighter.
I encourage you to make these your own. Use whatever meat you have, swap in your favorite cheese, carve the faces however you like—grumpy, happy, surprised. That’s the beauty of this recipe. It’s forgiving and fun and always delivers. I love making these on a cool October evening when the leaves are falling and the air smells like woodsmoke. They make the house smell incredible, and they always make the people I’m feeding smile. That’s the best kind of cooking, isn’t it?
If you try these Cozy Jack-O-Lantern Stuffed Bell Peppers, I’d love to hear about it. Leave a comment below and tell me what faces you carved, or share a photo of your creation. And if you have your own twist on the filling, I’m all ears—I’m always looking for new ideas. Happy cooking, and happy Halloween!
Frequently Asked Questions
Can I make these stuffed peppers ahead of time?
Yes! You can assemble the peppers completely (including carving the faces and stuffing them) up to 24 hours in advance. Keep them covered in the refrigerator, then bake them just before serving. You may need to add 5-10 minutes to the baking time since they’ll be cold from the fridge.
What if my bell peppers won’t stand up straight?
This happens sometimes, especially with oddly shaped peppers. Trim a thin slice off the bottom of the pepper to create a flat surface. Just be careful not to cut into the face area. If they’re still wobbly, you can nestle them together in the baking dish so they support each other.
Can I use a different color bell pepper?
Absolutely. Orange peppers look the most like pumpkins, but yellow, red, or even green work fine. Red peppers are sweeter, while green peppers have a slightly more bitter, grassy flavor. Just keep in mind that the jack-o-lantern faces will be less obvious on darker peppers.
How do I prevent the filling from drying out?
The key is not to overcook the filling before stuffing, and to make sure you have enough sauce. The rice absorbs liquid as it sits, so the filling should look slightly saucy when you spoon it into the peppers. If it seems dry, add an extra 2-3 tablespoons of tomato sauce or a splash of beef broth.
Can I cook these in an air fryer?
Yes, but you’ll need to adjust the method. Air fry the stuffed peppers at 350°F for 15-18 minutes, covered with foil, then add the cheese and air fry for another 3-5 minutes uncovered until melted. The cooking time is shorter, so keep an eye on them. I recommend using a smaller batch so they don’t overcrowd the basket.
Pin This Recipe!

Cozy Jack-O-Lantern Stuffed Bell Peppers: Easy Fall Dinner
These Cozy Jack-O-Lantern Stuffed Bell Peppers are a fun and delicious fall dinner. Carved orange bell peppers are filled with a savory mixture of ground beef, rice, and tomato sauce, then topped with melted cheddar cheese.
- Prep Time: 15 minutes
- Cook Time: 40 minutes
- Total Time: 55 minutes
- Yield: 4 servings 1x
- Category: Main Course
- Cuisine: American
Ingredients
- 4 large orange bell peppers
- 1 tablespoon olive oil
- 1 pound ground beef (80/20)
- 1 cup cooked rice (white, brown, or cauliflower)
- 1 small yellow onion, diced (about ¾ cup)
- 3 cloves garlic, minced
- 1 can (15 ounces) tomato sauce
- 1 tablespoon tomato paste
- 1 teaspoon smoked paprika
- 1 teaspoon dried oregano
- ½ teaspoon ground cumin
- ½ teaspoon salt
- ¼ teaspoon black pepper
- Pinch of cayenne pepper (optional)
- 1 cup shredded sharp cheddar cheese
- 2 tablespoons chopped fresh parsley (optional)
Instructions
- Preheat oven to 375°F (190°C).
- Wash and dry bell peppers. Cut a small circle around the stem and remove the top. Set tops aside.
- Using a sharp paring knife, carve jack-o-lantern faces into the sides of each pepper. Cut two triangles for eyes and a zigzag or crescent for a mouth. Pop out cut pieces and save for snacking.
- Scoop out seeds and membranes from inside each pepper. Rinse briefly and pat dry. Place peppers upright in a 9×13-inch baking dish. Trim a thin slice off the bottom if needed to make them stand flat.
- Heat a large skillet over medium-high heat. Add ground beef and cook, breaking it up, until browned (5-7 minutes). Drain excess fat, leaving about 1 tablespoon.
- Add diced onion to the skillet and cook for 3-4 minutes until softened. Add minced garlic and cook for 30 seconds until fragrant.
- Stir in tomato sauce, tomato paste, smoked paprika, oregano, cumin, salt, pepper, and cayenne (if using). Simmer for 2-3 minutes until slightly thickened. Stir in cooked rice. Taste and adjust seasoning.
- Spoon filling into each carved pepper, packing gently but firmly. Level with the top of the pepper. Place any extra filling in a small ramekin and bake alongside.
- Cover the baking dish tightly with aluminum foil. Bake for 25 minutes.
- Remove foil carefully. Sprinkle shredded cheddar cheese evenly over the tops of the peppers. Return to oven, uncovered, and bake for 10-15 minutes until cheese is melted and bubbly and peppers are tender.
- Remove from oven and let rest for 5 minutes. Sprinkle with fresh parsley if desired. Serve warm.
Notes
For best results, use orange bell peppers that are as round as possible. Carve faces after cutting the tops off for stability. Don’t overcook the peppers before stuffing; baking covered in the oven gives a tender-but-not-mushy texture. Use a toothpick to test doneness after covered baking. Watch the cheese closely if broiling to avoid burning. Leftovers keep in the refrigerator for up to 4 days or freeze for up to 3 months.
Nutrition
- Serving Size: 1 stuffed pepper
- Calories: 385
- Sugar: 8
- Sodium: 680
- Fat: 18
- Saturated Fat: 8
- Carbohydrates: 24
- Fiber: 4
- Protein: 28
Keywords: stuffed bell peppers, jack-o-lantern peppers, Halloween dinner, fall dinner, ground beef stuffed peppers, easy weeknight dinner


